My Lemon & Blackberry Sandwich Cake is easy to make with step-by-step instructions, a handy video, and do-ahead advice. Afternoon Tea never looked (or tasted) so good with this glamorous verison of the classic Victoria Sandwich Cake! Featuring super moist lemon cake, blackberries, vanilla buttercream, and more!
A Stunning Yet Simple Centrepiece
This Lemon & Blackberry Sandwich Cake is the kind of dessert that turns heads at any gathering—but don’t let its elegant looks fool you. It’s surprisingly simple to make, with a few key steps that you can prep ahead of time.
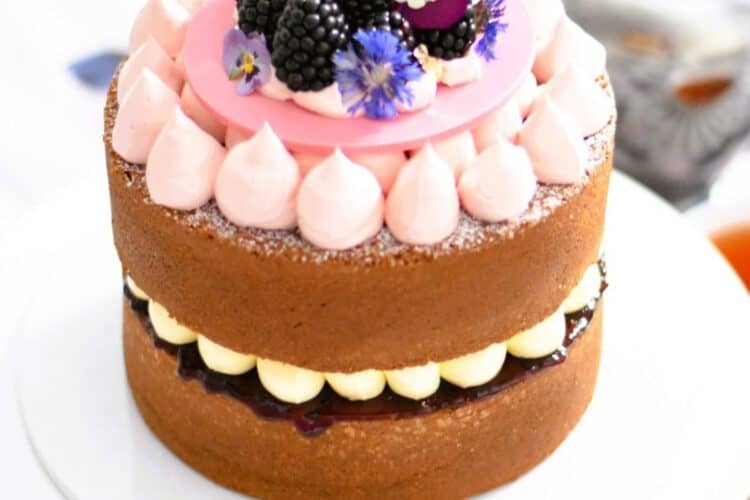
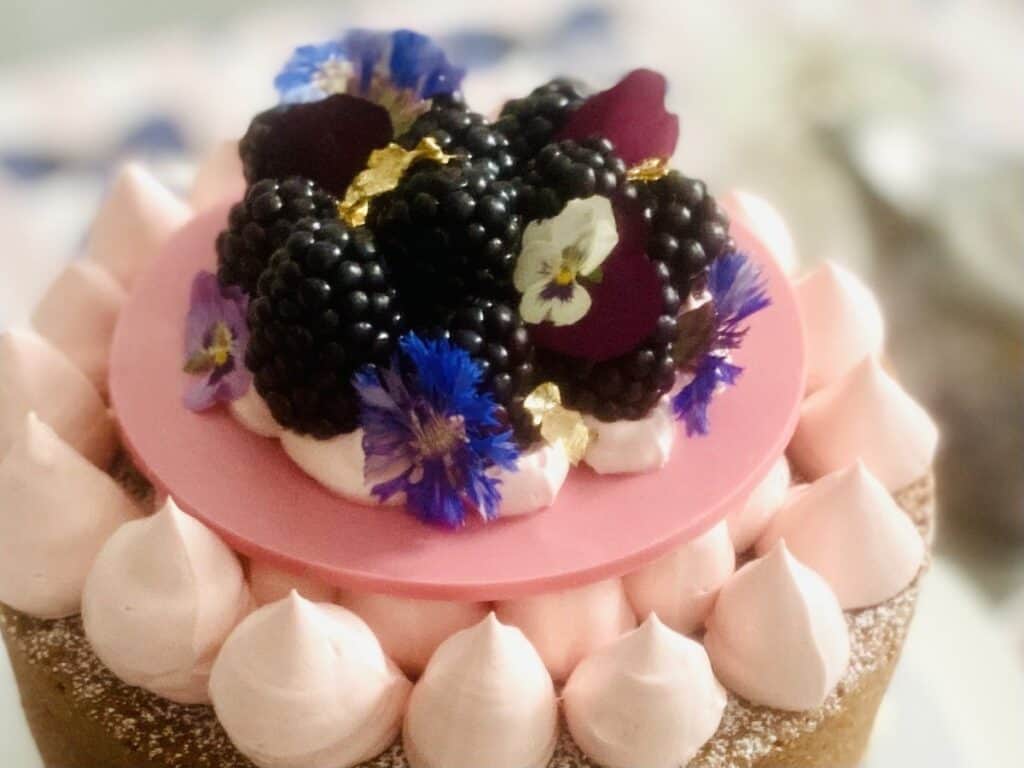
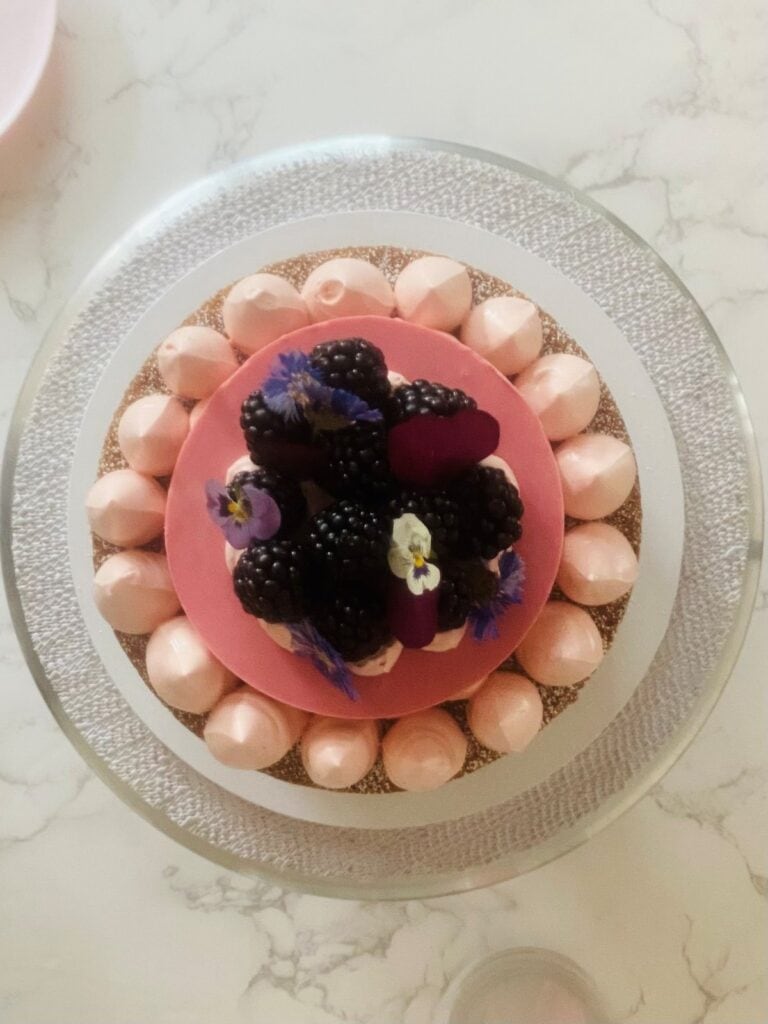
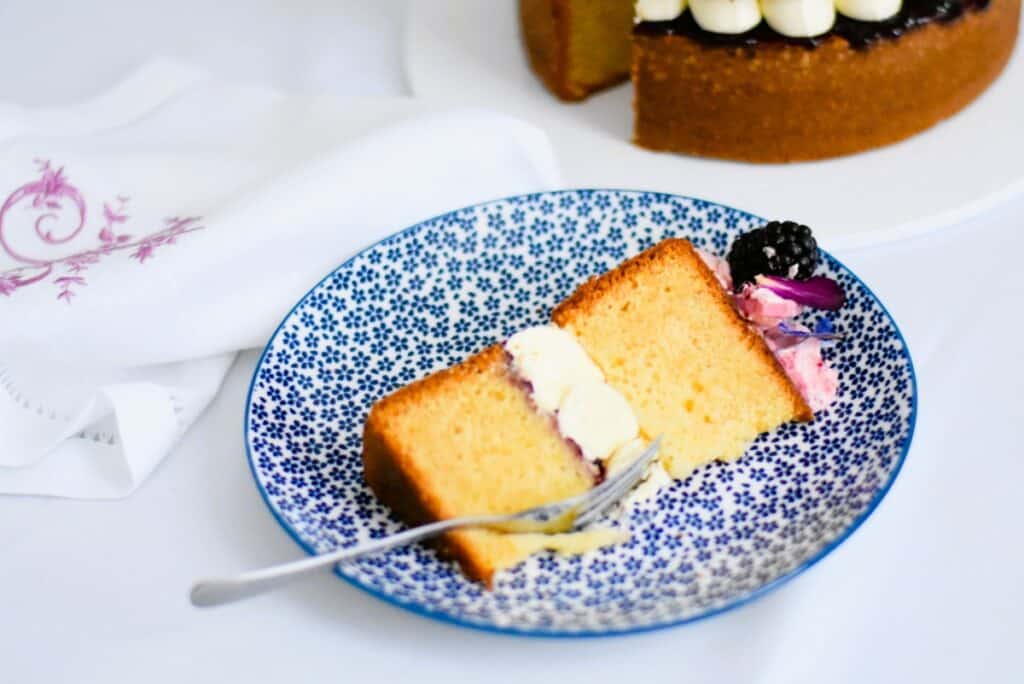
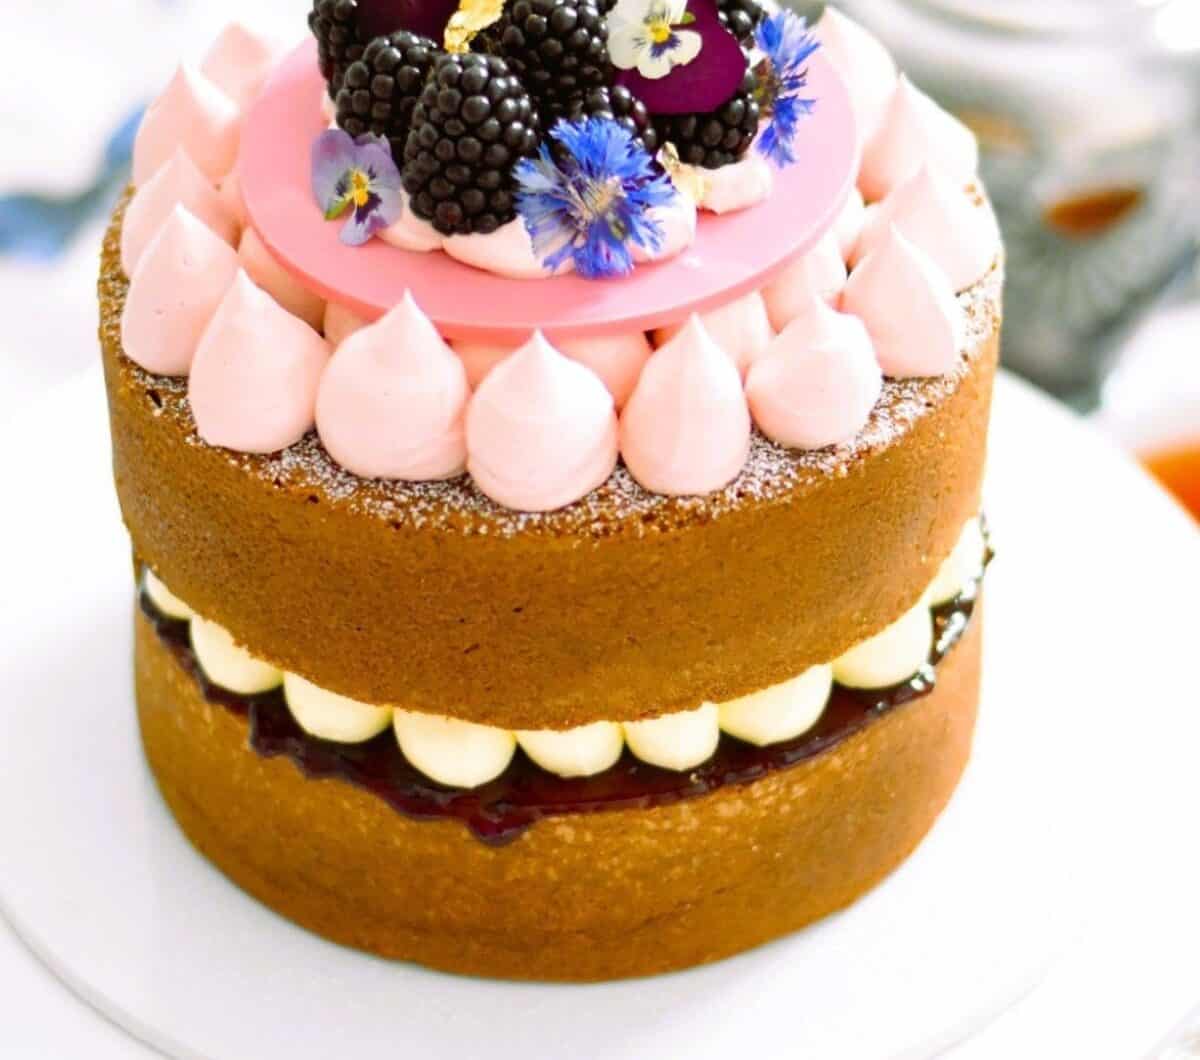
Featuring two high layers of ultra-moist lemon cake, brushed with lemon syrup, filled with tart blackberry jam and silky vanilla Swiss meringue buttercream. Finished with a smooth white chocolate disc, fresh blackberries, and a delicate touch of edible gold leaf and flowers—this cake is a luxurious centrepiece for Afternoon Tea or any special occasion. Most importantly though, it tastes amazing.
Why You’ll Love This Cake
Easy to make
Just take it step-by-step and follow my do-ahead tips to reduce the work. The piping is perfect for beginners too!
Moist and Flavourful
Thanks to the addition of sour cream and the lemon syrup, this cake stays incredibly tender and full of zesty flavour.
Swiss Meringue Buttercream Magic
If you haven’t tried Swiss meringue buttercream before, now is the time. It’s silky, not overly sweet, and makes decorating a breeze—no icing sugar clouds or endless sifting required. I’ve included a link to my step-by-step post featuring two quantity options.
Flexible and Seasonal
No blackberries? No problem. Swap them out for blueberries, raspberries, or strawberries. Just match the jam and adjust the buttercream and chocolate disc colour to suit—pink hues for berries like raspberries or strawberries or keep things classic and neutral with blueberries.
Make-Ahead Tips
My Lemon & Blackberry Sandwich Cake is a great candidate for prepping ahead:
- Cakes: Make in one stand mixer bowl, divide between tins, bake then either refrigerate or freeze once cooled.
- White Chocolate Disc: Make up to two days in advance.
- Lemon Syrup: Whip this up a day before to save time.
- Blackberry Jam: Use store-bought for convenience—no one will know!
This is the kind of cake that makes people think you’ve spent all day in the kitchen—when really, it’s just a matter of smart planning. Whether you’re serving it for an elegant tea or a casual brunch, this Lemon & Blackberry Sandwich Cake never fails to impress.
Good to know
- You will need digital scales to make this recipe, accuracy is key to get great results.
- These are professional cake decorating cakes that bake nice and high so they can be trimmed to size for perfect presentation.
- You will need a few specialty items from your local cake decorating store, but nothing over the top or expensive.
NOTE: This recipe uses a large circle cutter for the white chocolate disc measuring 12cm / 4.7 inches. I have included an alternative no cutter method if you are unable to find this size.
Step-by-step all the way
I’ve divided my post into two separate posts so I don’t have to skimp on the photos and steps. I want you to enjoy making my Lemon & Blackberry Sandwich Cake (it really is easy to do), but I don’t want to sacrifice the explanations because of space constraints – very long posts are not easy to navigate and I’m all for user friendly as you know!
So you will find everything you need to make and assemble the cake below except for the buttercream which you will find here: Swiss Meringue Buttercream
As with any recipe make sure you read all the instructions before you begin, and watch the short video I’ve put together on assembling this cake too.
Bake like a Pro – weigh your ingredients!
I use weight measurements not cup measurements in all my recipes as cup sizes are not universal – a cup in the US for example is different to a cup in Australia. This ensures accuracy and a far better result, especially if you are baking which relies on scientific principles. Yes it’s a bit nerdy, but ingredients are expensive and there’s nothing worse than following a recipe to the letter only to have it fail on you. What a waste of time and money! Invest in a set of digital scales and you will set yourself up for success every single time. It’s what all professional cake creators and pastry chefs use so why not you?
Look for a set that goes up in 1g increments, includes weights for liquids like fl oz / ml and can toggle between metric / US if you need to.
Pro tip: Always keep a set of spare batteries for your scales. You don’t want your scales dying halfway through a recipe!
Other recipes to try
Lemon Tartlets with Pistachio Meringues
Cake Ingredients
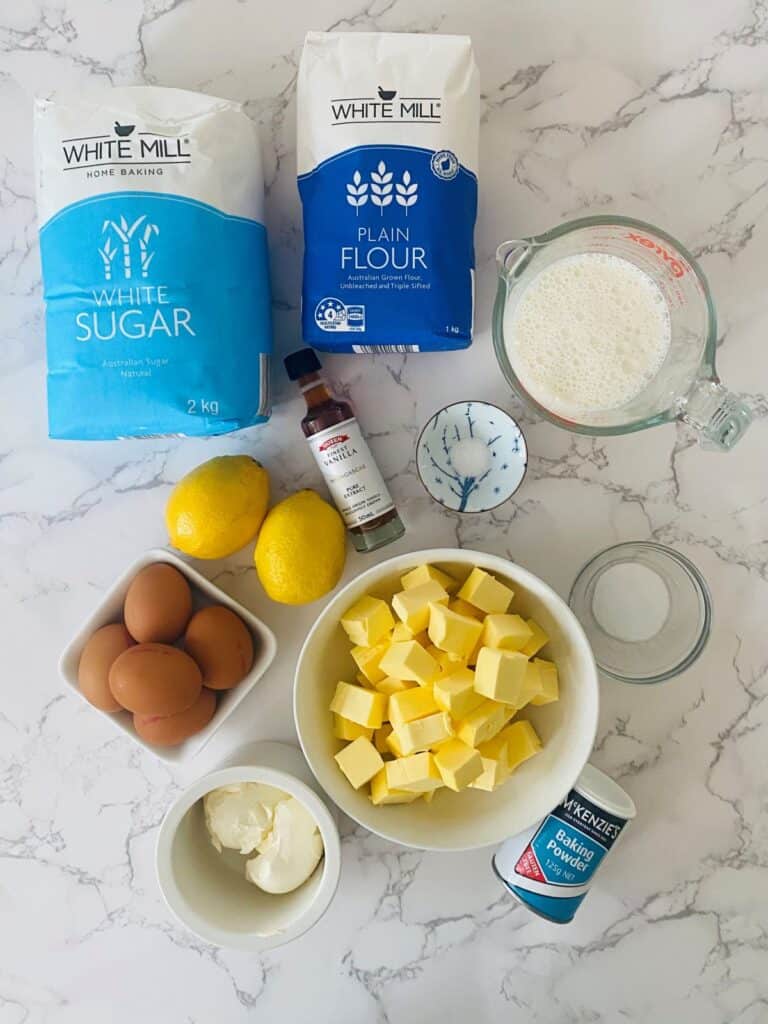
Plain / all purpose flour – Works perfectly in this recipe, no need to sift.
Unsalted butter – Using unsalted butter ensures consistent results and allows you to add just the right amount which is particularly important in baking. If you only have salted butter on hand, then omit the salt specified in the recipe.
Granulated white sugar – This is the most common type of sugar used in baking and cooking and perfect for this cake.
Baking powder – Make sure your baking powder is not older than 6 months otherwise your cakes may not rise as high as you expect. Write the date of opening on top when you buy a new box.
Baking soda – Also known as sodium bicarbonate / bicarb soda.
Salt – Use fine table salt in this recipe
Lemon – You will need the zest for the cake, but save the lemon for juice as you will need it for the lemon syrup.
Eggs – Large eggs from a 700g / 24 oz carton
Sour cream – With a rich, tangy flavour and creamy texture, sour cream adds fat which will give the cake a moist texture and mouthfeel.
Full fat/full cream milk – Also known as whole milk.
Vanilla extract – Pure vanilla extract is recommended (with or without seeds). Avoid imitation vanilla essence.
You will also need:
Baking spray / canola spray to grease your cake tins. Substitute with a little butter and some scrunched up baking paper for a similar result.
How to make
Adjust your oven rack so it is in the centre position.
Preheat the oven to 160 C fan / 320F.
Prep your tins
You will need two 7 inch x 3 inch (18 cm x 7.5cm) round cake tins.
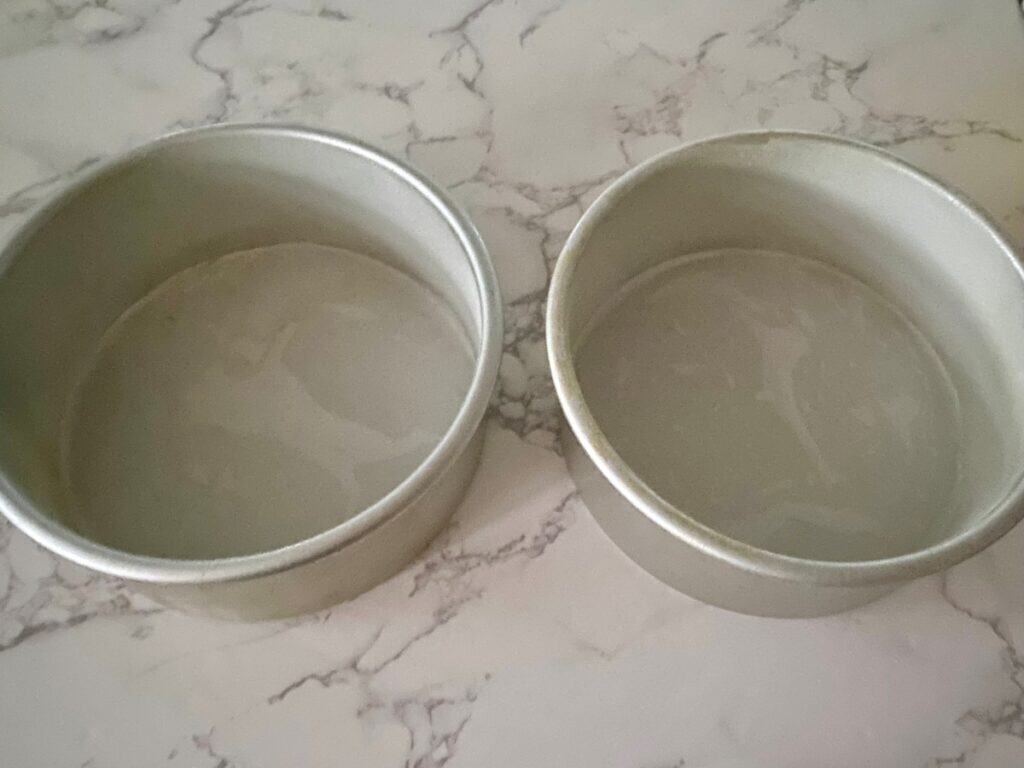
Trace the base of each tin on to baking paper, cut out with scissors, then turn over. Spray each cake tin with baking spray / canola spray and place a circle in the bottom of the tin. Repeat with the other tin.
Place a little plain/all purpose flour in one tin then tilt and turn to completely coat the sides. Tip any excess into the other tin and repeat the process. Discard any excess.
Weigh out your ingredients
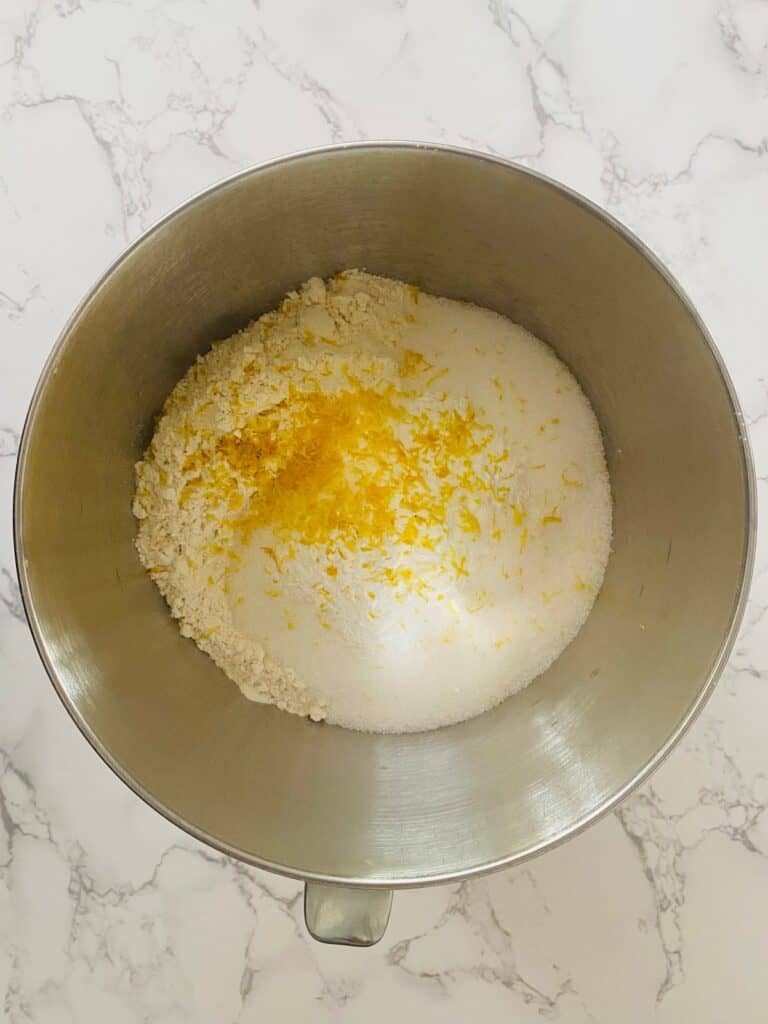
Weigh the flour and sugar into the stand mixer bowl, making sure you zero between ingredients. Add the baking powder, baking soda, salt and lemon zest. Set aside for now.
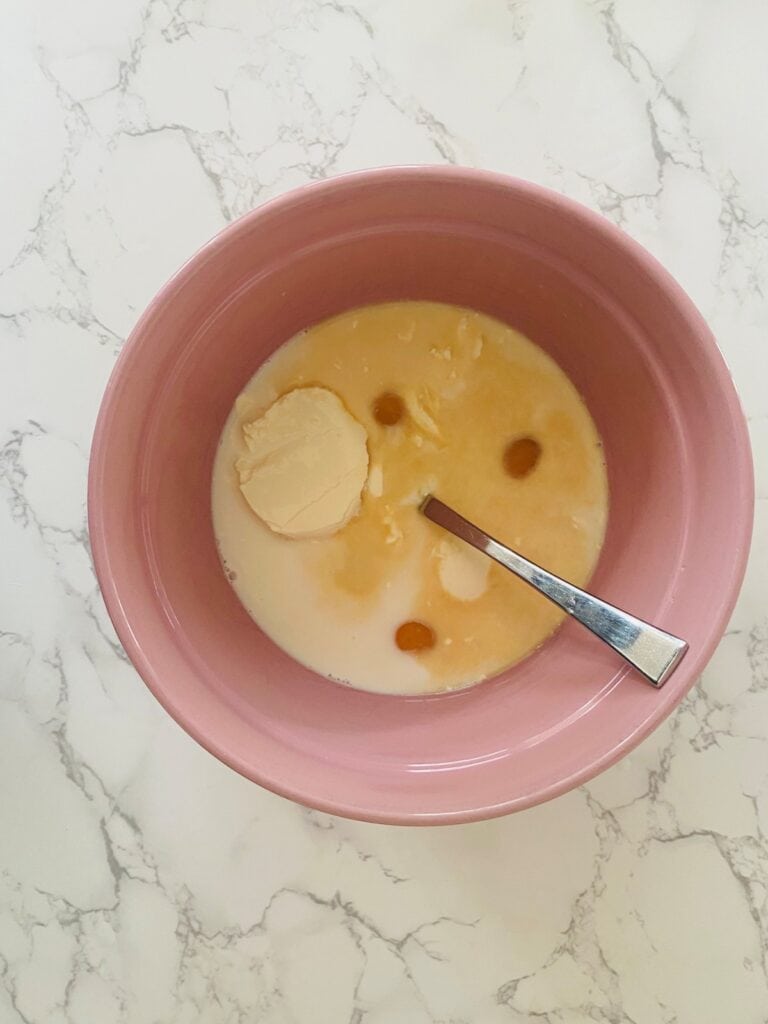
Place the eggs, sour cream, milk and vanilla in a medium sized microwave safe bowl and stir with a fork until combined. Bring to room temperature by microwaving on high for 20 seconds (900w). Stir. Test. If still a little cool, microwave for an extra 10 seconds. Sit the bowl next to the stand mixer.
Cut the butter into even sized cubes and place in a medium microwave safe bowl. Soften in the microwave on high for 30 seconds (900w). Stir. Heat again for 20 seconds and stir.
Place it next to the stand mixer with a tablespoon.
Using the paddle attachment, mix the flour mixture for 15 seconds on low.
Make the batter
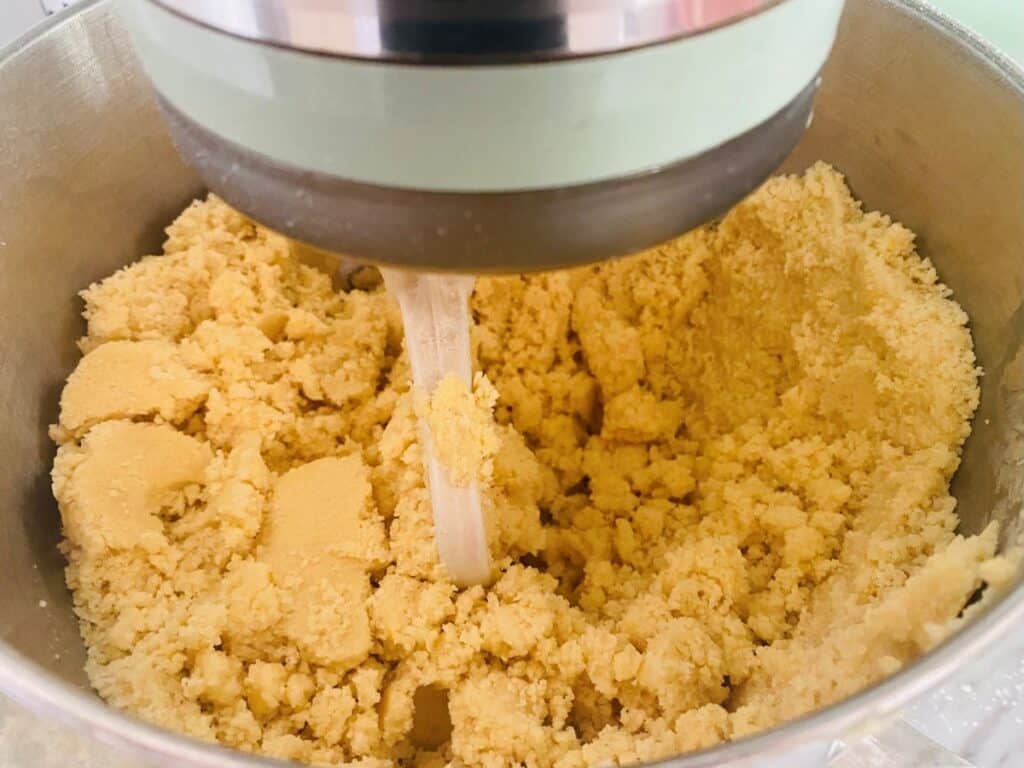
Slowly add the softened butter a little at a time (or else you will get covered in a flour cloud). Mix until all the butter has been incorporated.
Now add the egg/milk mixture very slowly, about a quarter at a time until all added.
Stop the mixer, take a spatula and scrape down the sides.
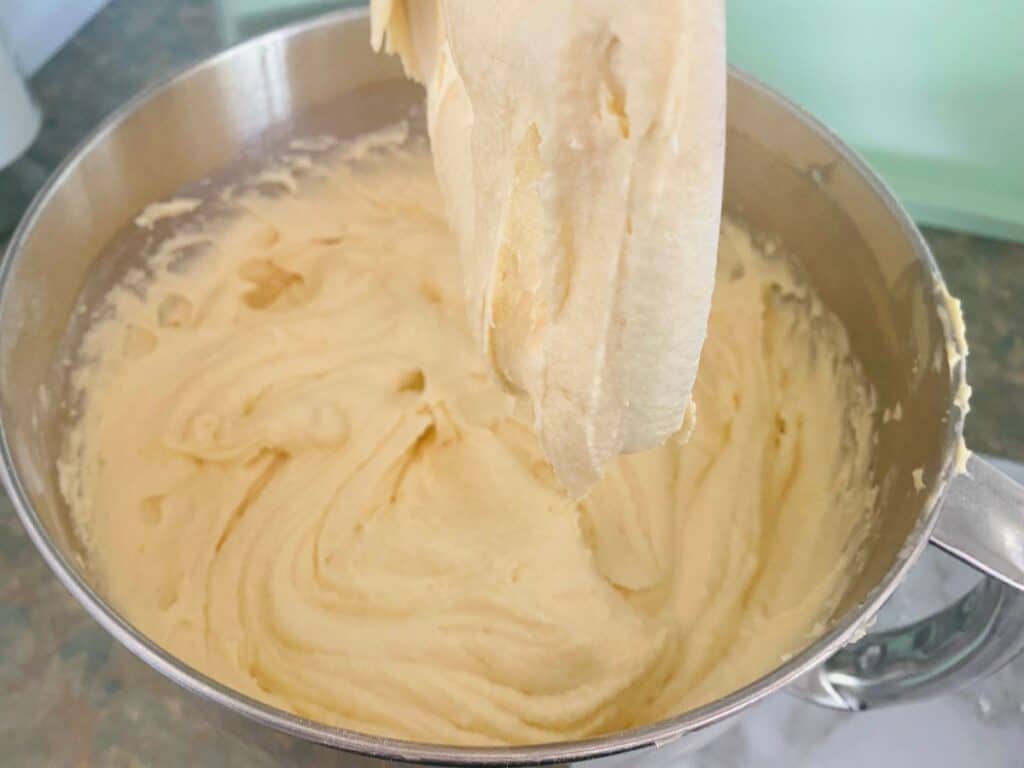
Turn the mixer back on to medium speed (5 on a KitchenAid) and beat for 30 seconds – use a timer! Don’t exceed this time or you will activate the gluten in the flour and the cake will have a gummy texture.
Stop the mixer, scrape down the sides and paddle attachment with a spatula and stir manually to incorporate.
Bake the cakes
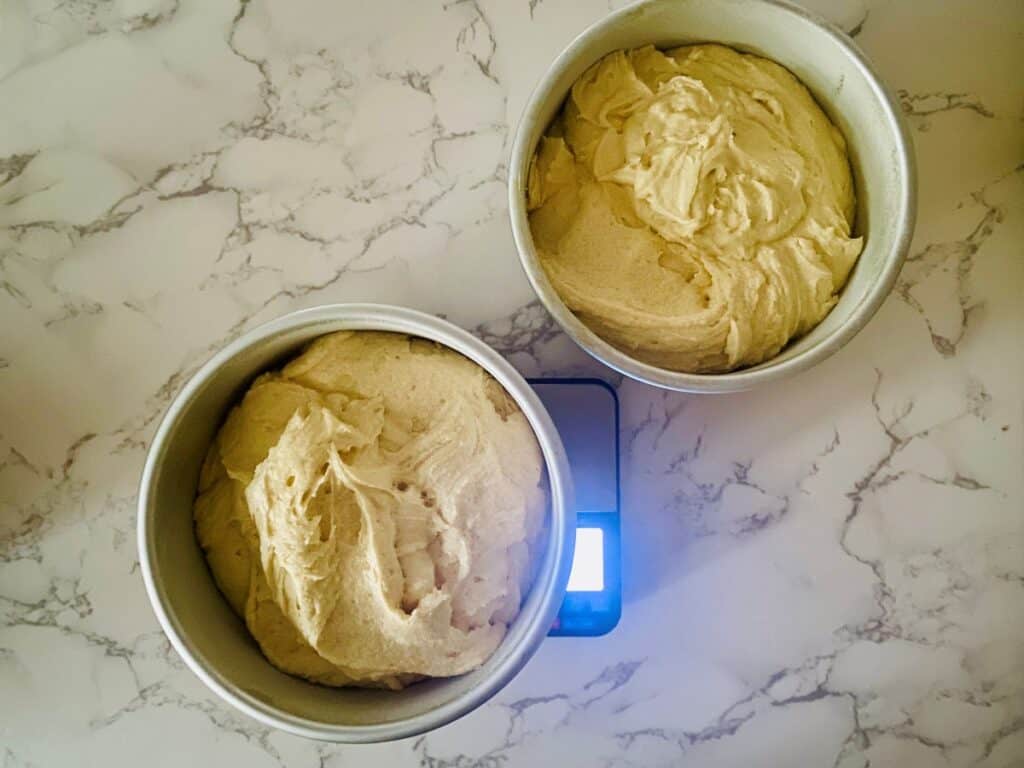
Divide the cake batter evenly between the two cake tins. Place one on the digital scale and take note of the amount. Do the same with the other cake tin. Adjust the mixture between the two tins until they both weigh the same. This is the secret to same height cakes!
Gently drop each tin on your bench 3 times to remove any air bubbles.
Place both tins on the same rack in the middle of the oven with a gap in between.
Bake for 1 hour and 25 minutes. Test for doneness by inserting a skewer in the middle of both cakes. If the skewer comes out clean, remove the cakes from the oven. If not, bake for an extra 5 minutes.
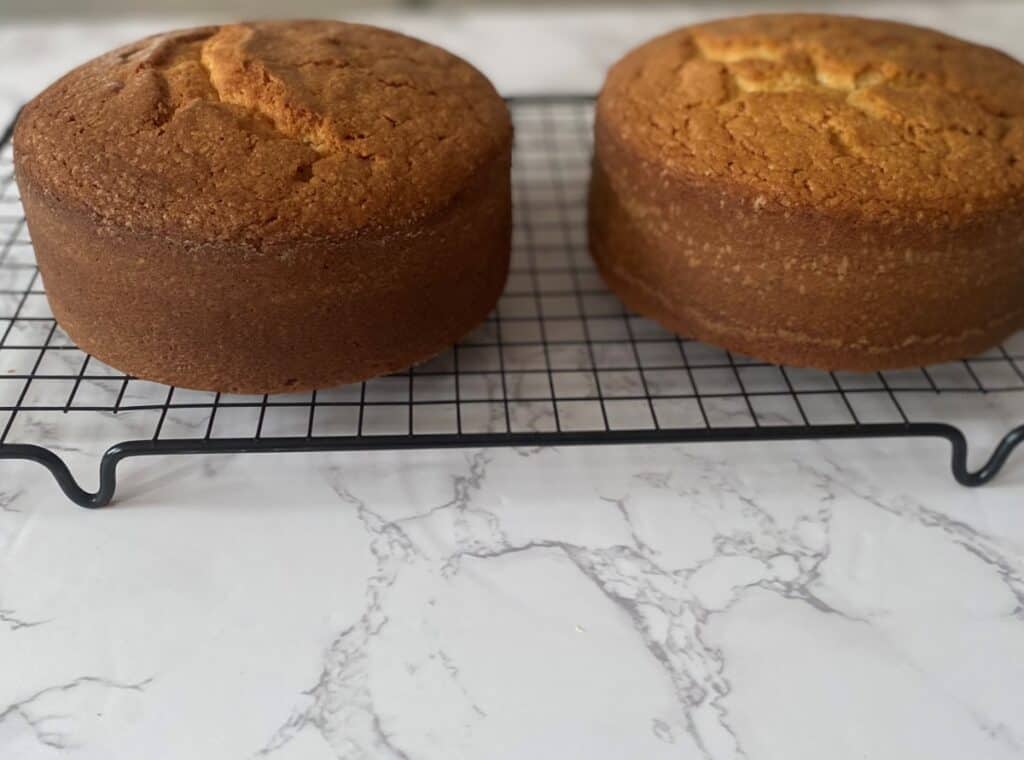
When done, remove the cakes from the oven and cool in the tins for 30 minutes before turning out onto a wire rack. Yes, they will have a little dome, however this will reduce once cooled.
Place a second wire rack on top of the upturned cakes and quickly flip over until the cakes are right side up.
Allow to cool completely.
Store
When cakes are completely cool, wrap each cake in two layers of plastic wrap followed by one layer of foil.
Refrigerate overnight before serving or freeze for up to 1 month. See FAQs for freezing/defrosting instructions.
Filling & Garnish ingredients for Lemon & Blackberry Sandwich Cake
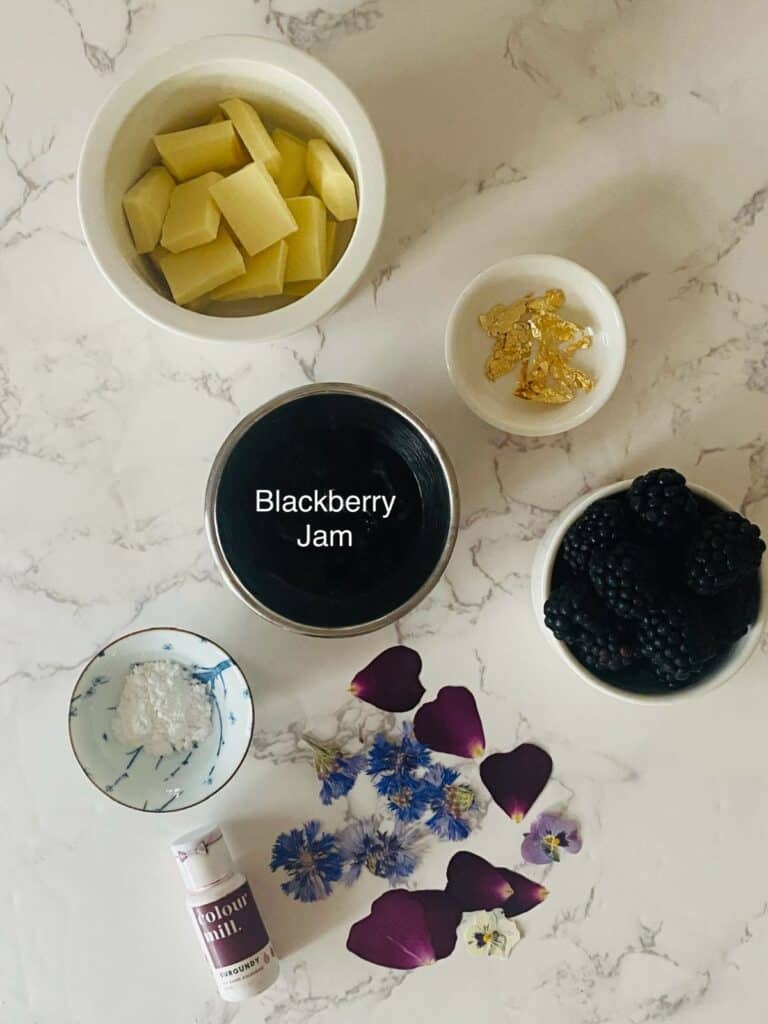

Swiss Meringue Buttercream see link for recipe – Silky smooth and so easy to pipe, this buttercream will take your cakes to the next level.
Lemon – Use fresh juice to make the lemon syrup.
Sugar – Granulated white sugar or caster sugar/superfine sugar.
Blackberry jam – Use store-bought and look for a good-quality jam that lists blackberries as the first ingredient—ideally one without too many additives or artificial flavours. I recommend the Beerenberg one from my home state of South Australia because it’s choc full of fruit and frankly, delicious!
Oil-based food colouring – Specially formulated to blend seamlessly with fats and oils, making it ideal for colouring chocolate, candy melts, buttercream, and oil-based batters. Unlike water-based food colouring, it does not cause chocolate to seize or ruin the texture of fat-heavy mixtures. I like the Colour Mill brand.
White chocolate – Use a good quality white chocolate for best results. I find the Plaistowe brand available from most supermarkets works well.
Blackberries – Use fresh for this recipe. You can substitute with raspberries, strawberries or blackberries. See Flexible and Seasonal at the start of this post for more.
Icing sugar or Icing mixture – Either will work to dust the top of the cake (and hide the naked edge).
Edible flowers – fresh or pressed (optional),– Violas, pansies, cornflowers, rose petals all work well with this cake as they help to fill in the gaps between the blackberries. Add them no more than one hour before serving.
Edible gold leaf (optional) – Very thin pure gold that is safe for consumption and used to add a luxurious, decorative touch to food and drinks. It is flavourless and has no impact on the taste or texture of a dish but creates a stunning visual effect.
Assembling my Lemon & Blackberry Sandwich Cake
Make the lemon syrup
Combine the juice and sugar in a small bowl. Stir well, then set aside. The sugar will dissolve while you work on the next steps.
Make the white chocolate disc
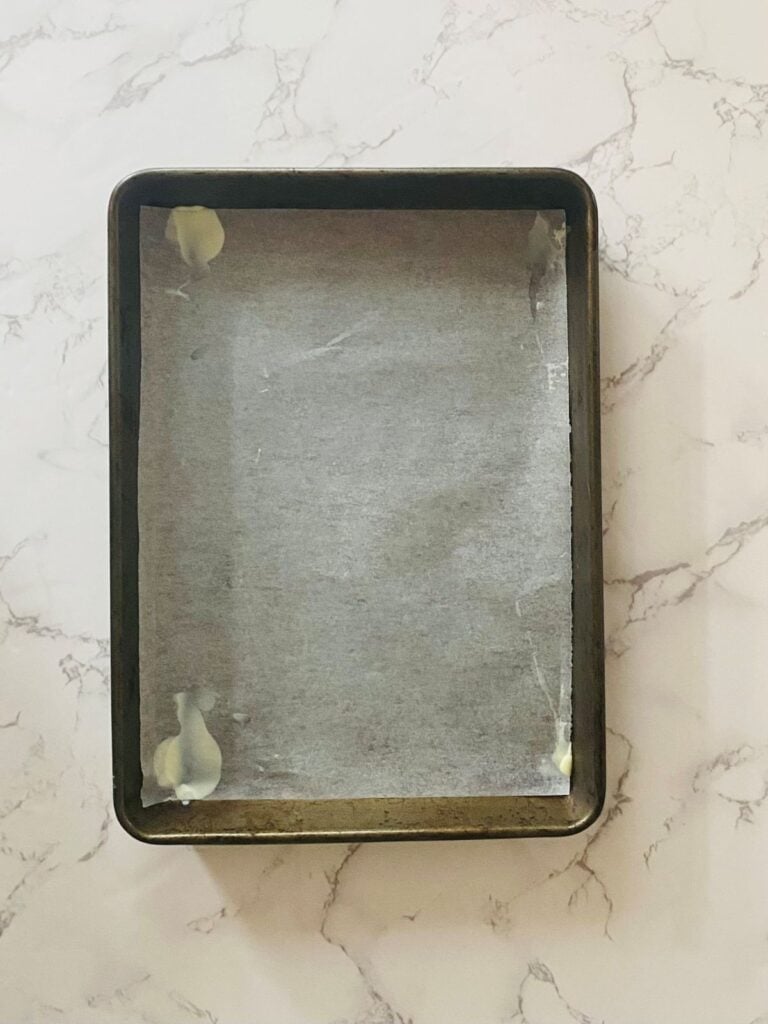
Line a small baking tray with a piece of baking paper.
Line a sealable container a little larger than the disc (greater than 12 cm / 4.7 in) with baking paper. Set aside.
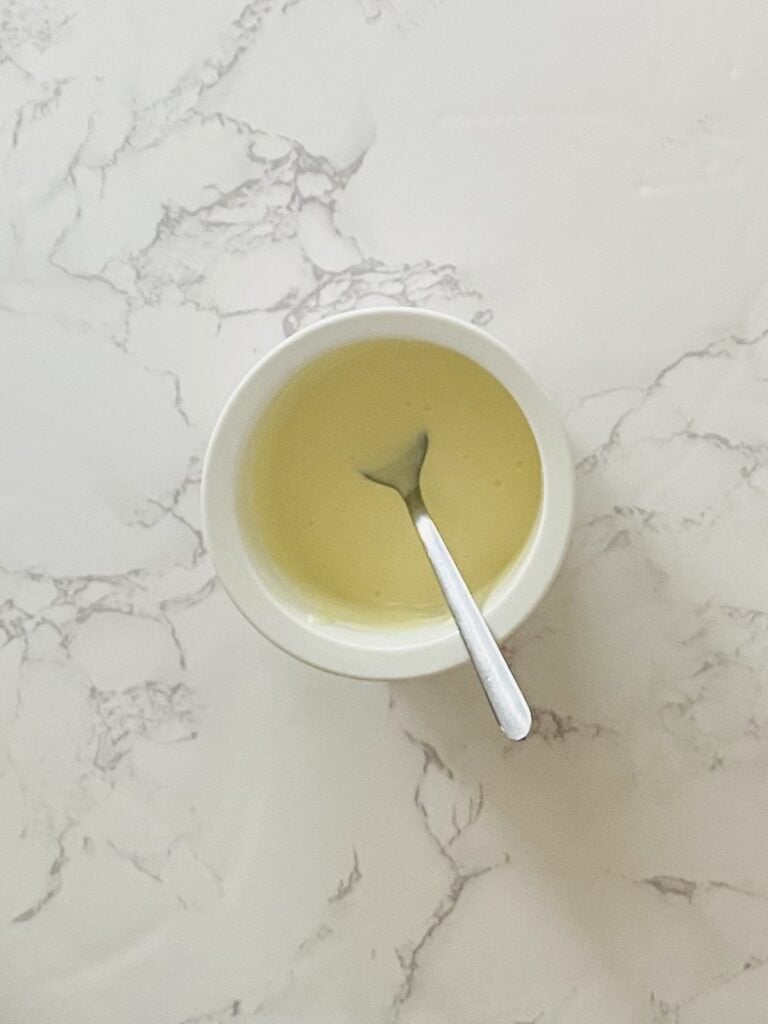
Break up the white chocolate into a microwave safe bowl. Heat on full power for 20 seconds then stir. Return to the microwave and repeat heating in 20 second bursts and stirring until all the chocolate is melted and smooth.
Take a little melted chocolate and place under the corners of the baking paper to ‘glue’ it in place. This will stop the paper from moving around.
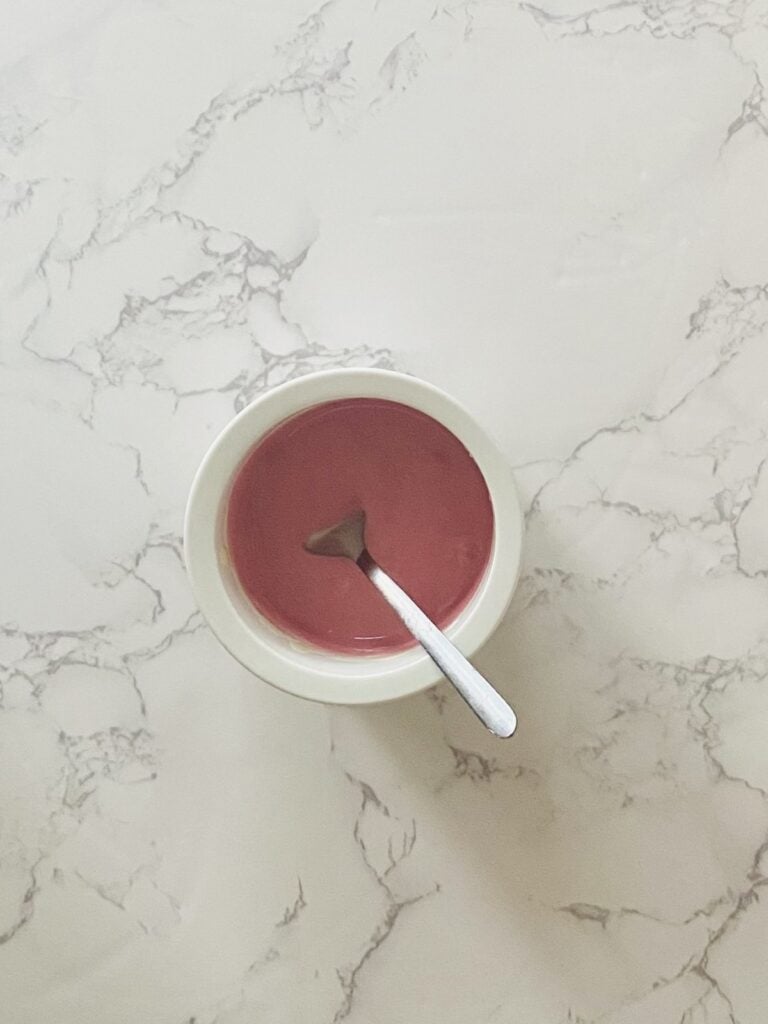
Add the colour
Add one drop of burgundy oil-based food colouring and stir it into the chocolate until no streaks remain.
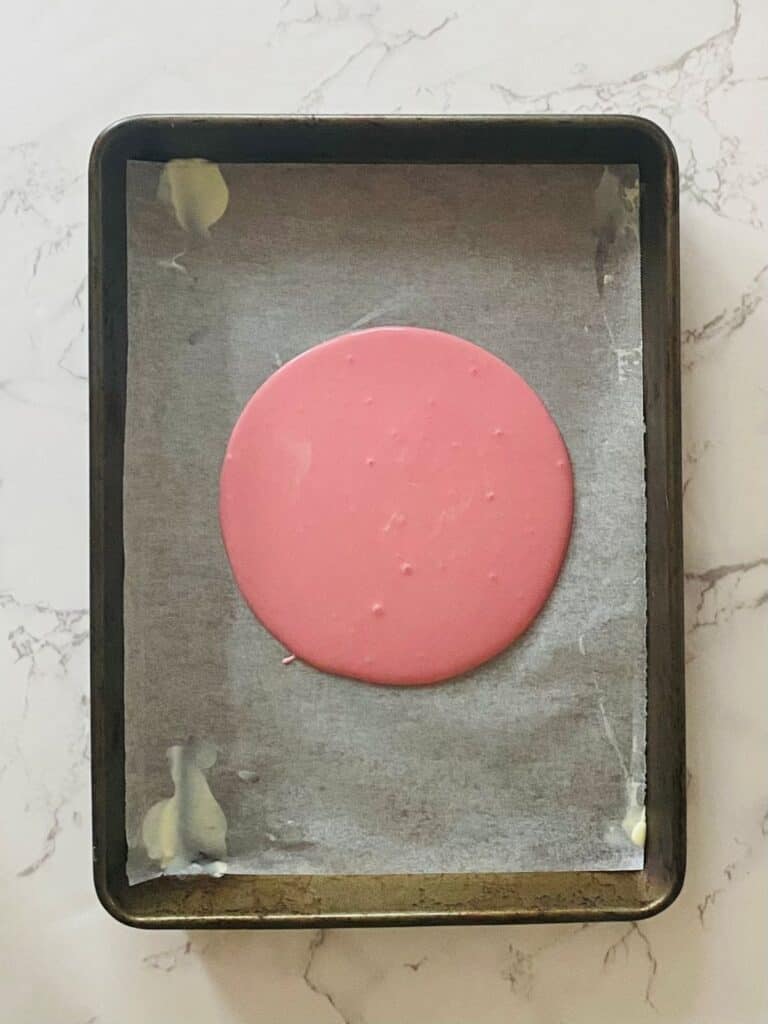
Pour the chocolate on to the baking paper in a thin stream keeping it centred so it makes a circle. Tilt the tray back and forth and side to side just a little to spread it evenly until it is a just a little larger than the circle cutter (hold the cutter above the chocolate to check). Use a toothpick to burst any little air bubbles.
Place in the fridge for 10 minutes (set a timer).
Cut out the disc
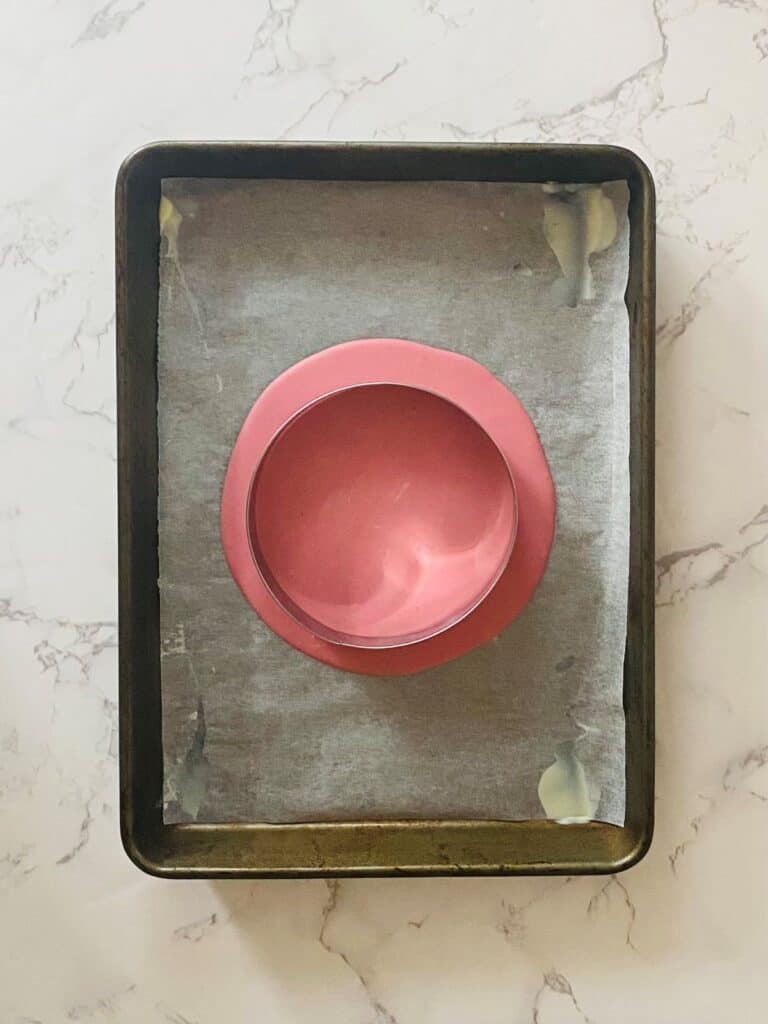
When the timer goes off, remove the tray from the fridge. Take the cutter (if using), press down and cut out a chocolate circle, you may need to remove the pieces around the cutter with a knife or angled spatula.
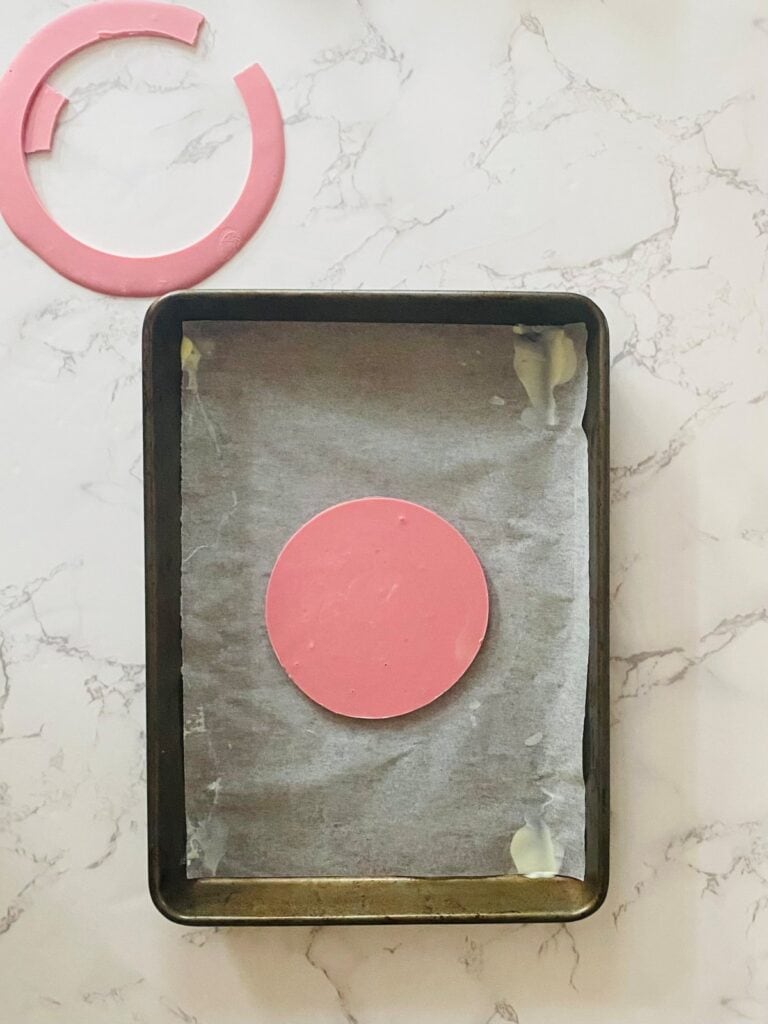
To store
Carefully peel back the paper and lift off the disc. Place it in the lined container, add the lid and return it to the fridge until required.
NO CIRCLE CUTTER?
If you don’t have a circle cutter, pour the chocolate as described above, then take a ruler and measure the diameter. Tilt the tray to spread until you get close to the required 12cm / 4.7. Refrigerate for 20 minutes, then follow the instructions for storing. While you won’t get the same sharp edge, you will still have a lovely round circle to crown your cake.
Level the cakes
Pro tip: Cutting cakes straight from the fridge makes slicing much easier, as the chilled fats are firmer, providing more stability to the cake and sharper edges.
Re-watch the video for Lemon & Blackberry Sandwich Cake if you need to – it shows this step in detail.
Remove the cakes from the refrigerator. Unwrap and place on a clean board or bench. Save the plastic wrap and foil, you’ll need them again.
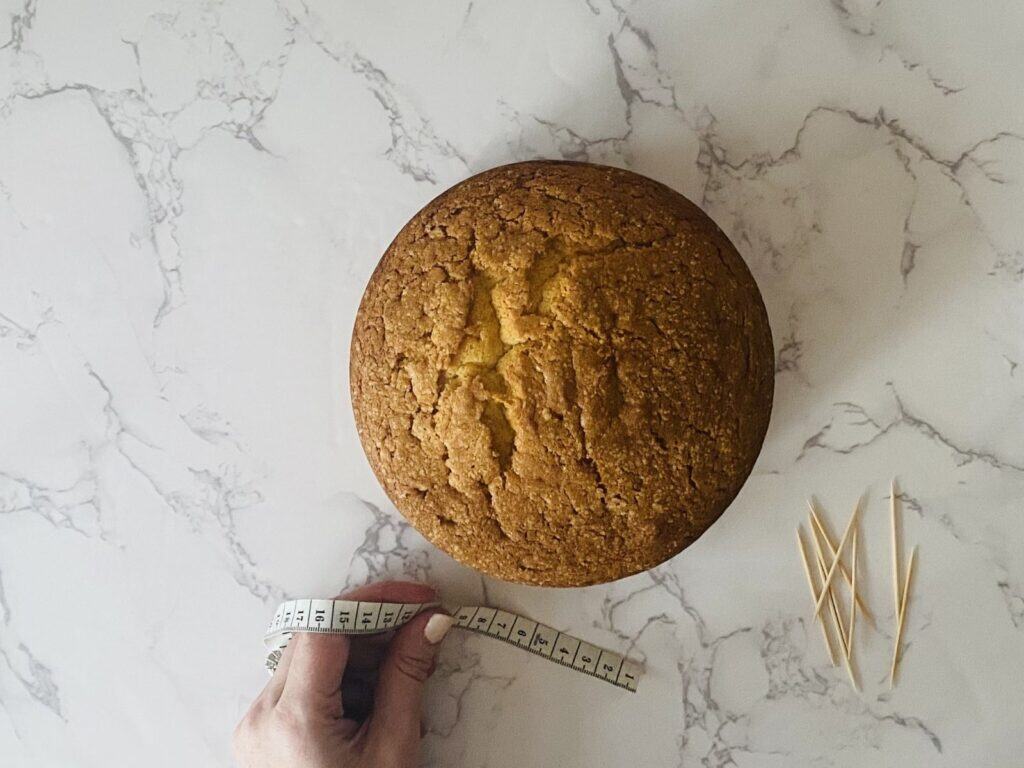
Take a ruler or tape measure and some toothpicks and measure 5cm / 2 inches from the base of the cake.
Insert a toothpick ‘marker’ then repeat until you have placed 6-8 toothpicks at evenly spaced intervals around the cake. Repeat with the other cake. These will act as a guide for your knife and ensure you have two equal sized cakes.
Remove the tops
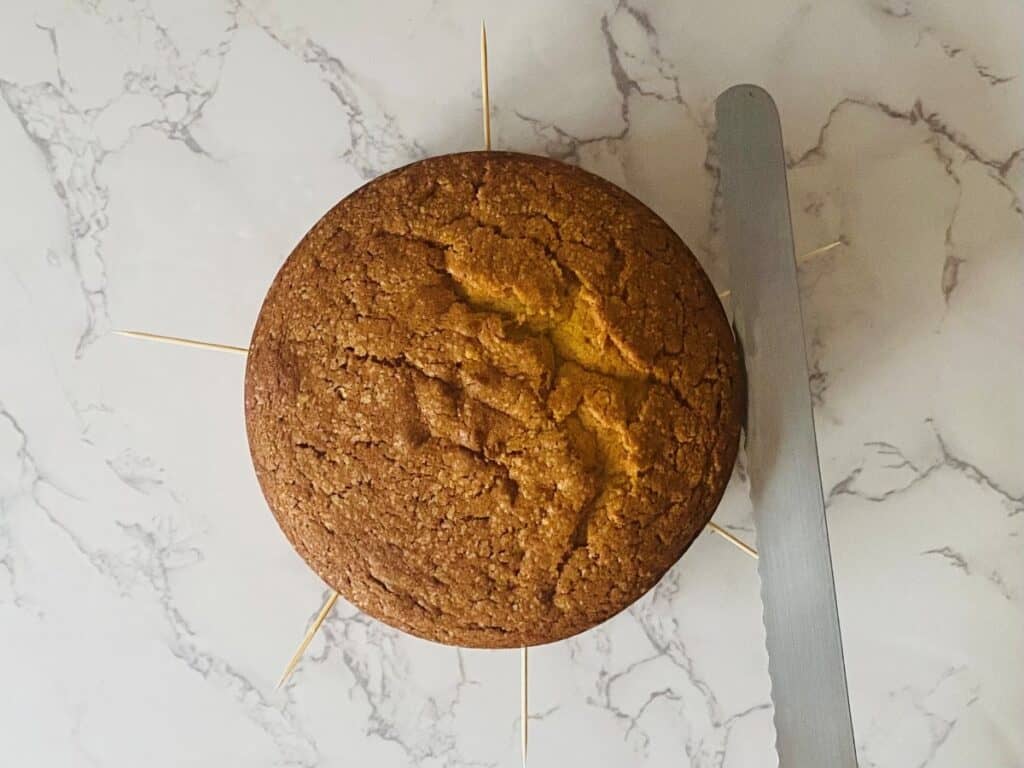
Take a knife with a serrated edge (a bread knife is perfect) and place one hand on top of the cake. Resting the knife on top of the toothpicks, gently score the cake to create a defined line (turn as you go).
Now insert your knife a bit deeper, then continue turning as you slowly slice across the top, using the line you created and the toothpicks as your guide. Remove the top and set aside (have a little taste if you like). Repeat with the other cake.
Note: If you absolutely hate levelling cakes then I recommend you invest in a brilliant tool called an AGBAY. It is a little pricey but you will get absolutely straight layers and tops every single time. I have a single blade one and it’s a game changer.
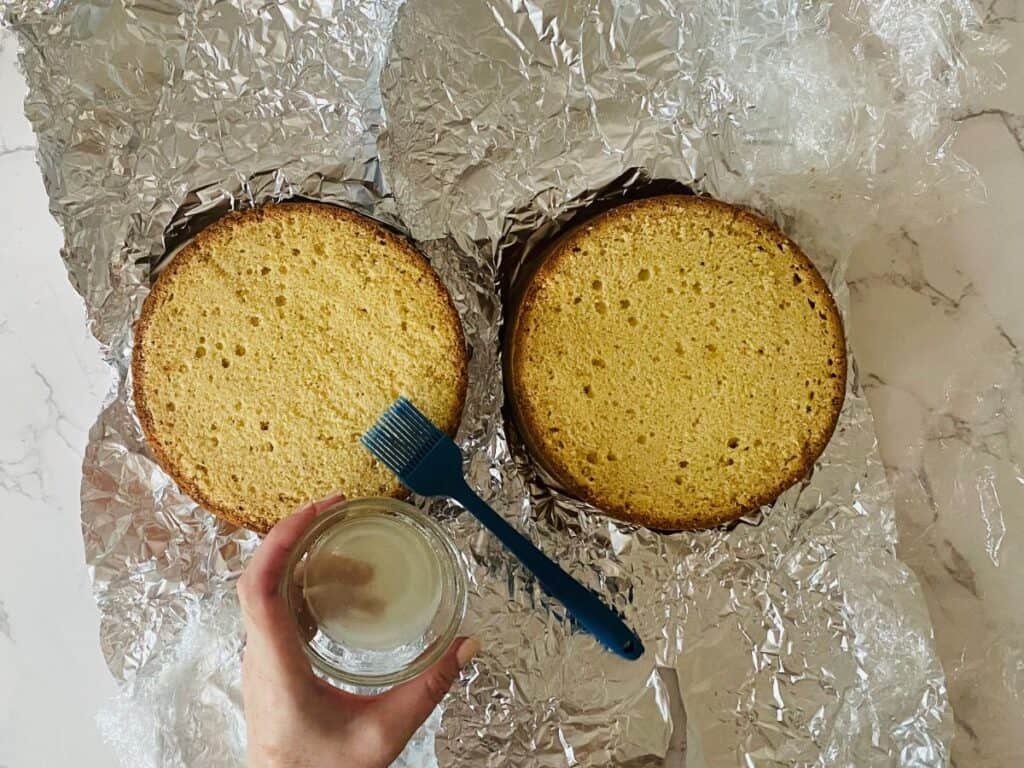
Brush with lemon syrup
Give the lemon syrup a good stir, then brush the tops of each cake until all the mixture is used up.
Cover the tops of each cake with the plastic wrap so they don’t dry out. Then wrap them loosely in the foil and leave them on your bench. Clean up any crumbs.
Rinse the blackberries
Place the blackberries in a medium mesh strainer and run under cold water. Drain on paper towels then take another piece of paper towel and carefully pat dry. Set aside.
Make the buttercream
Make a standard (4 egg white) quantity of Swiss Meringue Buttercream.
Assemble the cakes
Place your cake board on a turntable (if using) or your kitchen bench. Remove the foil and plastic wrap from each cake.
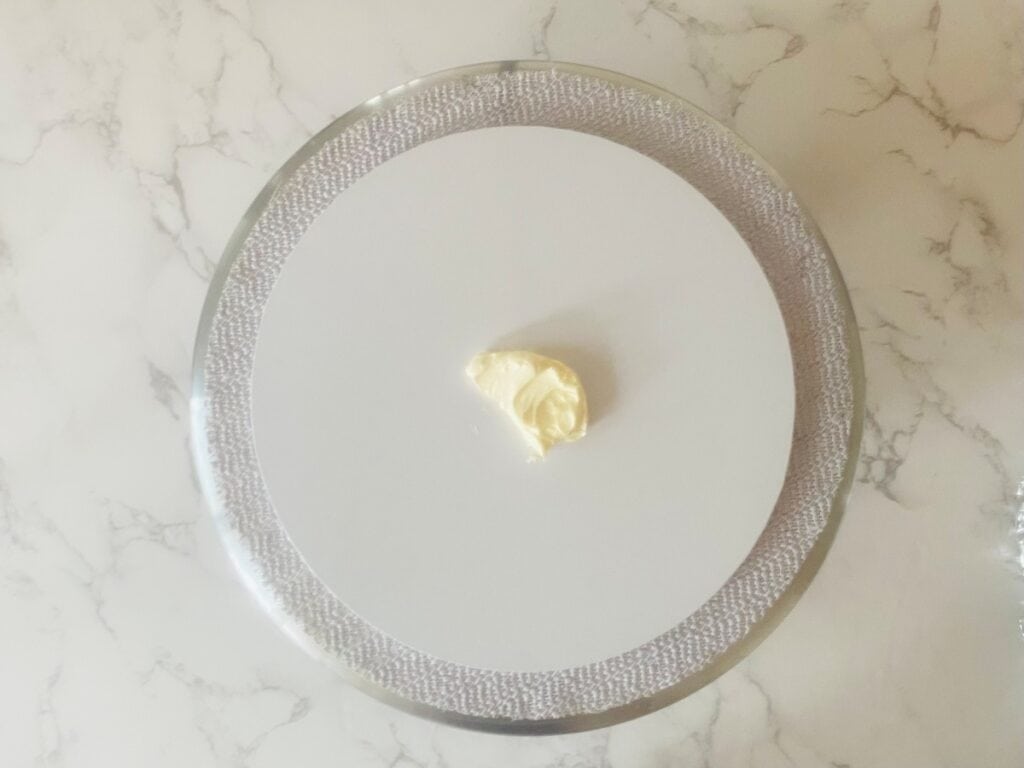
Stick the cake to the board
Take a small amount of buttercream and place a blob on your cake board.
Centre one cake on the board.
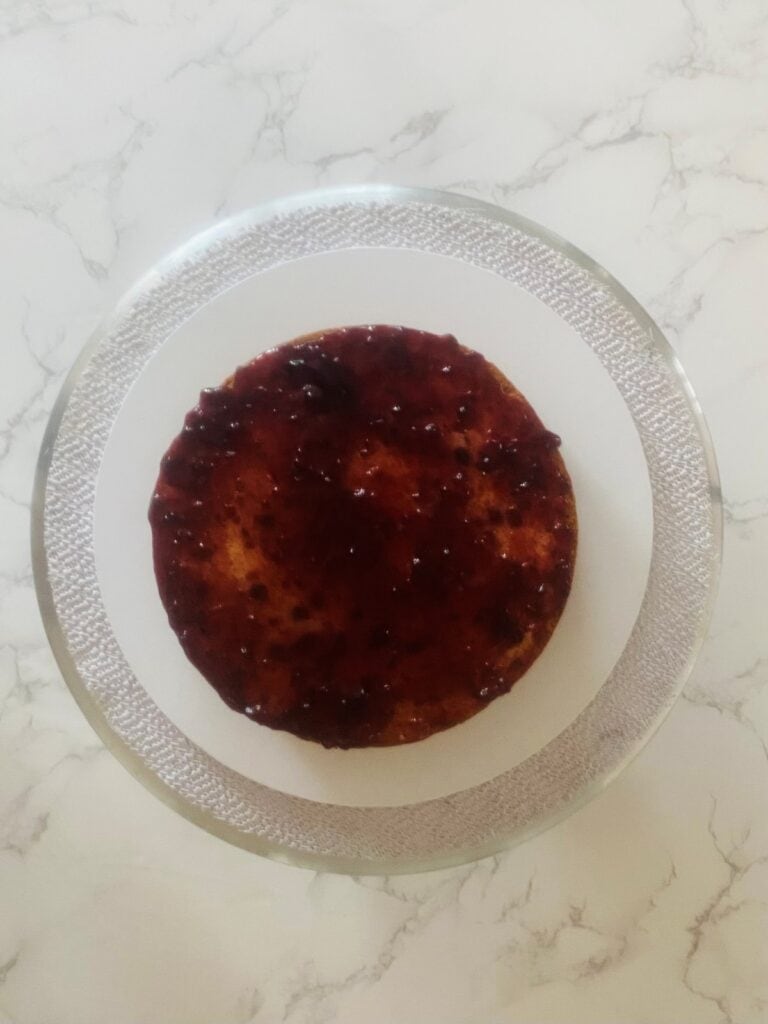

Add the jam
Add the Blackberry Jam and spread with the back of a spoon all the way to the edges.
Pipe the buttercream
Take a large disposable piping bag and cut 5cm / 2 inches off the tip.
Sit the bag inside a tall glass and turn over the top to form a cuff.
Re-mix the buttercream on the lowest speed for 1 minute. Turn off the mixer.
Using a spatula, take the buttercream and fill the bag up to the top of the glass.
Remove the bag, lift up the cuff and twist until a small amount of buttercream comes out the end
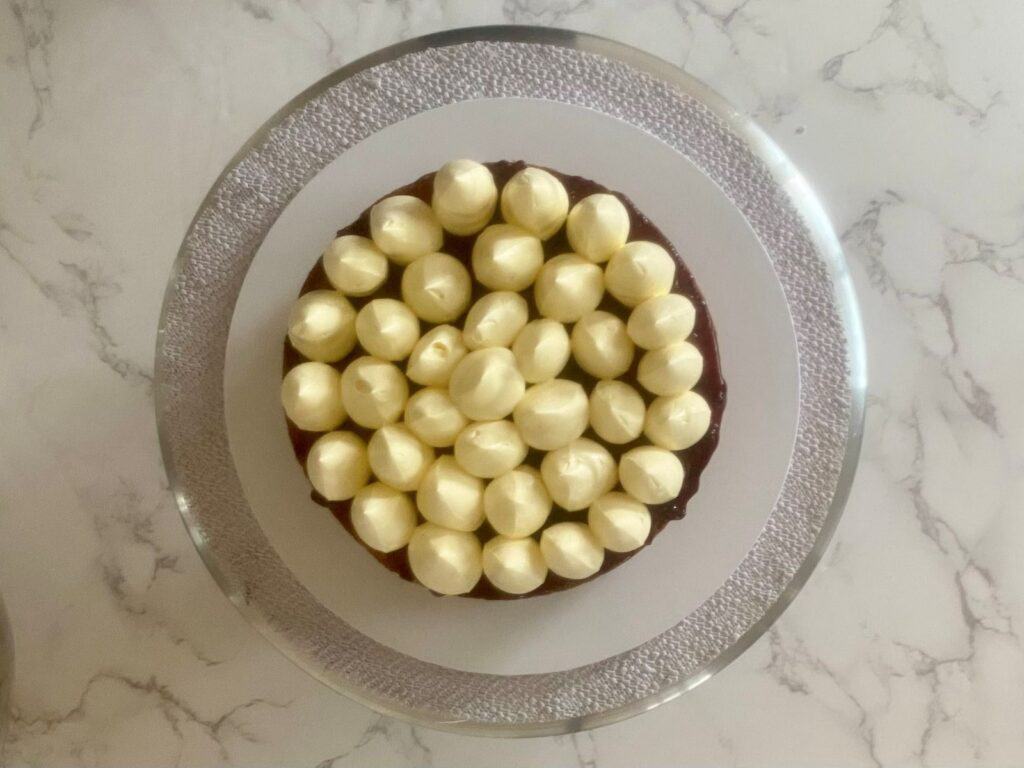
Hold the bag vertically over the cake and working from the outside in, pipe even sized blobs of buttercream on top of the blackberry jam.
Add the next cake layer
Take the second cake and place it cut side down on top of the buttercream blobs. Press down gently so the two layers stick together then bend down so that the cake is at eye level and check that the cake is even.

Dust
Place the icing sugar inside a small mesh strainer. Hold it above the top of the cake and gently shake from side to side until covered in icing ‘snow’. Make sure you concentrate of the edge of the cake as this is the area that will be on display. Let a little icing sugar fall on the cake board too for a pretty finish.
Colour the remaining buttercream
Squeeze any buttercream left in the bag back into the stand mixer bowl.
Add 3-4 drops of burgundy Colour Mill oil based food colouring, then mix on the lowest speed until combined and no streaks remain.
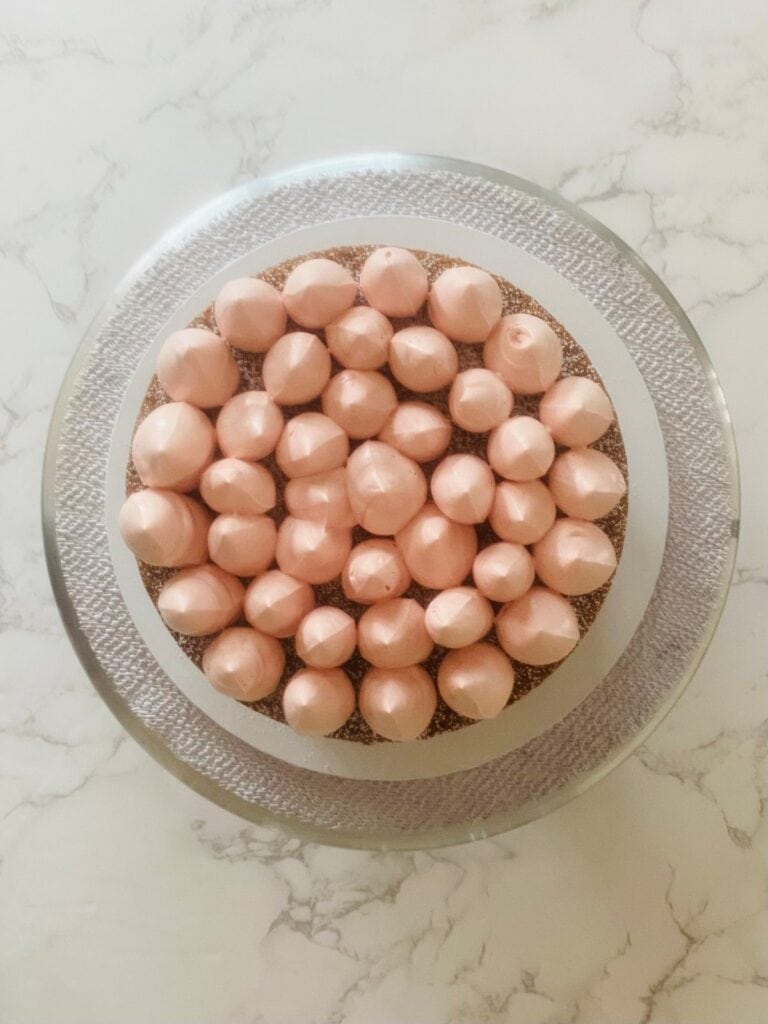
Pipe the buttercream
Take another disposable piping bag and again cut 5cm / 2 inches off the tip.
The steps for filling the bag are the same as before, except this time your buttercream should be a deep pink.
Again, working from the outside in, pipe blobs of buttercream on top of the cake, ensuring you save a little bit of buttercream in your bag for later.
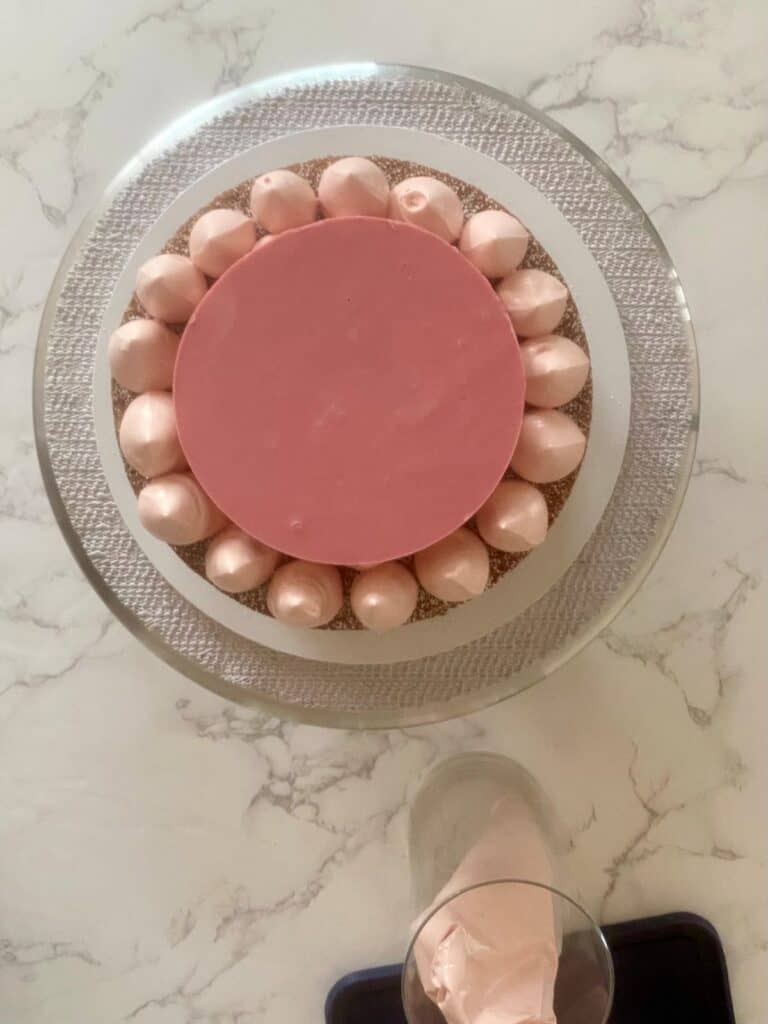
Add the chocolate disc
Remove the chocolate disc from the fridge and the sealed container, and place it as close to the cake as possible.
Peel back a little bit of the baking paper and carefully place your fingers underneath.
Place it in the centre on top of the buttercream blobs. Gently press down then check that it is even.
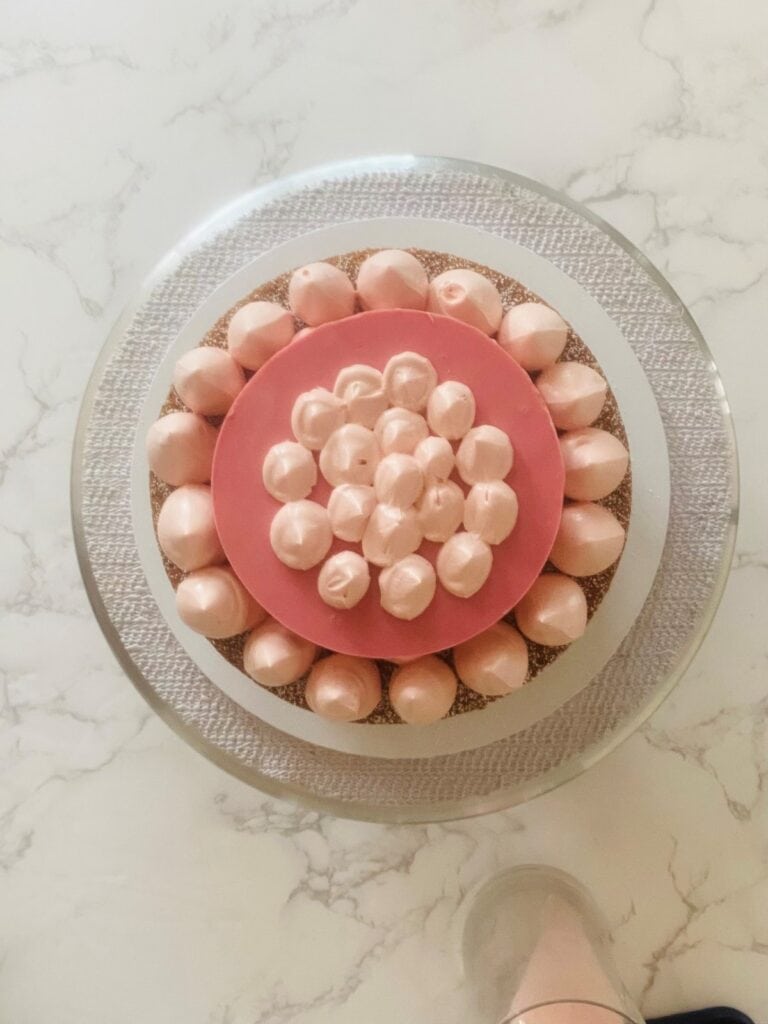
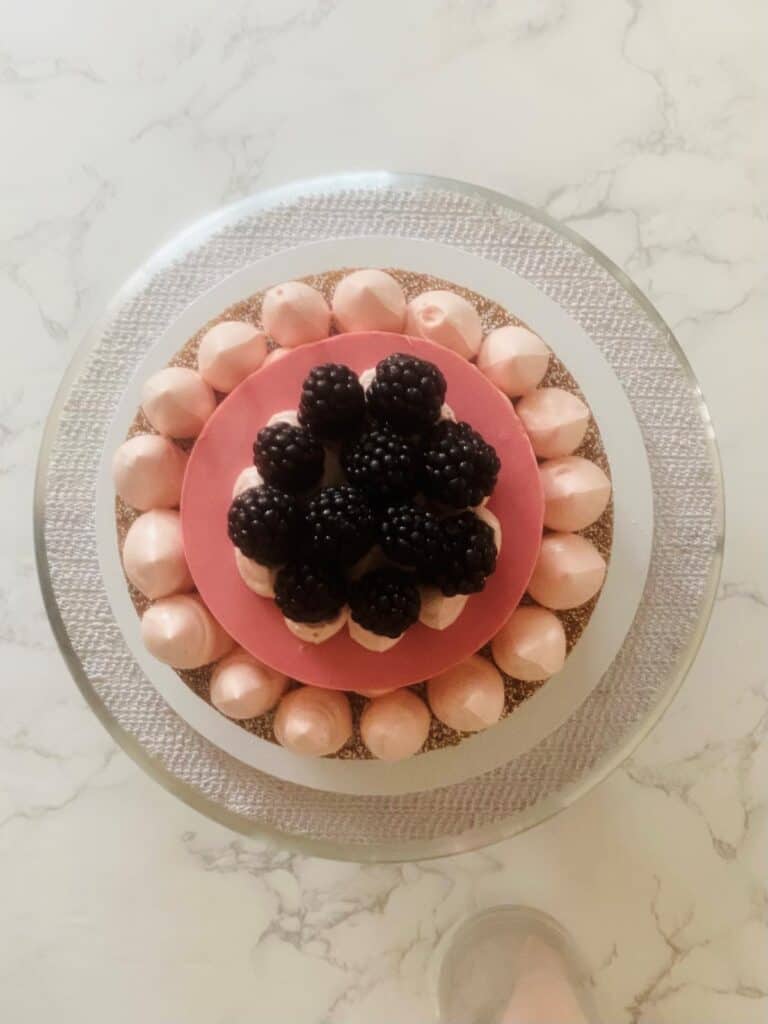
Add the blackberries
Pipe some small dots of buttercream in the middle of the disc.
Take the blackberries and press them into the buttercream to secure.
Store
Place your Lemon & Blackberry Sandwich Cake inside your cake box and store in the fridge (you may have to remove a shelf) up to 1 day before serving.

To serve – add the flowers & gold leaf
One hour before serving:
Remove the box from the fridge, take the cake out and place it on a cake stand.
Add some flowers in the gaps between the blackberries and gold leaf (both optional) to finish.
Place the cake stand on your table so everyone can admire your beautiful work! Cut and serve with a shard of white chocolate, a blackberry and edible flower.
FAQs
Can I make the buttercream ahead? Yes! While I prefer to make and use Swiss Meringue Buttercream straight away, sometimes it’s just not possible. Simply follow the Storing, Freezing & Reviving instructions in the Swiss Meringue Buttercream Recipe if you need to make some in advance.
How many people does this Lemon & Blackberry Sandwich Cake serve? Because this is quite a high cake, you don’t need to cut thick slices (unless you want to…yum). You should be able to get 16 slices from this cake. Use the pink icing clouds on top as a guide if you like, so everyone gets a good serving of the buttercream on the top. Also, break up the white chocolate and add a little shard as well as a blackberry and edible flower if you can.
How do I store leftovers? Remove any flowers and blackberries then place the cake in a sealed container lined with baking paper for up to 2 days. Make sure you let the cake come to room temperature before serving.
Lemon & Blackberry Sandwich Cake
16
servings2
hours1
hour25
minutesEquipment
 Two 7 inch x 3 inch round cake tins (18cm x 7.5cm)
 Stand mixer
 Digital scales
You will also need
Baking paper
Cooling racks x 2
A round 25cm / 10” cake board
10” x 6” cardboard cake box with lid to store
Small tray
Sealable container
Ring cutter 12cm / 4.7 inches
Disposable piping bags
Pastry brush
Disposable piping bags – size Large
Cake turntable (optional)
Keep the screen of your device on
Ingredients
- Lemon Sandwich Cake
550 g 19 2/5 oz plain / all purpose flour
480 g 17 oz sugar
360 g 12 5/7 oz unsalted butter, softened
1 3/4 teaspoon 1 3/4 teaspoon baking powder
3/4 teaspoon 3/4 teaspoon bicarb (baking) soda
1/2 teaspoon 1/2 teaspoon salt
2 2 lemons (zest only)
5 5 eggs
120 g 4 1/4 oz sour cream
300 ml 10 1/7 fl oz full fat/full cream milk
1 teaspoon 1 teaspoon vanilla extract
- Lemon syrup
2 tbsp 2 tbsp freshly squeezed lemon juice
1 tbsp 1 tbsp sugar
- Blackberry Jam
80 g 2 5/6 oz blackberry jam
- Buttercream
1 1 standard quantity of Swiss Meringue Buttercream (see separate post for recipe)
3 3 -4 drops of burgundy oil based colouring (Colour Mill brand)
- White chocolate disc
100 g 3 1/2 oz white chocolate
1 1 drop burgundy oil based colouring (Colour Mill brand)
- Garnish
125 g 4 2/5 oz Punnet of fresh Blackberries
Edible gold (optional)
Edible flowers (optional)
Directions
- Watch the video at the end of these directions before you begin, it helps to see the cake come together.
Adjust your oven rack so it is in the centre position. - Preheat the oven to 160 C fan / 320F.
- Prep your tins
- You will need two 7 inch x 3 inch (18 cm x 7.5cm) round cake tins.
- Trace the base of each tin on to baking paper, cut out with scissors, then turn over. Spray each cake tin with baking spray / canola spray and place a circle in the bottom of the tin. Repeat with the other tin.
- Place a little plain/all purpose flour in one tin then tilt and turn to completely coat the sides. Tip any excess into the other tin and repeat the process. Discard any excess.
- Make the cakes
- Weigh the flour and sugar into the stand mixer bowl, making sure you zero between ingredients.
- Add the baking powder, baking soda, salt and lemon zest. Set aside for now.
- Place the eggs, sour cream, milk and vanilla in a medium sized microwave safe bowl and stir with a fork until combined. Bring to room temperature by microwaving on high for 20 seconds (900w). Stir. Test. If still a little cool, microwave for an extra 10 seconds. Sit the bowl next to the stand mixer.
- Cut the butter into even sized cubes and place in a medium microwave safe bowl. Soften in the microwave on high for 30 seconds (900w). Stir. Heat again for 20 seconds and stir.
- Place it next to the stand mixer with a tablespoon.
- Using the paddle attachment, mix the flour mixture for 15 seconds on low.
- Slowly add the softened butter a little at a time (or else you will get covered in a flour cloud). Mix until all the butter has been incorporated.
- Now add the egg/milk mixture very slowly, about a quarter at a time until all added.
- Stop the mixer, take a spatula and scrape down the sides.
- Turn the mixer back on to medium speed (5 on a KitchenAid) and beat for 30 seconds – use a timer! Don’t exceed this time or you will activate the gluten in the flour and the cake will have a gummy texture.
- Stop the mixer, scrape down the sides and paddle attachment with a spatula and stir manually to incorporate.
- Divide the cake batter evenly between the two cake tins. Place one on the digital scale and take note of the amount. Do the same with the other cake tin. Adjust the mixture between the two tins until they both weigh the same. This is the secret to same height cakes!
- Gently drop each tin on your bench 3 times to remove any air bubbles.
- Place both tins on the same rack in the middle of the oven with a gap in between.
- Bake for 1 hour and 25 minutes.
- Test for doneness by inserting a skewer in the middle of both cakes. If the skewer comes out clean, remove the cakes from the oven. If not, bake for an extra 5 minutes.
- When done, remove the cakes from the oven and cool in the tins for 30 minutes before turning out onto a wire rack. Yes, they will have a little dome, however this will reduce slightly once cooled.
- Place a second wire rack on top of the upturned cakes and quickly flip over until the cakes are right side up.
- Allow to cool completely.
- Store
- When cakes are completely cool, wrap each cake in two layers of plastic wrap followed by one layer of foil. Alternatively, place each cake in a large ziplock bag, push out and air and seal.
- Refrigerate overnight before serving or freeze for up to 1 month. See FAQs for freezing/defrosting instructions.
- To assemble – Watch the video below before you start
- Make the lemon syrup
- Combine the juice and sugar in a small bowl. Stir well, then set aside. The sugar will dissolve while you work on the next steps.
- Make the white chocolate disc
- Line a small baking tray with a piece of baking paper.
- Line a sealable container a little larger than the disc (greater than 12 cm / 4.7 in) with baking paper. Set aside.
- Break up the white chocolate into a microwave safe bowl. Heat on full power for 20 seconds then stir. Return to the microwave and repeat heating in 20 second bursts and stirring until all the chocolate is melted and smooth.
- Take a little melted chocolate and place under the corners of the baking paper to ‘glue’ it in place. This will stop the paper from moving around.
- Add the colour
- Add one drop of burgundy oil-based food colouring and stir it into the chocolate until no streaks remain.
- Pour the chocolate on to the baking paper in a thin stream keeping it centred so it makes a circle. Tilt the tray back and forth and side to side just a little to spread it evenly until it is a just a little larger than the circle cutter (hold the cutter above the chocolate to check).
- Place in the fridge for 10 minutes (set a timer).
- When the timer goes off, remove the tray from the fridge. Take the cutter (if using), press down and cut out a chocolate circle, you may need to remove the pieces around the cutter until only the circle remains with a knife or angled spatula.
- Store until required
- Carefully peel back the paper and lift off the disc. Place it in the lined container, add the lid and return it to the fridge until required.
- If you don’t have a circle cutter
- Pour the chocolate as described above, then take a ruler and measure the diameter. Tilt the tray to spread until you get close to the required 12cm / 4.7.
- Refrigerate for 20 minutes, then follow the instructions for storing. While you won’t get the same sharp edge, you will still have a perfectly fine round circle to crown your cake.
- Level the cakes
- Pro tip: Cutting cakes straight from the fridge makes slicing much easier, as the chilled fats are firmer, providing more stability to the cake and sharper edges.
- Remove the cakes from the refrigerator. Unwrap and place on a clean board or bench. Save the plastic wrap.
- Take a ruler or tape measure and some toothpicks and measure 5cm / 2 inches from the base of the cake.
- Insert a toothpick ‘marker’ then repeat until you have placed 6-8 toothpicks at evenly spaced intervals around the cake. Repeat with the other cake. These will act as a guide for your knife and ensure you have two equal sized cakes.
- Remove the tops
- Take a knife with a serrated edge (a bread knife is perfect) and place one hand on top of the cake. Resting the knife on top of the toothpicks, gently score the cake to create a defined line (turn as you go).
Now insert your knife a bit deeper, then continue turning as you slowly slice across the top, using the line you created and the toothpicks as your guide. Remove the top and set aside (have a little taste if you like). Repeat with the other cake. - Give the lemon syrup a good stir, then brush the tops of each cake until all the mixture has been used.
- Cover the tops of each cake with the plastic wrap so they don’t dry out. Then wrap them loosely in the foil and leave them on your bench. Clean up any crumbs.
- Rinse the blackberries
- Place the blackberries in a medium mesh strainer and run under cold water. Drain on paper towels then take another piece of paper towel and carefully pat dry. Set aside.
- Make the Buttercream
- Make a standard (4 egg white) quantity of Swiss Meringue Buttercream.
- Assemble the cakes
- Place your cake board on a turntable (if using) or your kitchen bench. Remove the foil and plastic wrap from each cake.
- Stick the cake to the board
- Take a small amount of buttercream and place a blob on your cake board.
- Centre one cake on the board.
- Add the jam
- Add the Blackberry Jam and spread with the back of a spoon all the way to the edges.
- Pipe the buttercream
- Take a large disposable piping bag and cut 5cm / 2 inches off the tip.
- Sit the bag inside a tall glass and turn over the top to form a cuff.
- Re-mix the buttercream on the lowest speed for 1 minute. Turn off the mixer.
- Using a spatula, take the buttercream and fill the bag up to the top of the glass.
- Remove the bag, lift up the cuff and twist until a small amount of buttercream comes out the end
- Hold the bag vertically over the cake and working from the outside in, pipe even sized blobs of buttercream on top of the blackberry jam.
- Add the next cake layer
- Take the second cake and place it cut side down on top of the buttercream blobs. Press down gently so the two layers stick together then bend down so that the cake is at eye level, and check that the cake is even.
- Dust with icing sugar
- Place the icing sugar inside a small mesh strainer. Hold it above the top of the cake and gently shake from side to side until covered in icing ‘snow’. Make sure you concentrate of the edge of the cake as this is the area that will be on display. Let a little icing sugar fall on the cake board too for a pretty finish.
- Colour the remaining buttercream
- Squeeze any buttercream left in the bag back into the stand mixer bowl.
- Add 3-4 drops of burgundy Colour Mill oil based food colouring, then mix on the lowest speed until combined and no streaks remain.
- Pipe the buttercream
- Take another disposable piping bag and again cut 5cm / 2 inches off the tip.
- The steps for filling the bag are the same as before, except this time your buttercream should be a deep pink.
- Again, working from the outside in, pipe blobs of buttercream on top of the cake, ensuring you save a little bit of buttercream in your bag for later.
- Add the chocolate disc
- Remove the chocolate disc from the fridge and the sealed container, and place it as close to the cake as possible.
- Peel back a little bit of the baking paper and carefully place your fingers underneath.
- Place it in the centre on top of the buttercream blobs. Gently press down then check that it is even.
- Add the blackberries
- Pipe some small dots of buttercream in the middle of the disc.
- Take the blackberries and press them into the buttercream to secure.
- Store
- Place the cake inside your cake box and store in the fridge (you may have to remove a shelf) up to 1 day before serving.
- To serve
- Remove the cake from the fridge and place it on a cake stand.
- Add some flowers in the gaps between the blackberries and gold leaf (both optional) to finish.
- Place the cake stand on your table so everyone can admire your beautiful work!
- Cut and serve with a shard of white chocolate, a blackberry and edible flower.