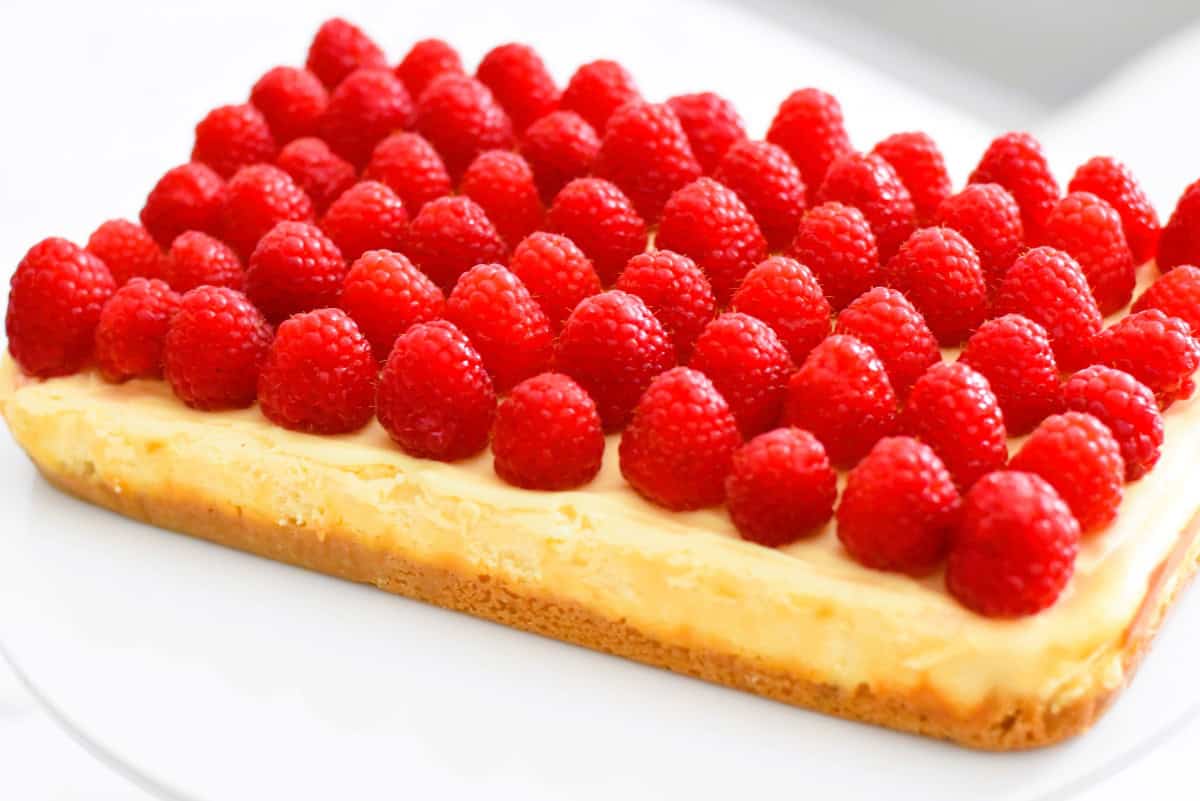
This indulgent Raspberry White Chocolate Cheesecake Slice pairs a buttery biscuit base with a creamy white chocolate and raspberry filling, carefully tested for clean slicing and balanced sweetness. Whether served as elegant bites or generous squares, it’s a versatile, crowd-pleasing addition to any Afternoon Tea table.

Raspberry & White Chocolate – A perfect combination
Prepare to impress with this Raspberry White Chocolate Cheesecake Slice. It’s a stunning dessert that’s surprisingly simple to make and perfect for afternoon tea or special occasions.
Why You’ll Love This
- Effortlessly impressive – Looks like it came from a patisserie, but it’s easy to make at home.
- No gelatine needed – A simple baked filling means less stress and no special setting agents.
- Versatile for any event – Slice it to suit anything from elegant tea tables to casual office gatherings.
- Reliable and forgiving – Even if cracks happen, no one will notice beneath the berries and chocolate.
- Incredible flavour – The sweet and tart balance of white chocolate and fresh raspberries is a summer dream.
Cut it any way you like
Serve it on a cake stand for a striking display before slicing into little fingers, squares or slices, or pre-cut and arrange elegantly on a decorative platter or tiered afternoon tea stand. This slice stores beautifully in a sealed container, and I’ve included instructions to ensure easy removal and perfect presentation every time.
But most importantly, it tastes exquisite. The combination of creamy cheesecake, sweet white chocolate, and tart, juicy raspberries is a celebration of summer and highlights the beauty and flavour of whole berries in their natural state.
Whether you’re hosting a fancy afternoon tea or simply treating someone special this Raspberry White Chocolate Cheesecake Slice is guaranteed to be the star of the show.
Good to Know
- Make ahead – This cheesecake slice can be made the day before and stored in the fridge for ultimate convenience.
- Serving tip – For clean slices, use a hot knife wiped between cuts.
- Storage – Keeps well in the fridge for 3–4 days in an airtight container.
- Presentation idea – Add a light dusting of icing sugar or edible flowers for a show-stopping finish.
- Fruit swap – Use blackberries, blueberries or strawberries or a mix of all three if you prefer
Bake like a Pro – weigh your ingredients!
I use weight measurements not cup measurements in all my recipes as cup sizes are not universal – a cup in the US for example is different to a cup in Australia. This ensures accuracy and a far better result, especially if you are baking which relies on scientific principles. Yes it’s a bit nerdy, but ingredients are expensive and there’s nothing worse than following a recipe to the letter only to have it fail on you.
Pro tip: Always keep a set of spare batteries for your scales. You don’t want your scales dying halfway through a recipe!
Other recipes to try
Chicken Wellington Sausage Rolls
Vanilla Cupcakes with Edible Flowers
How to make Raspberry White Chocolate Cheesecake Slice
Biscuit base ingredients
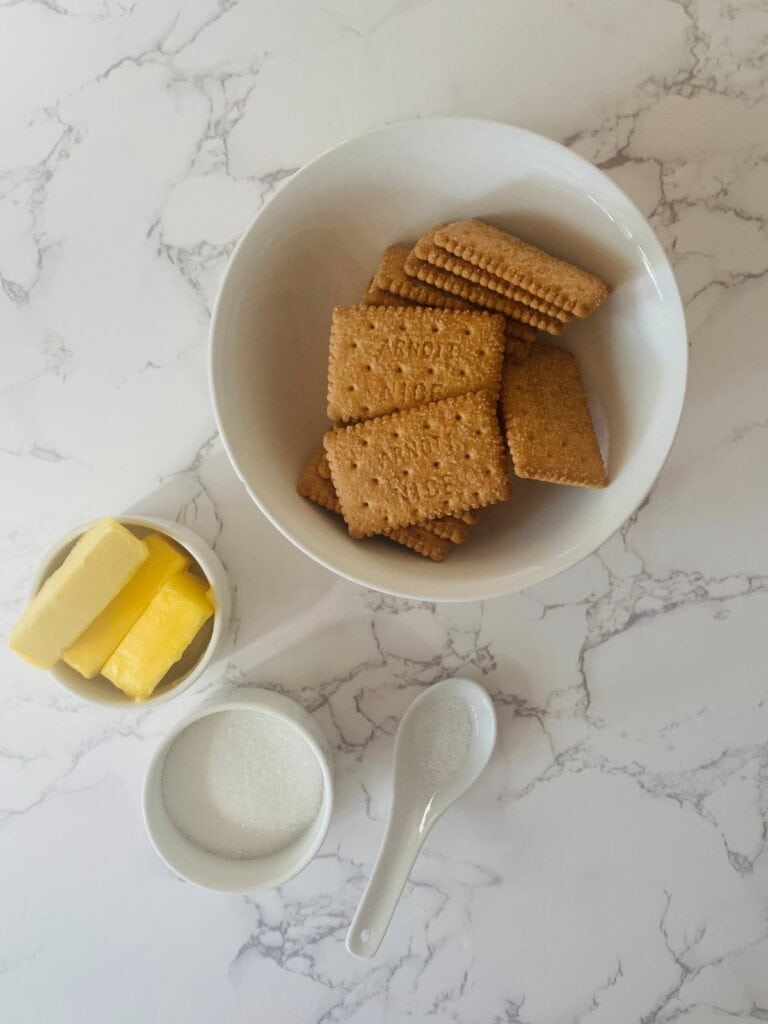
Plain sweet biscuits – I like Arnotts Nice but any plain sweet biscuit that when crushed makes a fine crumb will work.
Unsalted butter – This is the preferred butter for this recipe so that you can control the amount of salt in the base. If you only have salted butter available then don’t add the recommended pinch of salt.
Pinch of salt – Use fine table salt
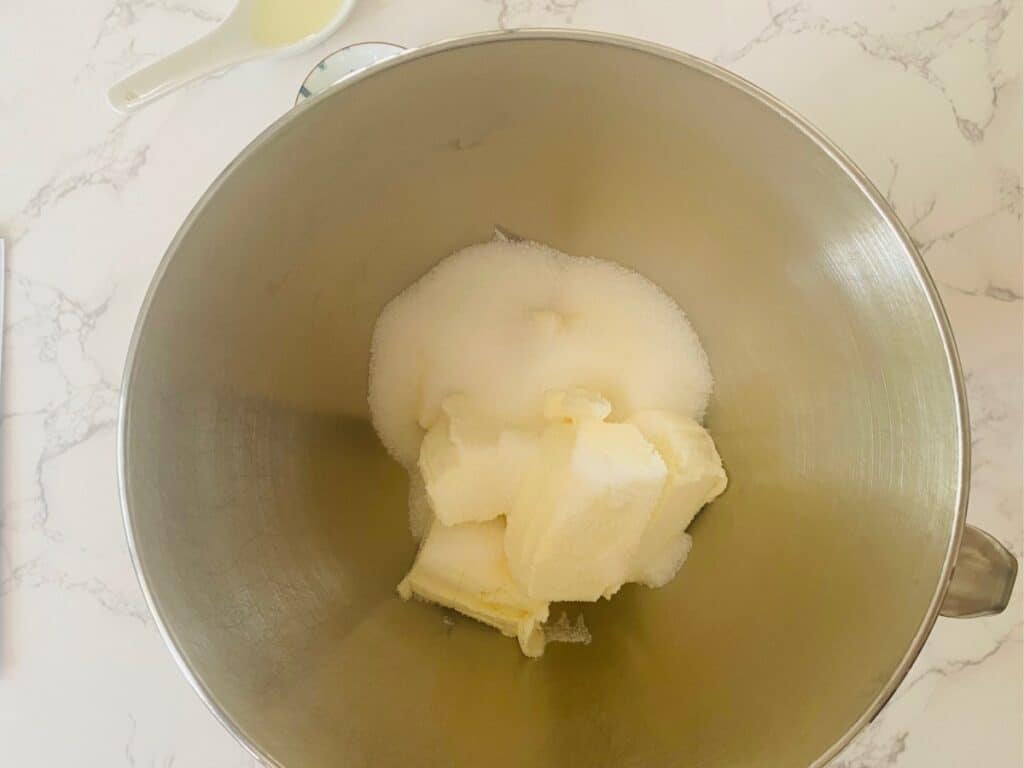
Caster sugar – Also known as superfine sugar, caster sugar has the same sweetness as granulated sugar but with much smaller crystals so it dissolves much faster.
Extra butter or baking spray to help your baking paper stick to the tray

Prepare the slice tin
Grease a 27cm x17.5cm x 3.5cm (10.8”x7”x1.4”) slice pan with butter or baking spray.
Cut a piece of baking paper that extends over the long edges of the pan and press it firmly into the butter so it adheres to the slice pan. You may need to fold the corners a little so they stay flat. Don’t worry if the short edges of the pan are exposed.
Make the biscuit base
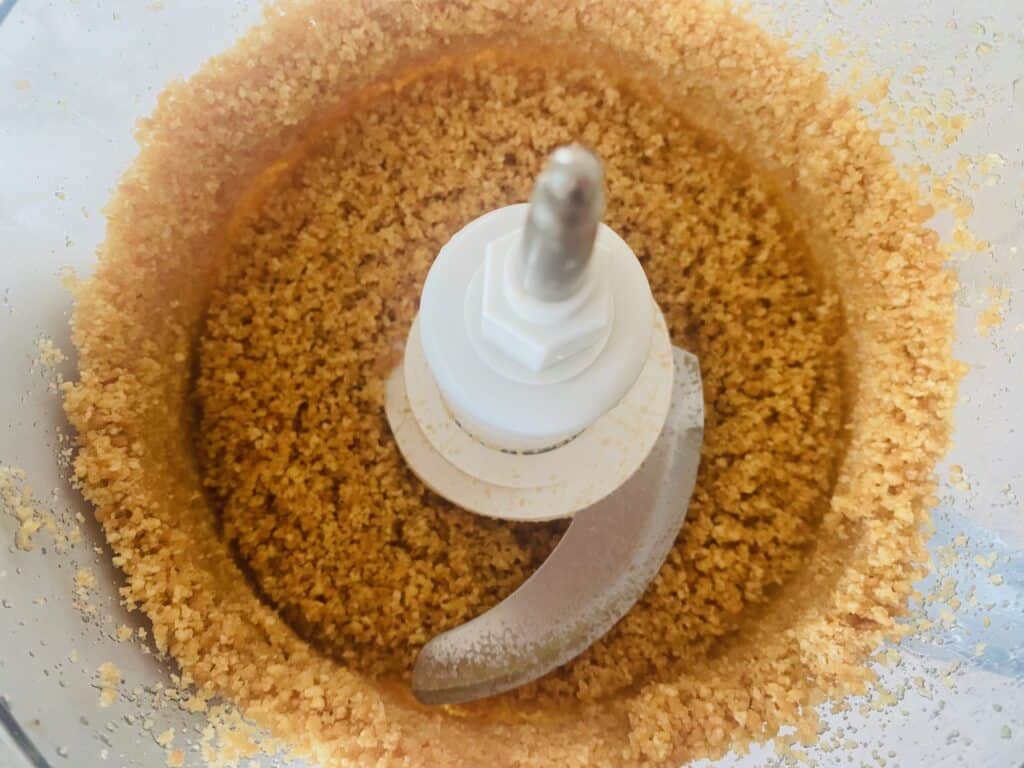
Place the biscuits, sugar and pinch of salt in a food processor and process until fine.
Measure the butter into a microwave safe jug and cook on High for 20 seconds, stir. Repeat until fully melted.
Add the melted butter to the crumb mixture and process on low speed until fully incorporated. The mixture should look like fine, wet sand and hold together when pressed.

Tip the mixture into the lined slice pan and spread it with the back of the spoon or small spatula until you can’t see any baking paper. Press the mixture down gently with your hands until the entire base feels flat and even.
Place the pan in the refrigerator to firm up while you make the filling.
Cheesecake filling ingredients
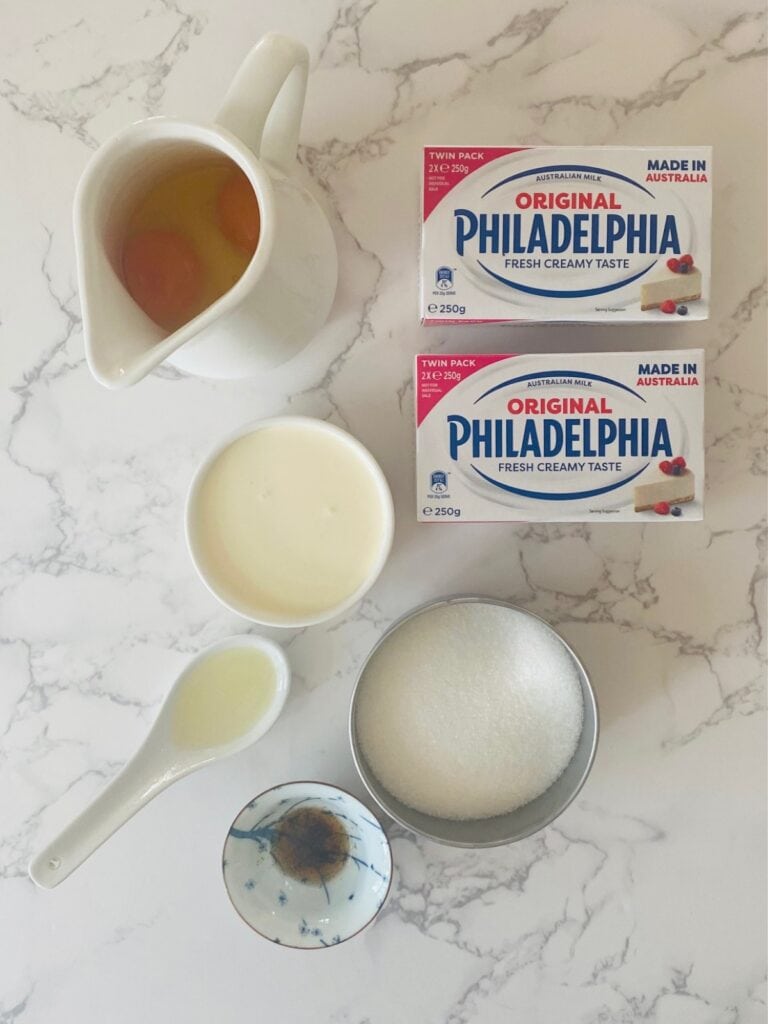
Philadelphia cream cheese: I have tried this recipe with other cream cheese brands however the result is nowhere near as good. Stick with Philadeliphia brand if you can. I buy the two-pack so it is more economical.
Cream – Use pure cream for this recipe or thickened cream if you can’t find it, both work well.
Caster sugar – Also known as superfine sugar, caster sugar has the same sweetness as granulated sugar but with much smaller crystals that dissolve faster, making it ideal for the filling where a smooth consistency is key.
Eggs – Use large eggs from a 700g / 24 oz carton.
Fresh lemon juice – Squeezed from half a lemon, not from a bottle.
Vanilla extract with seeds – This is vanilla extract with the tiny little seeds which adds extra flavour and gives a really nice look when mixed with the cream cheese. Of course normal vanilla extract will be just fine, it just won’t have the little specks (not a big deal..!) Try not to use Imitation Vanilla Essence as it is far removed from the real thing.
Beat the cream cheese
Preheat the oven to 160 C fan /320F.
Place the cream cheese and sugar in the bowl of a stand mixer fitted with the whisk attachment or in a bowl that you can use with handheld beaters. Beat on medium until smooth.
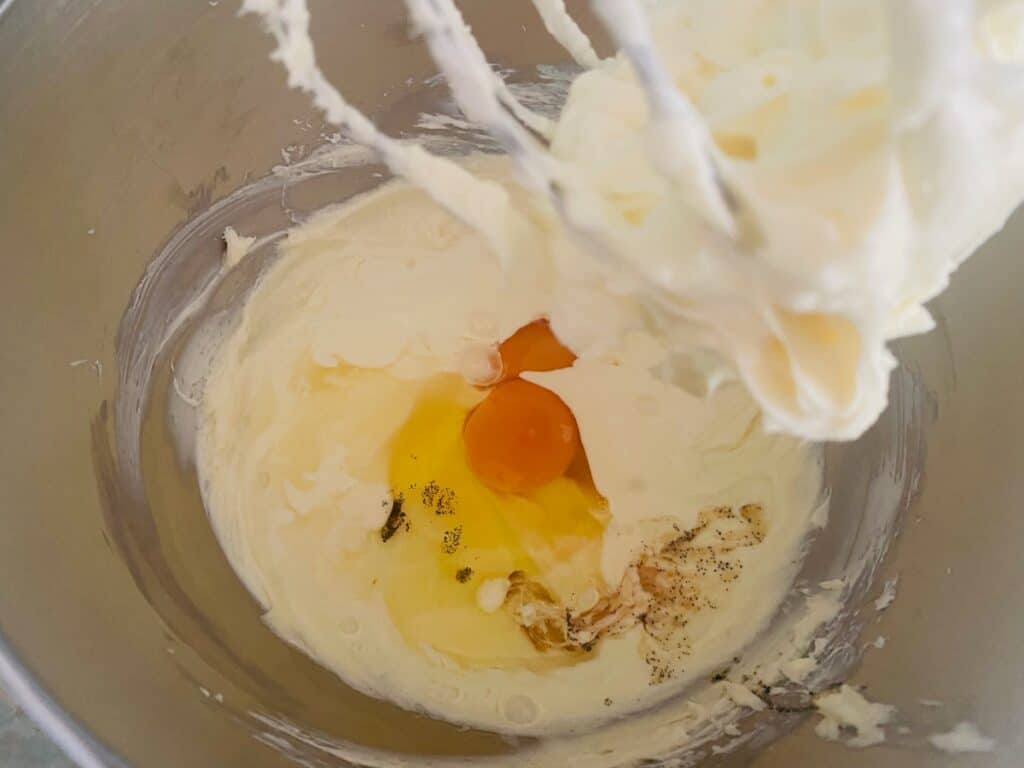
Add the cream, eggs, vanilla and lemon
Add the cream, eggs, vanilla and lemon juice and beat on medium again until fully incorporated and smooth – about 2 minutes.
Fill and bake
Remove the biscuit base from the fridge.
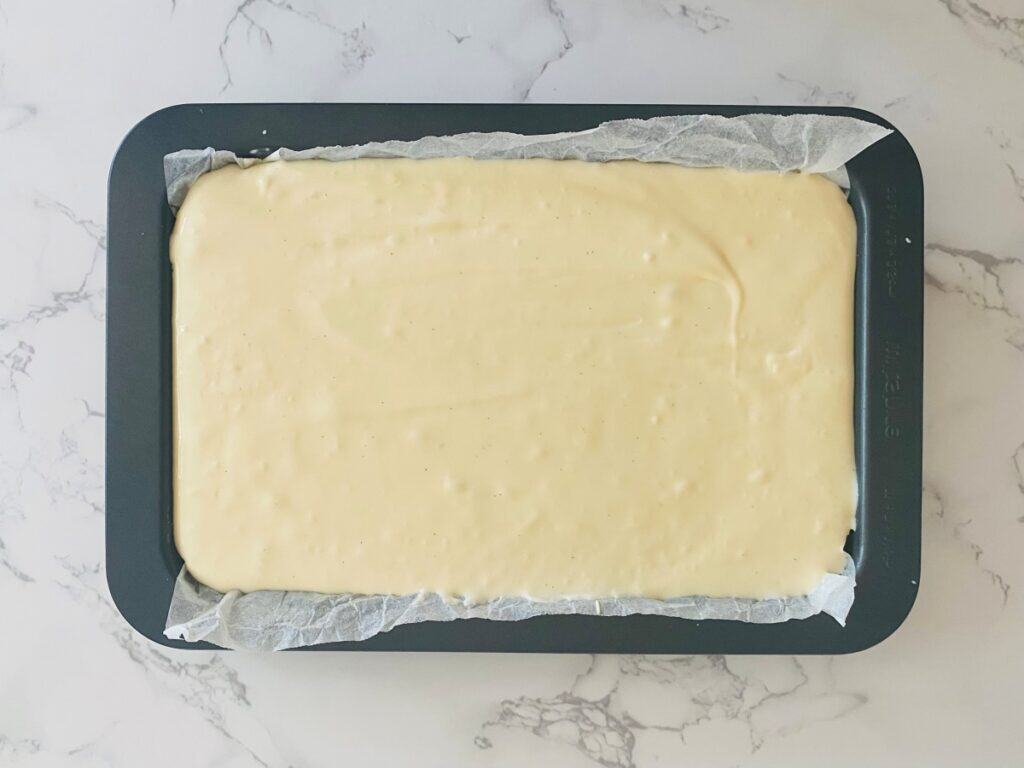
Pour the cream cheese mixture into the slice pan and gently guide the filling into the corners with the back of a spoon. Smooth the top.
Bake in the preheated oven for 25 minutes then turn off the oven but leave the cheesecake inside.

Place a wooden spoon in the door to gently speed up the cooling process and leave to cool for 90 minutes (set a timer). This will prevent cheesecake from cracking.
When the 90 minutes is up remove from the oven, place on a wire rack and leave to cool completely before covering with plastic wrap and placing in the refrigerator overnight.
Ingredients for the white chocolate and raspberry layer
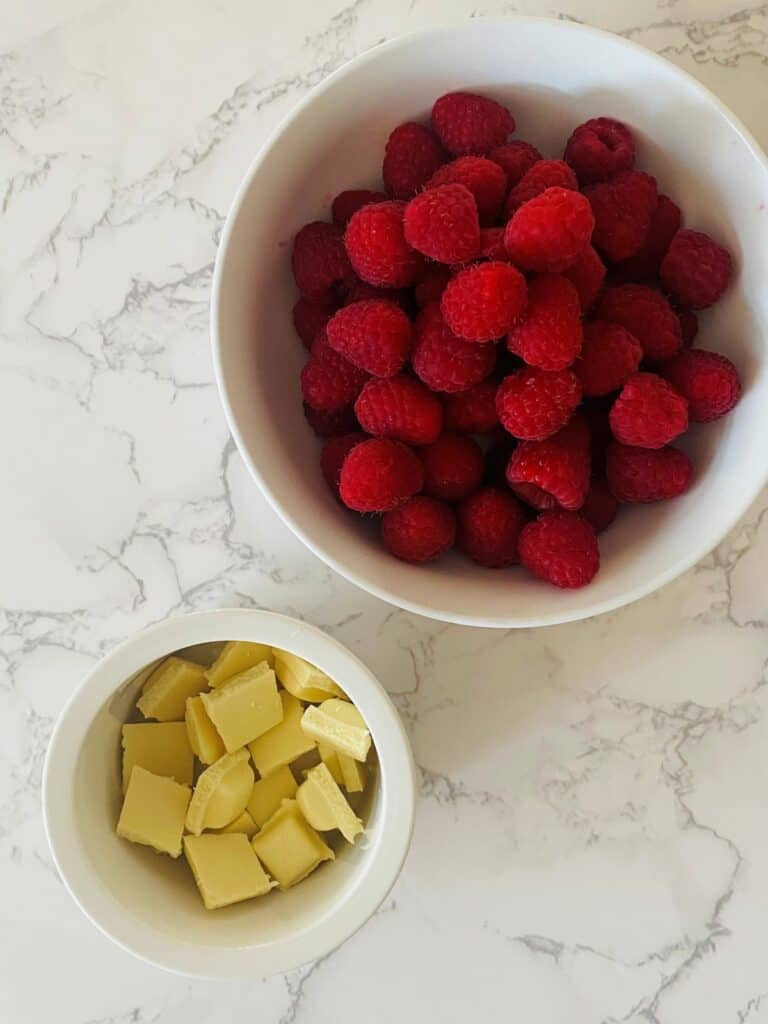
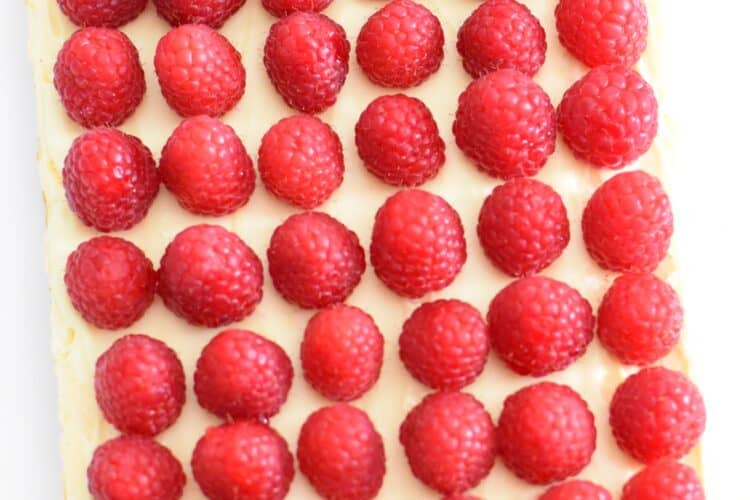
Raspberries – Use the freshest raspberries available. For this recipe you will need a total of 60 raspberries (3 x 125g /4.4oz punnets). I used Driscolls brand and as you can see they were excellent quality. Each punnet contained 21 raspberries so I was able to pick and choose the best ones.
White chocolate – Use good quality baking chocolate from a bar if possible. I like Nestle’s Plaistowe which is available in most supermarkets.
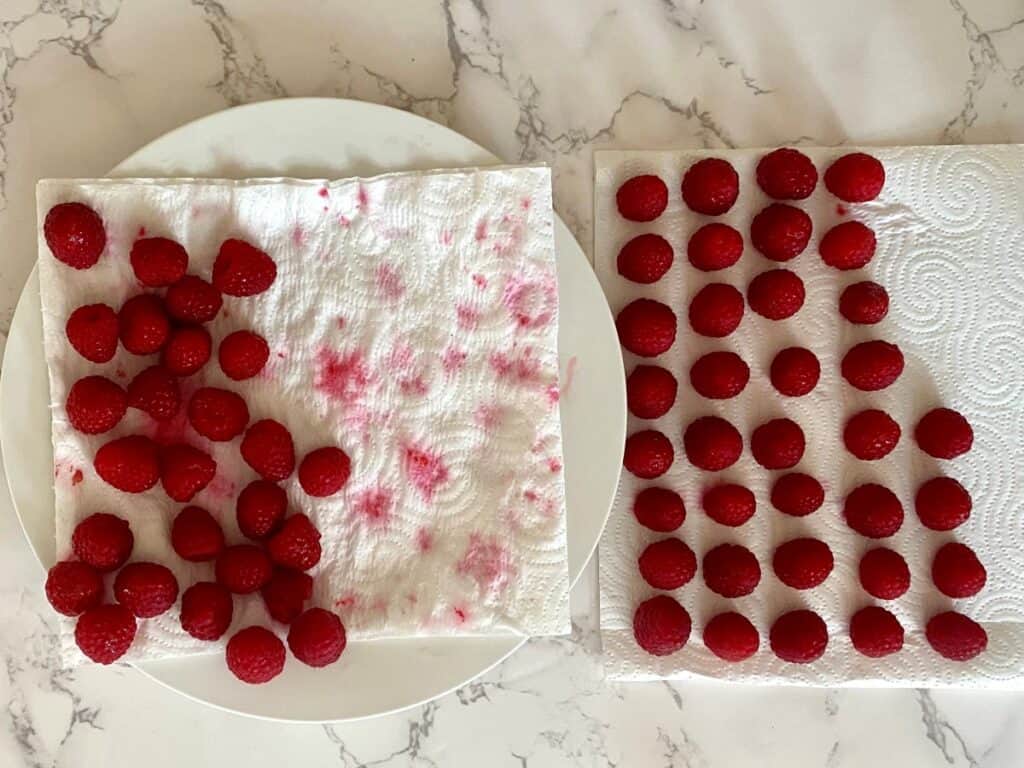
Prepare the raspberries
Line a large tray with paper towels.
Count out the raspberries (you will need 60), place them in a sieve and run them under cold water to remove any dirt.
Give the sieve a good shake to remove any excess water then tip the raspberries out onto the paper towels. Turn each of them over so the hole is facing down then gently pat dry with more paper towels and set aside.
Remove the cheesecake from the fridge and peel off the plastic wrap.
Grab the longer sides of baking paper and very carefully pull up to release the cheesecake from the pan. Now remove the paper and place the cheesecake on a cutting board.

Melt the chocolate
Break the chocolate into a small microwave safe bowl and melt in 20 second bursts, stirring each time, until the chocolate is fully melted.
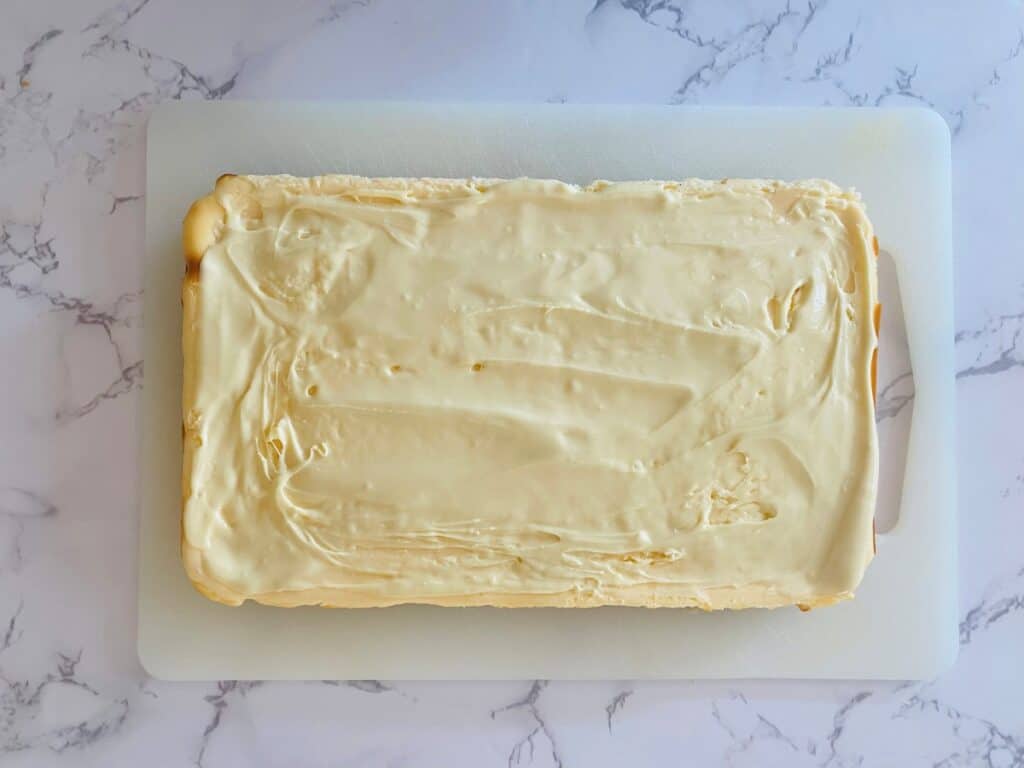
Spread the chocolate
Working very quickly (as the cold cheesecake will make the chocolate set), tip the melted chocolate over the top of the cheesecake and spread it with the back of a spoon.
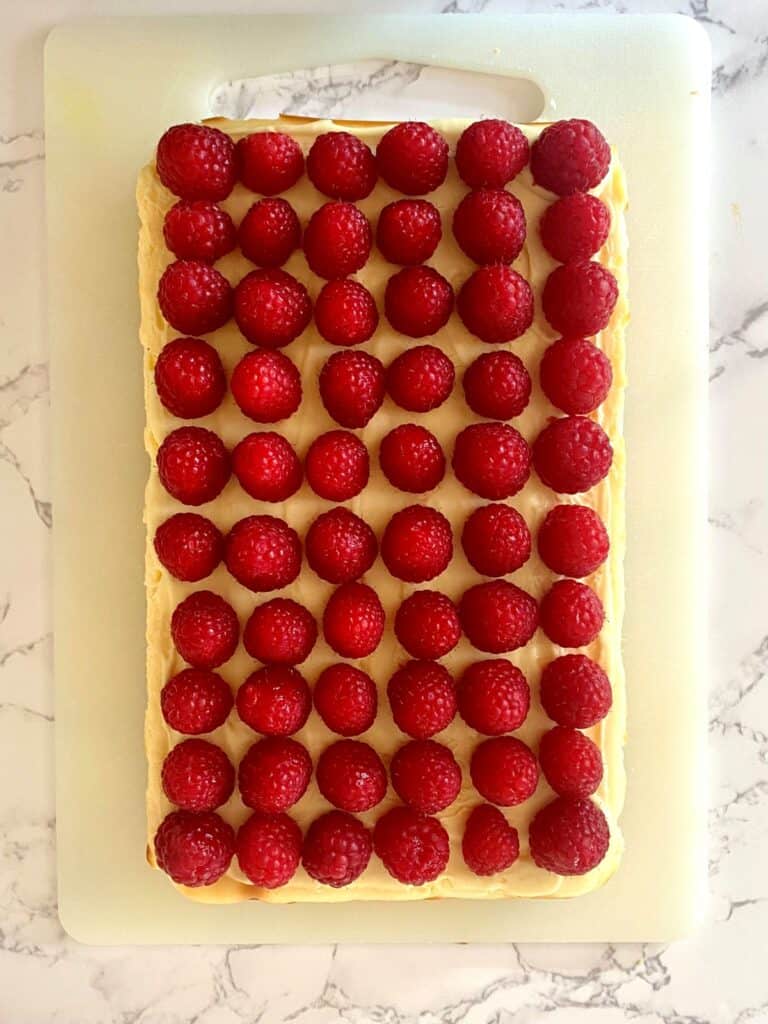
Add the raspberries
Place a row of 6 raspberries along one of the short edges. This row will act as a guide for each row so they stay straight. Leave a small gap then start your next row. Repeat until you have covered the entire top of the cheesecake slice. You should have 10 rows of 6 raspberries in total.
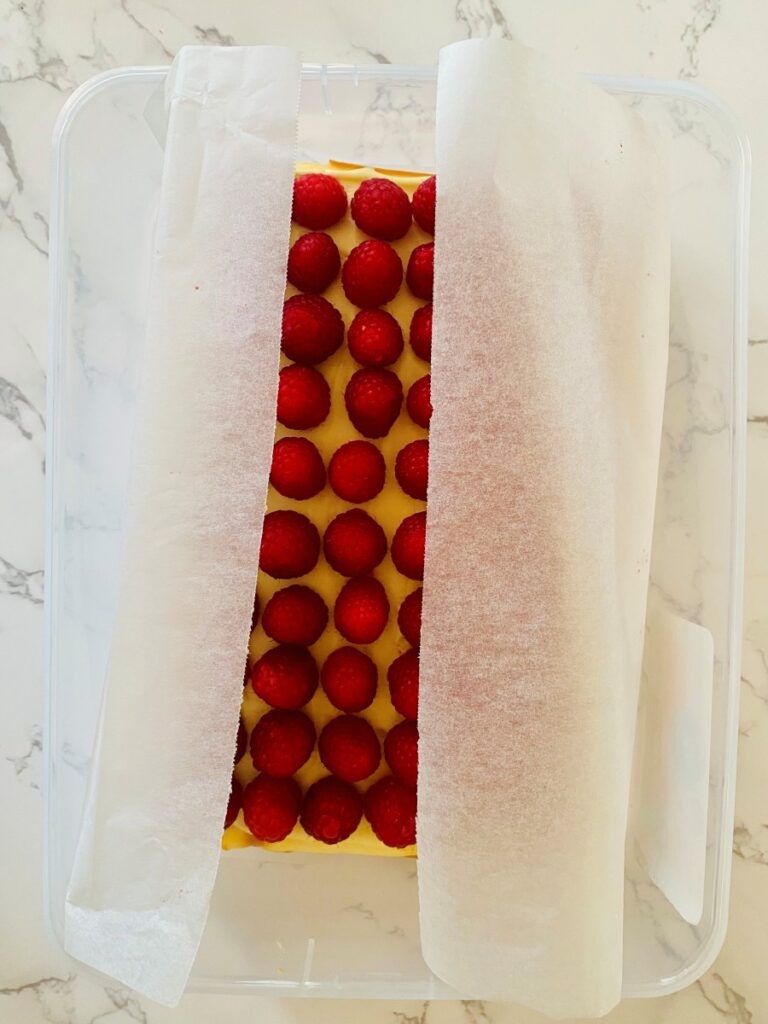
Store
Line a container with baking paper making sure to extend the edges – they will act as ‘handles’ when you want to remove the cheesecake slice.
Use a metal spatula to lift the corner of cheesecake slice up off the cutting board. Slide your hand underneath, then carefully place it in the container. Add the lid then refrigerate up to 24 hours.

Serve
Remove the container from fridge.
Take off the lid, grab hold of the baking paper on either side and lift it out. Slide your hand between the slice and baking paper then transfer it to a cake stand or platter for displaying at your afternoon tea.
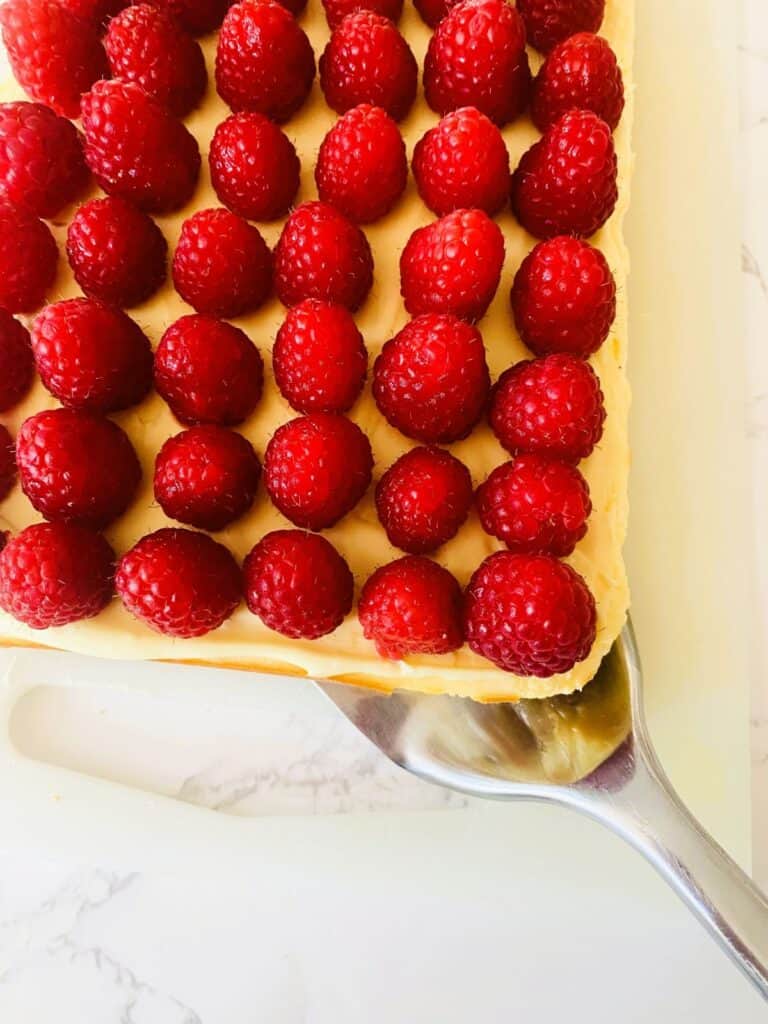
Using a sharp knife, cut it into:
- little fingers (3 raspberries on top – 20 serves),
- squares (4 raspberries on top – 15 serves), or
- slices (6 raspberries on top – 10 serves) – the choice is yours.
Serving tip: For clean slices, use a hot knife wiped between cuts.
FAQs
Can I use any other types of berries? Yes of course! this recipe works equally well with fresh strawberries, blueberries and blackberries or why not try a mix?
Raspberry White Chocolate Cheesecake
10-20
servings30
minutes25
minutesEquipment
 Brownie and slice tin
27cm x 17.5cm x 3.5cm (10.8”x7”x1.4”) Stand mixer or handheld beaters
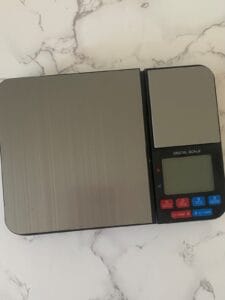 Digital scales
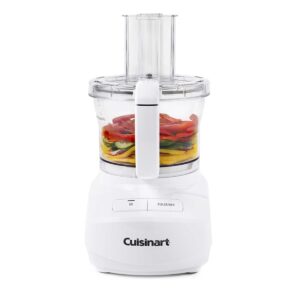 Food processor
 Microwave safe jug
 Small microwave safe bowl
Other Equipment
Wooden spoon
Spatula (metal)
Large strainer
Citrus juicer
Measuring spoons
Keep the screen of your device on
Ingredients
- Biscuit base
200 g 7 oz Plain sweet biscuits
125 g 4 2/5 oz Unsalted butter
Pinch Pinch Salt
1 tablespoon 1 tablespoon Caster sugar
Extra butter or baking spray to help your baking paper stick to the tray.
- Cheesecake filling
500 g 17 2/3 oz Philadelphia cream cheese (2 blocks)
120 g 4 1/4 oz Cream
150 g 5 2/7 oz Caster sugar
2 2 Eggs
1 teaspoon 1 teaspoon Vanilla extract with seeds if possible
1 teaspoon 1 teaspoon Freshly squeezed lemon juice
- White chocolate and raspberry topping
100 g 3 1/2 oz White chocolate
375 g 13 1/4 oz Raspberries (60 berries)
Directions
- Make the base
- Grease a 27cm x17.5cm x 3.5cm (10.8”x7”x1.4”) slice pan with butter or baking spray.
- Cut a piece of baking paper that extends over the long edges of the pan and press it into the butter so it adheres to the slice pan. You may need to fold the corners a little so it sits flat. Don’t worry if the short edges of the pan are a little exposed.
- Make the crumb
- Place the biscuits, sugar and pinch of salt in a food processor and process until fine.
- Measure the butter into a microwave safe jug and cook on High for 20 seconds, stir. Repeat until fully melted.
- Add the melted butter to the crumb mixture and process on low speed until fully incorporated. The mixture should look like wet sand and hold together when pressed.
- Tip the mixture into the lined slice pan and spread the mixture with the back of the spoon until you can’t see any baking paper. Press the mixture down gently with your hands until the entire base feels flat and even.
- Place the pan in the refrigerator to firm up while you make the filling.
- Preheat the oven to 160 C fan /320F
- Make the cheesecake filling
- Place the cream cheese and sugar in the bowl of a stand mixer fitted with the whisk attachment or in a bowl that you can use with handheld beaters. Beat on medium speed until smooth.
- Add the cream, eggs, vanilla and lemon juice and beat again on medium speed until fully incorporated and smooth – about 2 minutes.
- Remove the biscuit base from the fridge.
- Pour the cream cheese mixture into the slice pan and gently guide the filling into the corners with the back of a spoon. Smooth the top.
- Bake in the preheated oven for 25 minutes then turn off the oven but leave the cheesecake inside. Place a wooden spoon in the door to gently speed up the cooling process and leave to cool for 90 minutes (set a timer). This will prevent cheesecake from cracking.
- When the 90 minutes is up remove it from the oven and leave to cool completely on a rack before covering with plastic wrap and placing in the refrigerator overnight.
- To decorate
- Line a large tray with paper towels.
- Count out the raspberries (you will need 60), place them in a sieve and run them under cold water to remove any dirt.
- Give the sieve a good shake to remove any excess water then tip the raspberries out onto the paper towels. Turn each of them over so the hole is facing down then gently pat dry with more paper towels and set aside.
- Remove the cheesecake from the fridge and peel off the plastic wrap.
- Grab the longer sides of baking paper and very carefully pull up to release the cheesecake from the pan. Now remove the paper and place the cheesecake on a cutting board.
- Make the white chocolate layer
- Break the chocolate into a small microwave safe bowl and melt in 20 second bursts, stirring each time, until the chocolate is fully melted.
- Working very quickly (as the cold cheesecake will make the chocolate set), tip the melted chocolate over the top of the cheesecake and spread it with the back of a spoon. It doesn’t have to be perfect as it will get covered with raspberries in the next step. See photo in post (above).
- Add the raspberries
- Place a row of 6 raspberries along one of the short edges. This row will act as a guide for each row so they stay straight. Leave a small gap then start your next row. Repeat until you have covered the entire top of the cheesecake slice. You should have 10 rows of 6 raspberries in total.
- Store
- Line a container with baking paper making sure to extend the edges – they will act as ‘handles’ when you want to remove the cheesecake slice.
- Use a spatula to lift the corner of cheesecake slice up off the cutting board. Slide your hand underneath, then carefully place it in the container. Add the lid then refrigerate up to 24 hours.
- Serve
- Take off the lid, grab hold of the baking paper on either side and lift it out. Slide your hand between the slice and baking paper then transfer it to a cake stand or platter for displaying at your afternoon tea.
- Using a sharp knife, cut into little fingers (3 raspberries on top – 20 serves), squares (4 raspberries on top – 15 serves) or slices (6 raspberries on top – 10 serves) – the choice is yours Serving tip: For clean slices, use a hot knife wiped between cuts.