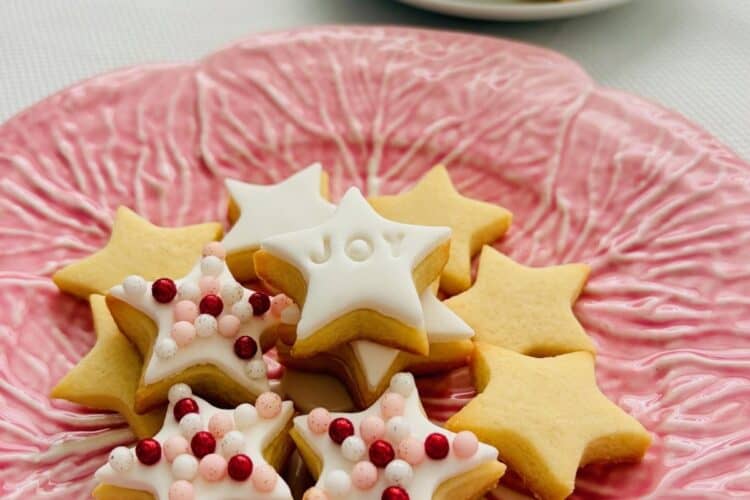
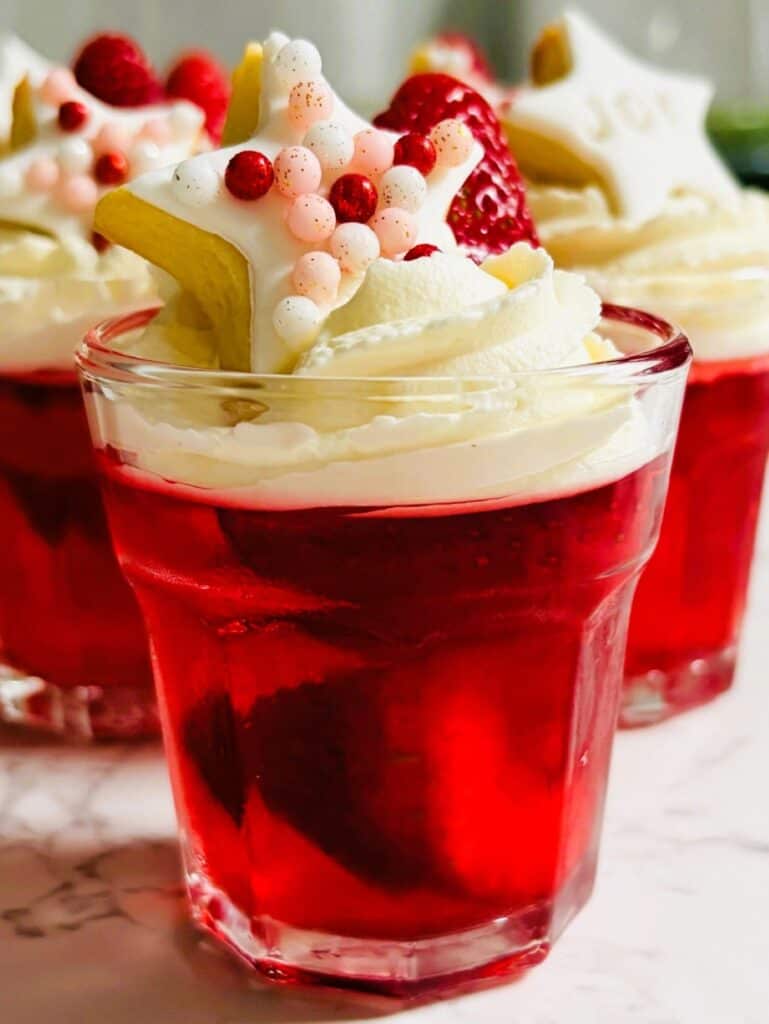
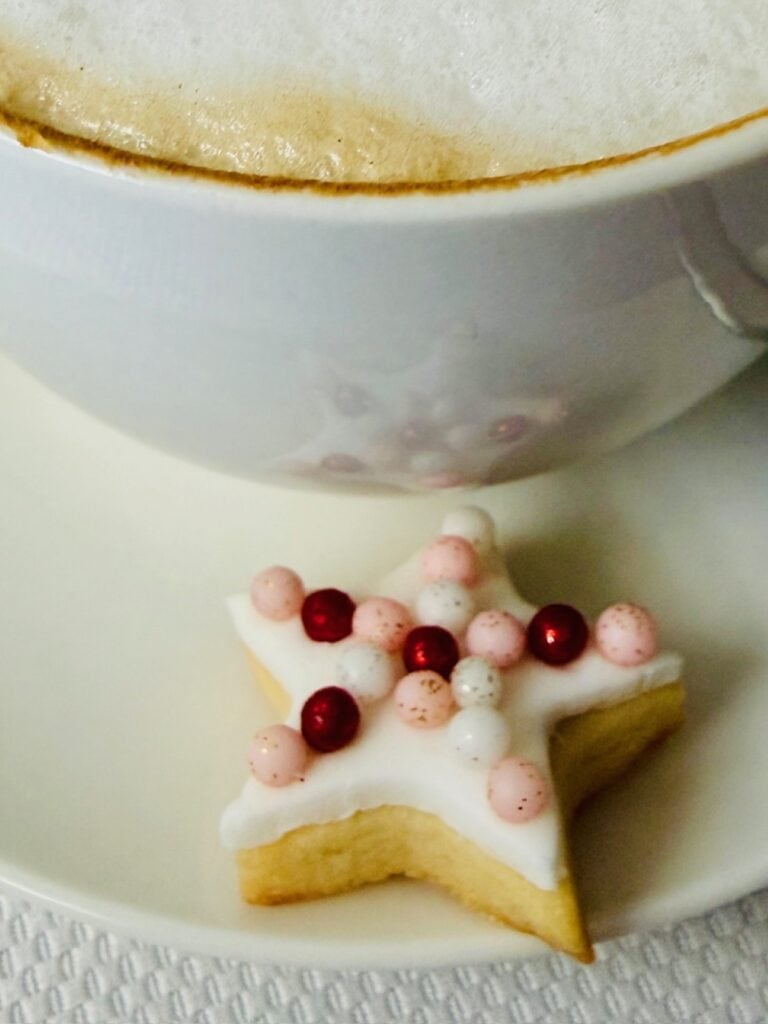
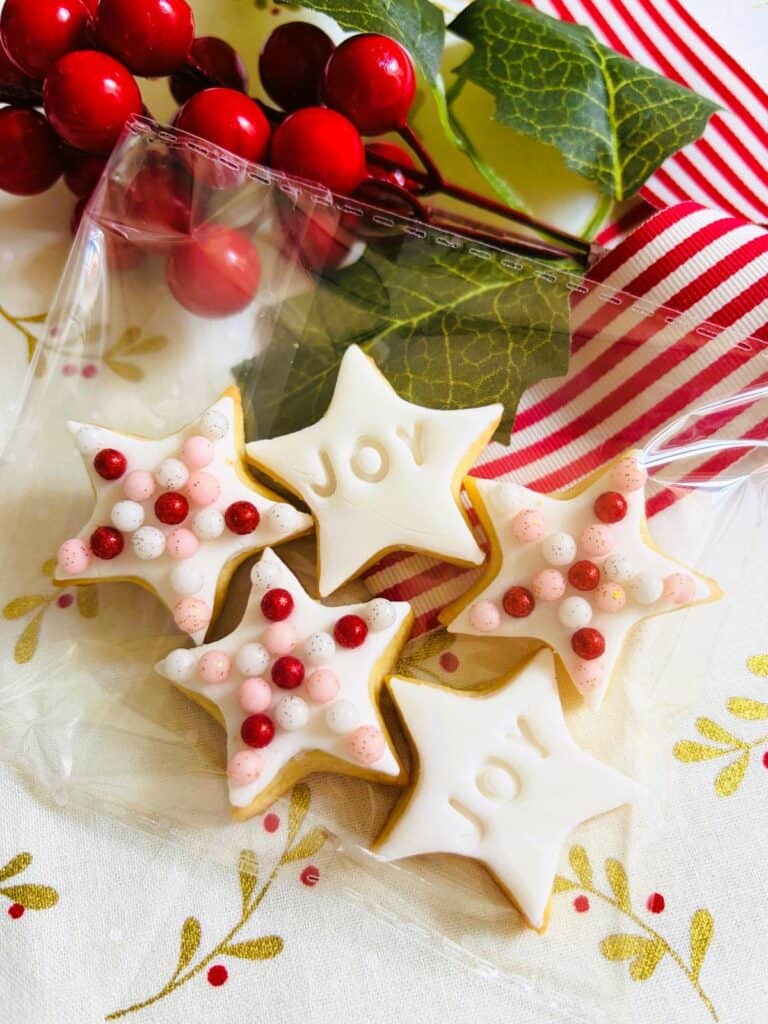
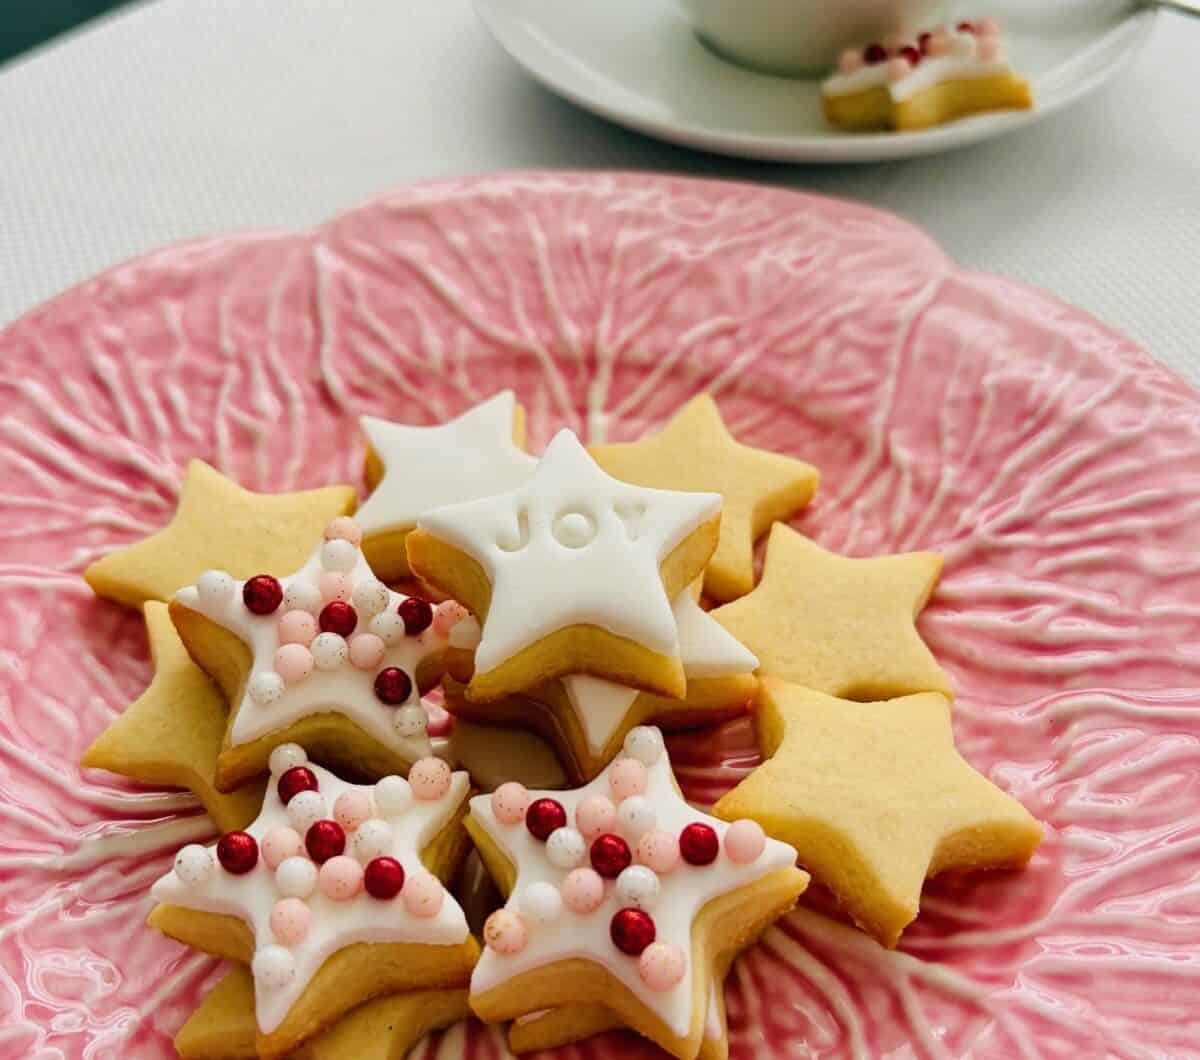
Versatile, buttery Little Star Cookies—perfect for garnishing your Little Strawberry Jelly Cups, serving with tea or coffee, or wrapping up as a sweet homemade gift. These tiny treats are delicious, reliable, and wonderfully adaptable.
Your Go-To Cookie Recipe
If you’re anything like me, you probably have a collection of cookie cutters tucked away in a drawer or stashed in the back of a cupboard. Why not bring them out and actually use them?
My recipe for Little Star Cookies is the perfect place to start—especially if you haven’t baked cookies in a while or just love a buttery cookie!
A small amount of beaten egg, combined with chilling the dough before rolling and again after cutting out your shapes, helps the cookies bake beautifully and hold their crisp outlines. No more cookies coming out of the oven looking like melted little blobs!
Fondant Confidence
These Little Star Cookies are just the right size for adding a layer of fondant—because you only need a small amount, the whole process feels far less fiddly or intimidating. I love the Queen brand fondant that you can purchase at your local supermarket – just make sure you store your leftovers in a zip lock bag inside an airtight container so it doesn’t dry out.
Of course, fondant is completely optional. These cookies are equally lovely with a simple dusting of caster/superfine sugar. If you go this route, sprinkle the sugar on as soon as the cookies come out of the oven for the best results.
Freezer-Friendly Dough
This recipe makes the smallest batch of sugar cookie dough you can make, but it still yields quite a lot of cookies. Thankfully, the dough freezes beautifully for up to six weeks, so you can whip up fresh cookies whenever you need them. Just defrost the dough on the bench for a couple of hours before rolling.
If you want an even bigger batch, simply double the recipe—just use a whole egg (beaten) rather than measuring out 1.5 tablespoons of beaten egg.
Flavour Options
These cookies work well with a variety of flavours. Swap the vanilla for a teaspoon of orange or lemon zest to create a bright, citrusy variation or add a teaspoon of cinnamon for a warming, wintery cookie.
Sprinkles, Stamp – or Both
Decorate these little cookies with your choice of sprinkles. I recommend a small bottle of sugar glue for this. Try this one from Bake Boss.
If you love adding a message, then the Wiltshire stamp set is an easy to use and inexpensive choice.
Why You’ll Love These Little Star Cookies
- They hold their shape perfectly thanks to the egg and chill time—ideal for decorative cookie cutters. Of course if you use a larger cutter than my little stars then do a small test batch of four cookies to determine how much extra baking time you’ll need.
- Small and versatile: garnish desserts like my Little Raspberry Jelly Cups, serve as a sweet accompaniment to tea or coffee, or package them up as gifts.
- Beginner-friendly: a great recipe for everyone! It’s fantastic for making cookies with children, or anyone wanting a reliable, no-stress cookie.
- Customisable: decorate with fondant, stamp a message, dust with sugar, or switch up the flavourings.
- Freezer-friendly dough means fresh cookies are always within reach.
Good to Know
- Chilling is essential: Don’t skip either chill—before rolling and after cutting. It makes all the difference in shape and texture.
- Fondant sticks best when brushed lightly with my sugar syrup before applying. Make ahead then store covered in the fridge.
- Roll evenly: Aim for a consistent dough thickness to ensure even baking.
- Watch the bake time: These small cookies can over-brown quickly—remove them as soon as the edges turn lightly golden.
- Storage: Once baked, they keep well in an airtight container for up to two weeks.
How to make the Little Star Cookies

Place the softened butter, sugar and vanilla extract in the bowl of a stand mixer fitted with the paddle attachment and mix on the lowest speed until the mixture reaches the creamy stage.
Add 1.5 tablespoons of the beaten egg and mix until well combined.
Add the flour then mix again on the lowest speed until the dough comes together then turn off the mixer.
Chill the dough
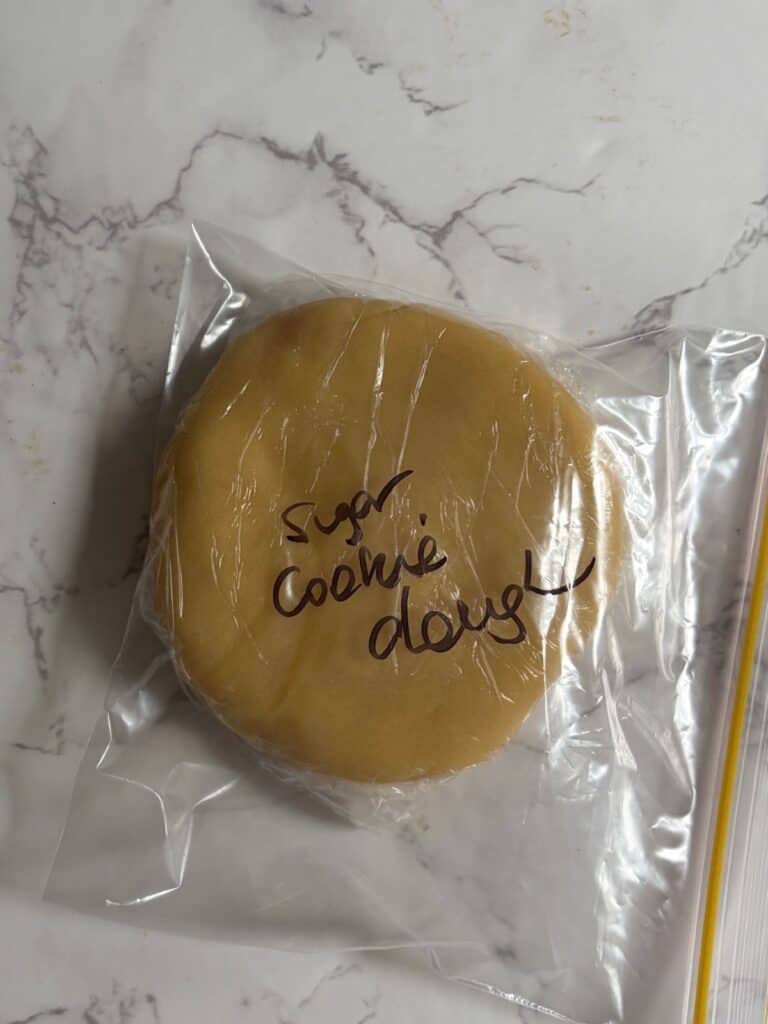
Wrap the dough in plastic wrap then pat it into a flat disc shape and place it in the fridge to rest for 1 hour.
Make the sugar syrup (it will help stick the fondant on the cookies)
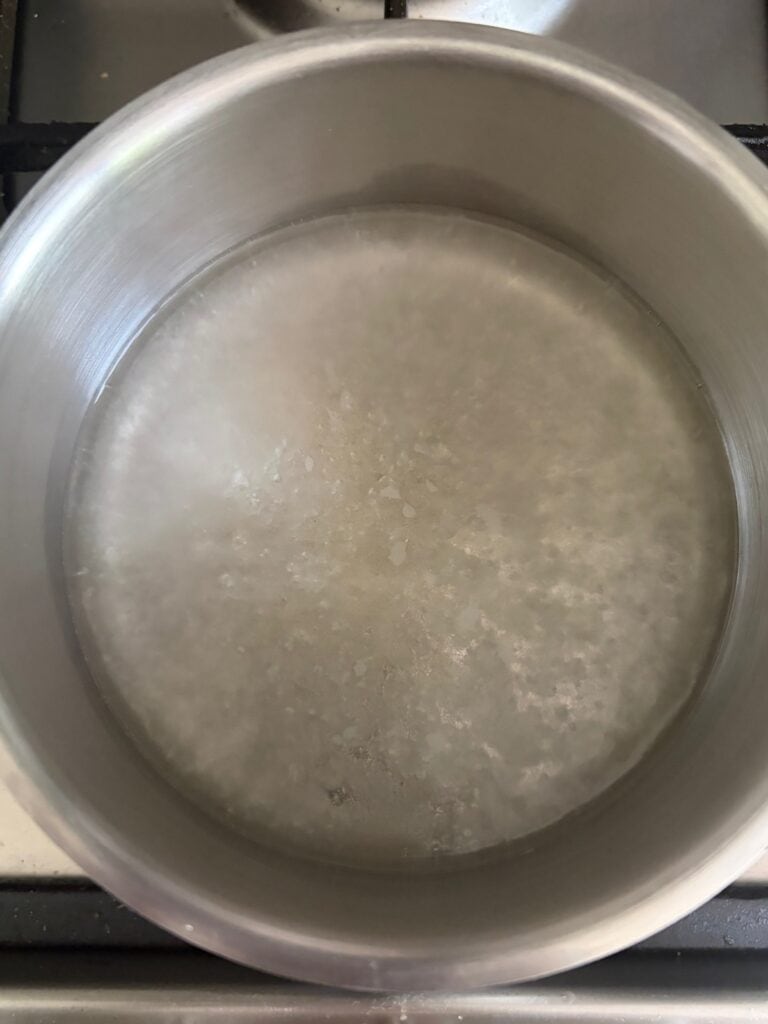
While the dough is resting make the sugar syrup for the cookies if you plan to add fondant. Put the caster sugar and water together in a small saucepan. Bring to the boil then immediately remove from the heat. Stir then decant into a small heatproof bowl. Leave to cool then cover and refrigerate until required. Sugar syrup will keep for up to a week.
Roll out the dough
Remove the rested dough from fridge. Line a baking or cookie sheet with baking paper and set aside.
Dust the dough, a clean bench or board, as well as your rolling pin with a little extra plain flour and roll the dough out to a 50mm thickness. Bend down and check that the dough is as even as possible.
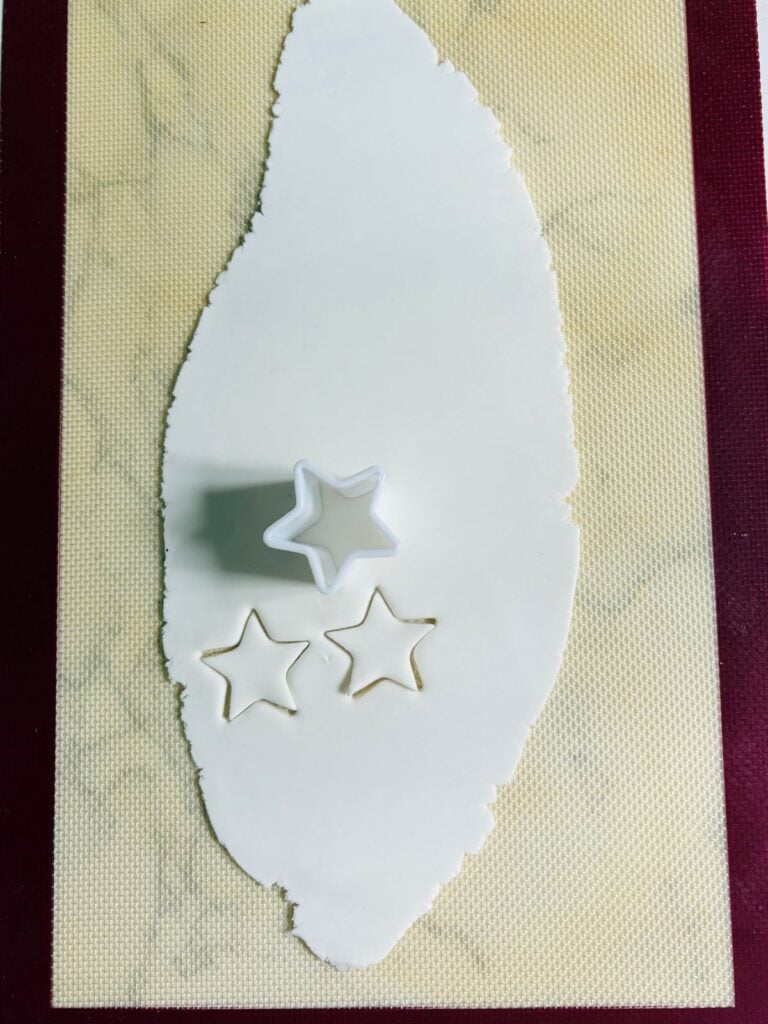
Cut out stars
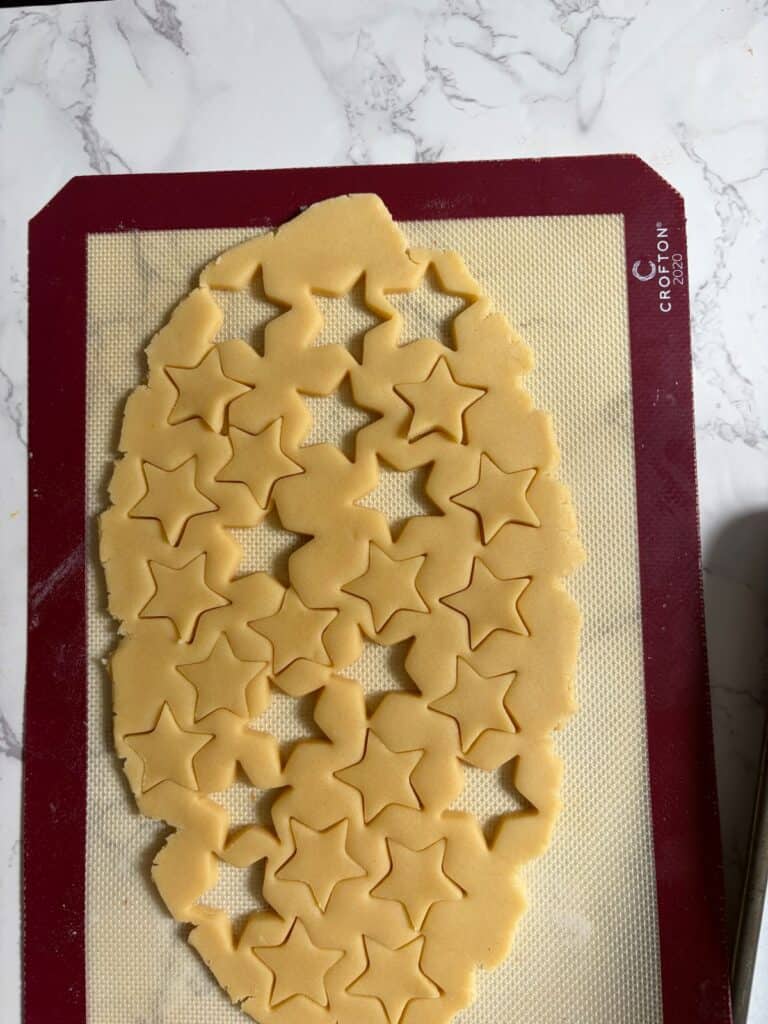
Cut out the star cookies then transfer them to your baking / cookie sheet with a small angled spatula leaving 2cm between each one.
Gather up the dough scraps and gently bring them together before rolling out again and cutting more stars. You can make as many stars as you like then freeze the leftover dough for up to 6 weeks.
Refrigerate the cookies
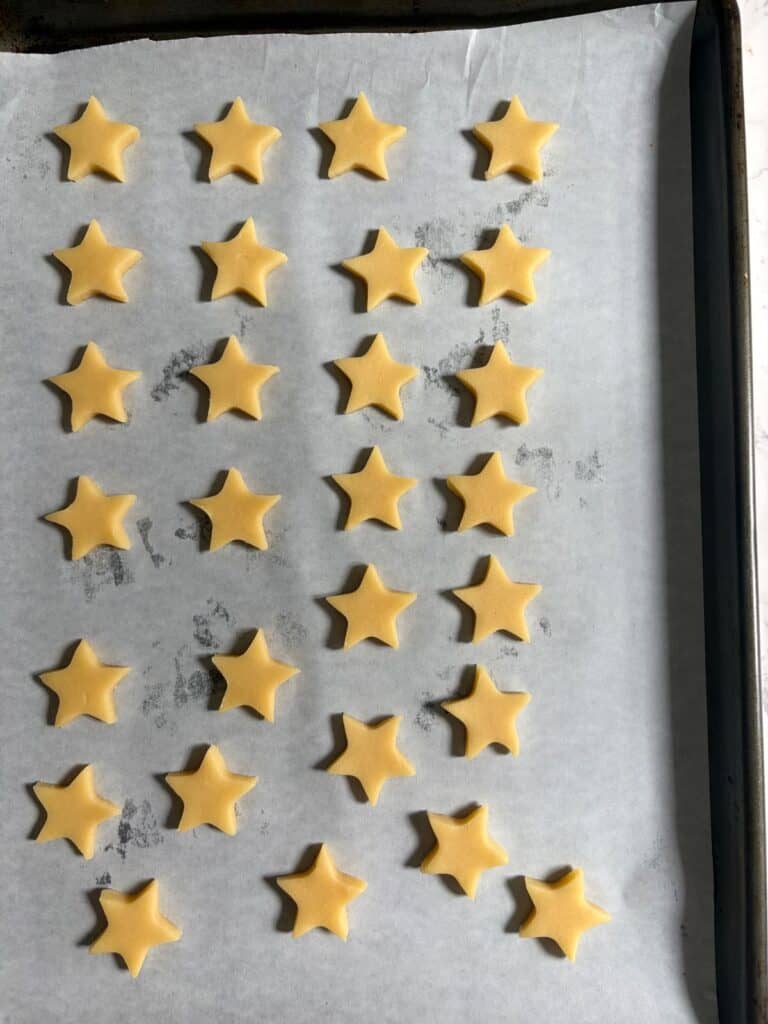
Return the tray of cookies to the fridge for another 30 minutes.
Preheat your oven to 170 C fan / 338 F fan.
Bake
Bake the cookies in the oven for 7 minutes or until the star cookies are just starting to brown on the tips.
Remove from the oven then transfer to a wire rack to cool.
Storage tips for gift giving
You can store the un-iced cookies in an airtight container lined with baking paper for up to 2 weeks. If you plan to cover them in fondant and give them as gifts then I suggest making them on one day then covering them in fondant the next day. This will ensure your cookies stay as fresh as possible and give your gifts 12 days shelf-life.
Add the fondant to the Little Star Cookies
Roll out the fondant to 3mm thick on a silicone mat or bench then cut out enough star shapes for the number of cookies you’ve baked
TIP: Cover the fondant stars with a piece of baking paper so they don’t dry out.
Brush with sugar syrup
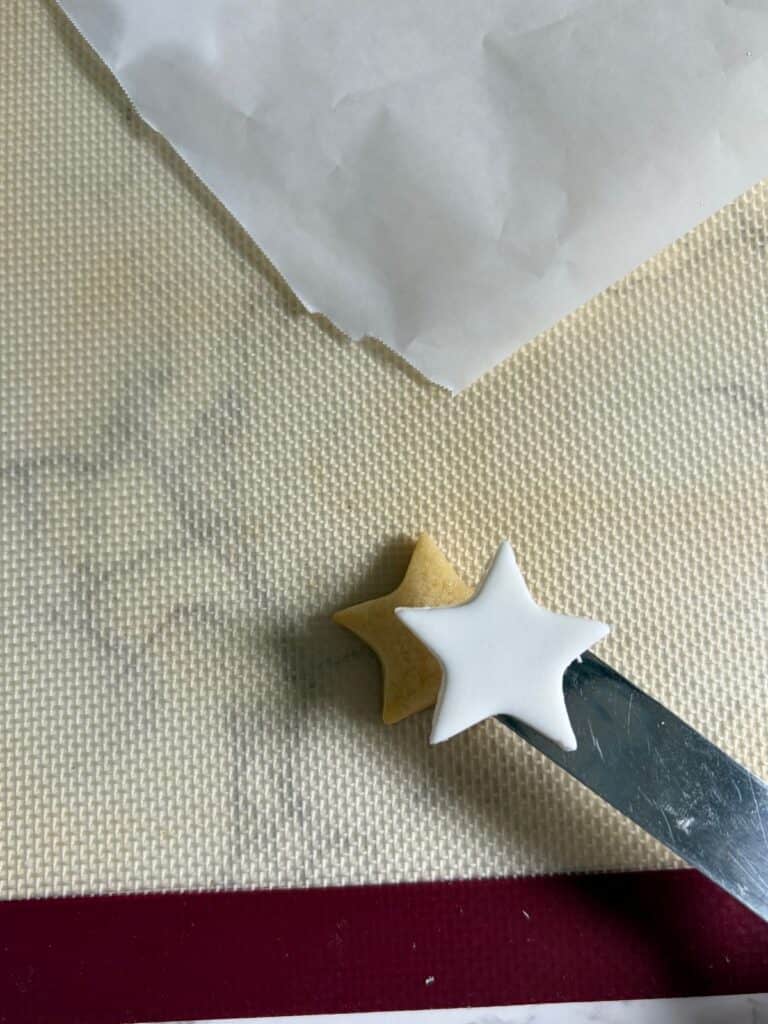
Important: Work with one cookie at a time.
Take a pastry brush and a star cookie with a small amount of the sugar syrup making sure you cover the star’s tips. Don’t use too much or else you will make the cookie soggy and it will lose its crisp edges.
Using your angled spatula carefully lift a fondant star onto the cookie – try to line up the points as best you can. Repeat the process with remaining cookies and fondant.
Add the sprinkles or stamp each cookie
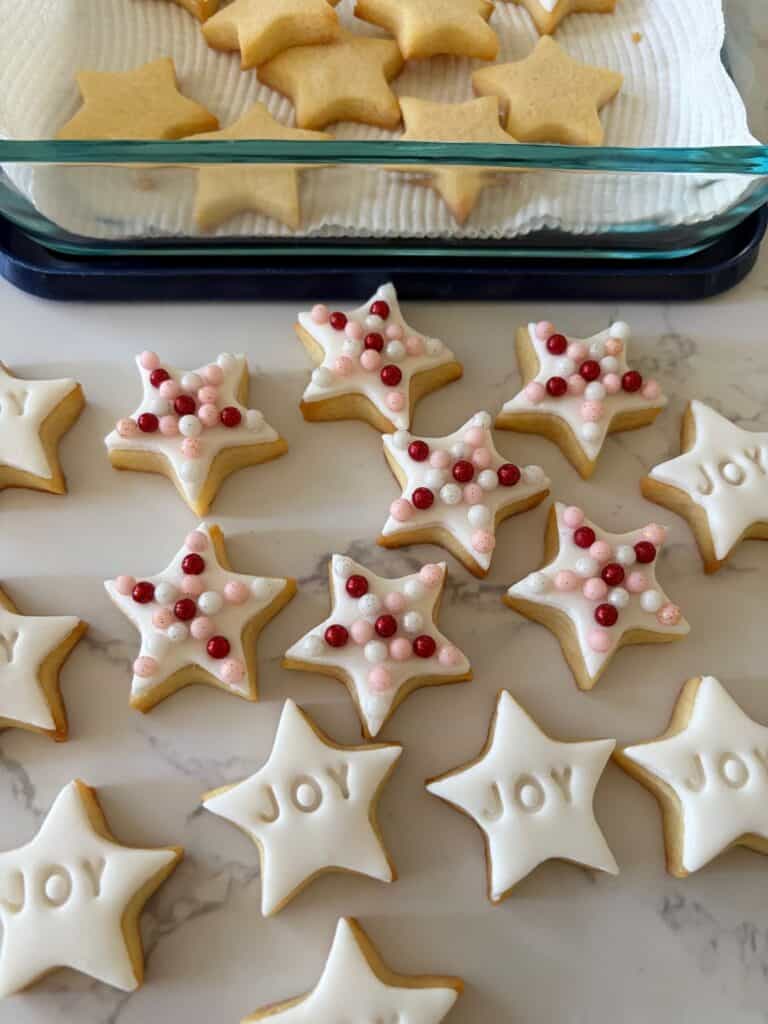
TIP: If you are stamping some or all of the cookies then do this first while the fondant is still soft.
Line up the letters in the centre of the star ensuring the point of the star is in the 12 o’clock position.
Gently press then release. Repeat with some or all of the remaining cookies.
Add the sprinkles
Squeeze a small amount of sugar glue into a dish or saucer.
Using a small clean paintbrush add a thin amount over the fondant making sure you take it all the way to the edges.
Add the sprinkles then leave to dry for 30 minutes before storing in an airtight container lined with baking paper.
To store
You can store the cookies (either iced or un-iced) for up to 2 weeks. See timeframe above for gift-giving.
Little Star Cookies
24
cookies (or more)10
minutes7
minutes60
minutes30
minutesEquipment
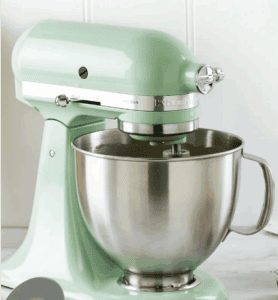 Stand mixer with paddle attachment
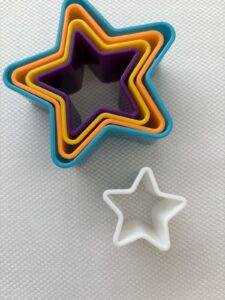 Small star cutter 4cm across
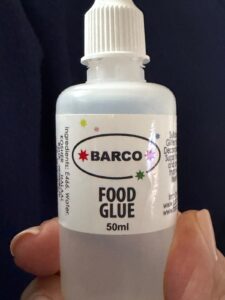 Food glue (for attaching sprinkles NOT fondant)
Other equipment
Angled spatula
Digital scales
Small saucepan
Small clean paintbrush
Small dish
Stamp set (optional)
Wire rack
Measuring spoons
Pastry brush
Rolling pin
Baking tray
Baking paper
Keep the screen of your device on
Ingredients
- Cookie dough
100 g 3 1/2 oz unsalted butter, softened
100 g 3 1/2 oz caster/superfine sugar
1 1 egg, beaten
200 g 7 oz plain/all purpose flour
1/2 teaspoon 1/2 tsp vanilla extract
- Sugar Syrup (if using fondant)
100 g 3 1/2 oz caster sugar
100 g 3 1/2 oz water
- Decoration
150 grams 5 1/3 ready to roll fondant
sprinkles of your choice
sugar glue (store bought)
stamp set (optional)
Directions
- Make the cookies
- Place the softened butter, sugar and vanilla extract in the bowl of a stand mixer fitted with the paddle attachment and mix on the lowest speed until the mixture reaches the creamy stage.
- Add 1.5 tablespoons of the beaten egg and mix until well combined.
- Add the flour then mix again on the lowest speed until the dough comes together then turn off the mixer.
- Chill the dough
- Wrap the dough in plastic wrap then pat it into a flat disc shape and place it in the fridge to rest for 1 hour.
- Make the sugar syrup (it will help stick the fondant on the cookies)
- While the dough is resting make the sugar syrup for the cookies if you plan to add fondant. Put the caster sugar and water together in a small saucepan. Bring to the boil then immediately remove from the heat. Stir then decant into a small heatproof bowl. Leave to cool then cover and refrigerate until required. Sugar syrup will keep for up to a week.
- Roll out the dough
- Remove the rested dough from fridge.
- Line a baking or cookie sheet with baking paper and set aside.
- Dust the dough, a clean bench or board, as well as your rolling pin with a little extra plain flour and roll the dough out to a 50mm thickness. Bend down and check that the dough is as even as possible.
- Cut out stars
- Cut out star cookies using a 4cm wide star cutter, then transfer them to your baking / cookie sheet with a small angled spatula leaving 2cm between each one.
- Gather up the dough scraps and gently bring them together before rolling out again and cutting more stars. You can make as many stars as you like then freeze the leftover dough for up to 6 weeks.
- Refrigerate
- Return the tray of cookies to the fridge for another 30 minutes.
- Preheat your oven to 170 C fan / 338 F fan.
- Bake
- Bake the cookies in the oven for 7 minutes or until the star cookies are just starting to brown on the tips.
- Remove from the oven then transfer to a wire rack to cool.
- Storage tips for gift giving
- You can store the un-iced cookies in an airtight container lined with baking paper for up to 2 weeks. If you plan to cover them in fondant and give them as gifts then I suggest making them on one day then covering them in fondant the next day. This will ensure your cookies stay as fresh as possible and give your gifts 12 days shelf-life.
- Add the fondant to the Little Star Cookies
- Roll out the fondant to 3mm thick on a silicone mat or bench then cut out enough star shapes for the number of cookies you’ve baked
- Cover the fondant stars with a piece of baking paper so they don’t dry out.
- Brush with sugar syrup
- Important: Work with one cookie at a time.
- Take a pastry brush and a star cookie with a small amount of the sugar syrup making sure you cover the star’s tips. Don’t use too much or else you will make the cookie soggy and it will lose its crisp edges.
- Using your angled spatula carefully lift a fondant star onto the cookie – try to line up the points as best you can. Repeat the process with remaining cookies and fondant.
- Add the sprinkles or stamp each cookie
- TIP: If you are stamping some or all of the cookies then do this immediately while the fondant is still soft. Keep half covered while you stamp the other half.
- To stamp: Line up the letters in the centre of the star ensuring the point of the star is in the 12 o’clock position.
- Gently press then release. Repeat with some or all of the remaining cookies.
- Add the sprinkles
- Squeeze a small amount of sugar glue into a dish or saucer.
- Using a small clean paintbrush add a thin amount over the fondant making sure you take it all the way to the edges.
- Add the sprinkles then leave to dry for 30 minutes before storing in an airtight container lined with baking paper.
- To store
- You can store the cookies (either iced or un-iced) for up to 2 weeks. See timeframe above for gift-giving.