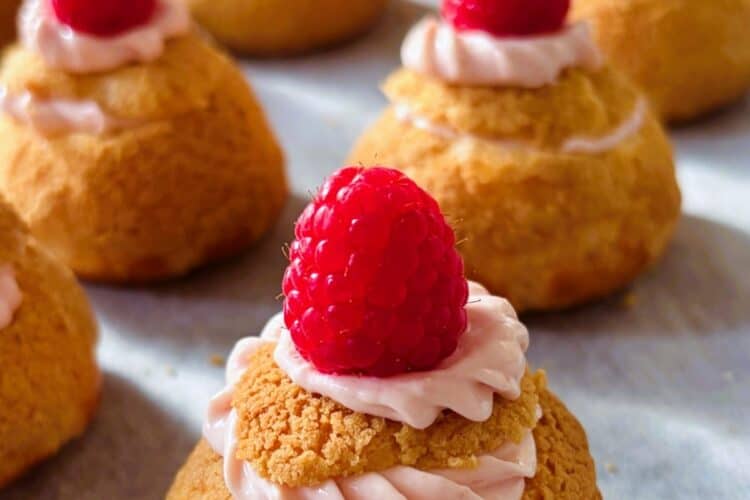
Pretty raspberry choux puffs covered with crunchy craquelin, filled with a creamy raspberry cheesecake filling then finished with a fresh raspberry. If you’ve never made choux before then this is a great recipe to start with! Featuring plenty of components that you can make ahead, I give you all the steps you need to bring everything together when you’re ready to serve – no stress required.

The perfect choux puff for all occasions
If you love fancy afternoon tea and all the beautiful pastries and cakes then you’re not alone. I particularly love choux puffs – light as air filled with so many different fillings, I can never get enough! And the best part is, they’re really easy to make at home too as you can take your time. Here’s what I mean:
Do ahead components
- Make the craquelin topping the day before making the puffs.
- Bake the choux puffs topped with craquelin and freeze.
- Make the raspberry cheesecake filling the day before assembly.
- Defrost the puffs then re-crisp in the oven. Slice off the tops, cool then add the raspberry cheesecake filling before garnishing with the fresh raspberry.
A twist on the traditional filling
This raspberry cheesecake filling is next level delicious, and while not a traditional puff filling, it works so well that we can make an exception (unless you’re French – sorry French friends). Super stable it will hold its shape once piped but not add moisture. The addition of icing sugar and a little mascarpone adds sweetness and lightness while a reduction of fresh raspberries adds the right hit of flavour as well as acidity so the creaminess doesn’t become too rich.
Save your arms with a mixer
A stand mixer is a must for this recipe—it makes the process much easier and saves your arms! No more frantically beating in each egg while you feel like your arms are about to drop off.
You’ll also need a digital scale as accuracy is important -this is a French patisserie recipe after all.
Be sure to read through the recipe first, gather your equipment, and have everything prepped. Choux pastry is surprisingly easy; the key is being well-organized, and it will come together beautifully every time.
As I mentioned, a lot of the components can be done ahead and I highly recommend you do. It will save you a lot of stress.

Good to know: A word on quantities
The raspberry cheesecake filling will fill and top 12 puffs – so it’s perfect for an afternoon tea party. The choux recipe however will make quite a lot of puffs even though it is the smallest quantity (in my opinion) of choux pastry you can make.
I don’t recommend trying to halve the choux paste recipe, instead, make the puffs, freeze them all but only take out 12 of the best when you’re ready to fill and serve. You can always use the leftover puffs for a quick mid-week dessert (or a little treat for yourself). Just follow the instructions for defrosting and re-crisping below, then fill with a little whipped cream and top with some melted chocolate or caramel before serving.
Planning an Afternoon Tea at Home? Here are some handy links to get you started
How to make Raspberry Cheesecake Choux Puffs
Make the craquelin
Mix all the ingredients together in a small bowl until smooth.
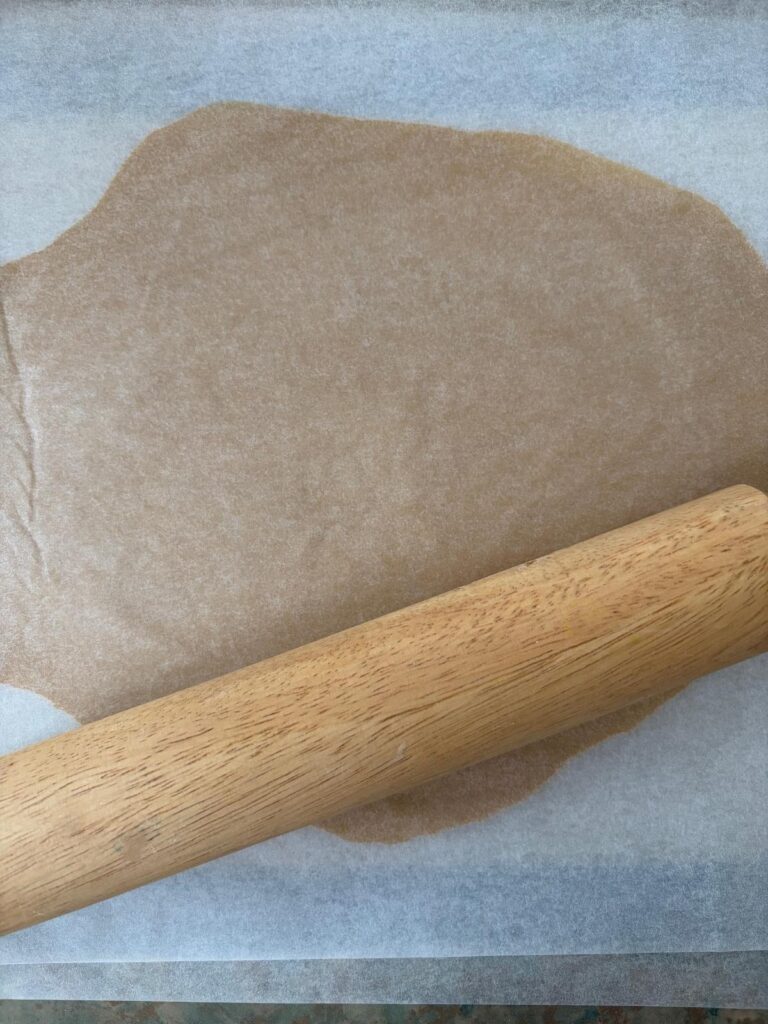
Place a piece of baking paper on your bench, place the mixture in the middle then top with another piece of baking paper the same size.
Using a rolling pin, roll out the mixture as thin as possible (about 3mm / 1/12 in approx.)
Place on a baking sheet or board so it stays flat, and refrigerate until required.
Make the raspberry cheesecake filling
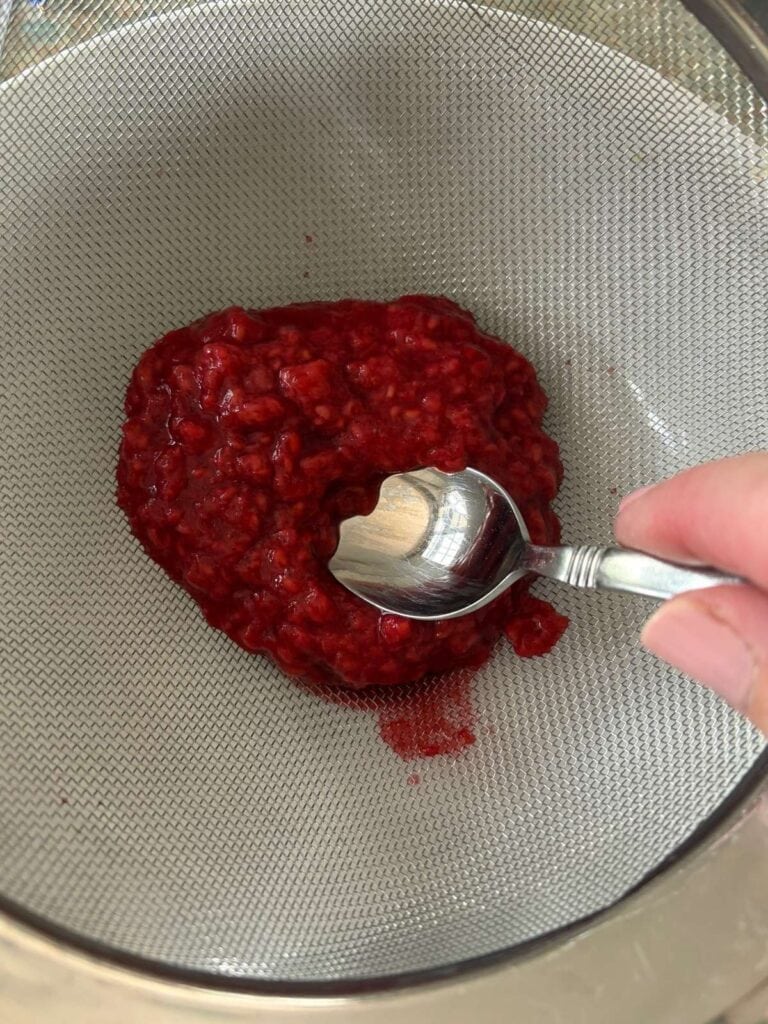
Cook the raspberries: Put the raspberries in a small saucepan together with the water then place on low heat. Break up the raspberries with a fork then cook for 5 minutes until thick and jammy. Remove from the heat then pass the raspberries through a small sieve to remove the seeds, pressing with teaspoon until all you’ve got as much of the raspberry puree as possible. Add the icing sugar, stir well then leave to cool completely.
Whip the cream cheese
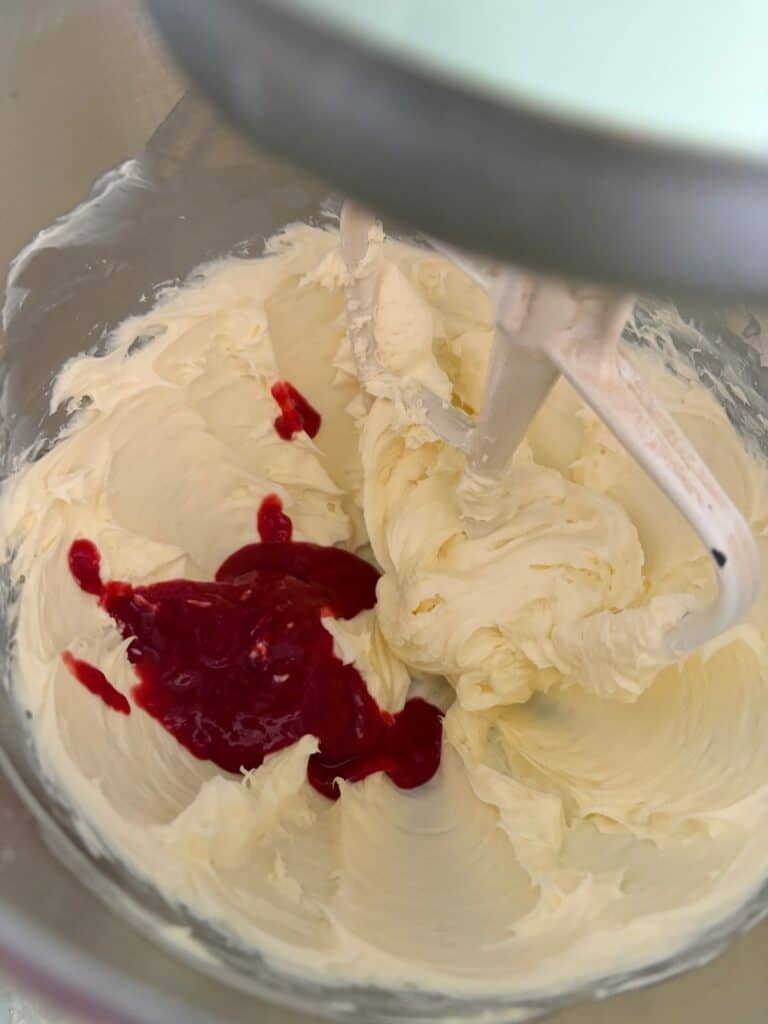
In the bowl of stand mixer fitted with the paddle attachment, add the cream cheese, sifted icing sugar and cream, and whip on medium speed until fluffy. Add the cooled raspberry puree and whip until fully incorporated. Taste and adjust the sweetness (sometimes the fresh raspberries are very tart) by adding an extra teaspoon of icing sugar if necessary. Transfer to a bowl, cover with plastic wrap and refrigerate for at least two hours (or overnight if you prefer).
Make the choux
Cut two large pieces of baking paper to fit two baking trays and set aside.
Fit a stand mixer with a mixing bowl and paddle attachment.
Preheat the oven to 200 C fan / 390F
Make the milk mixture
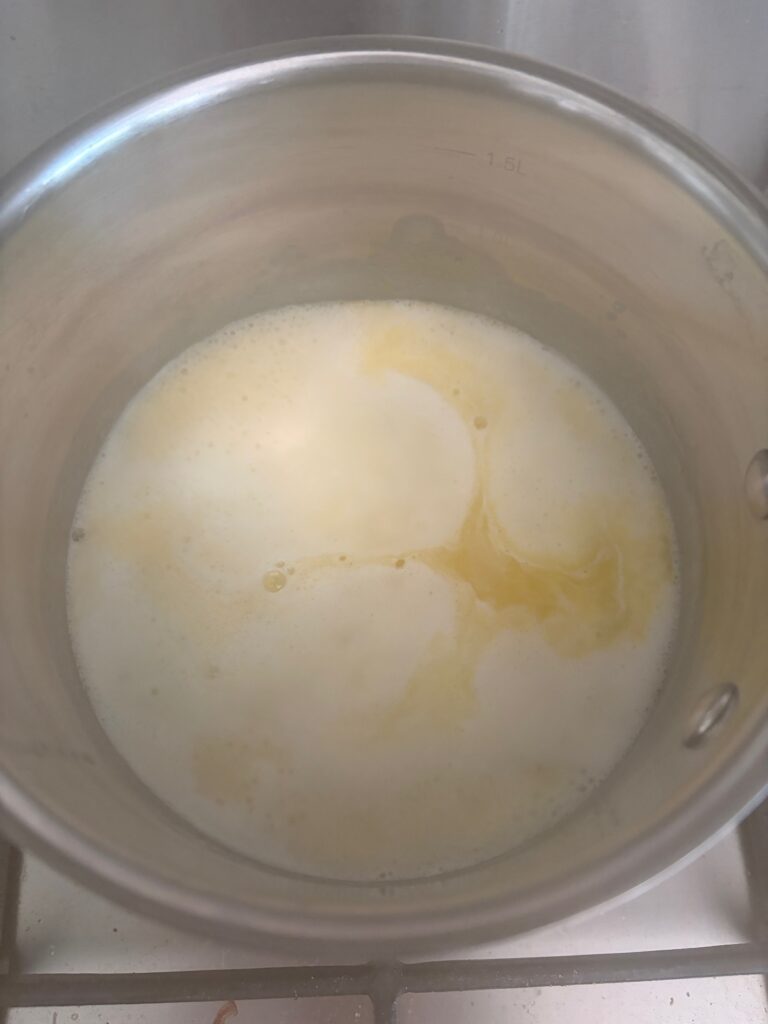
In a medium sized saucepan place the milk, water, butter, sugar and the salt on a medium heat on a hotplate.
Mix to combine with a wooden spoon then bring the mixture to a full boil before removing from the heat. Give the mixture another quick stir, checking that all the butter has melted. If not, keep stirring until it is fully combined. Do not put it back on the heat.
Add the Flour
Important: Make sure you have your wooden spoon ready.
Add the flour to the hot milk mixture in one go, then grab your wooden spoon and mix quickly until all the flour has been absorbed. There will be lumps when you start but keeping mixing and they will eventually disappear.
Place the saucepan back on a medium heat and cook while stirring the mixture for about 1 minute to dry it out. You will get a film on the bottom of your saucepan, this is normal.
The mixture is ready when it becomes a single blob that starts to stick to the bottom of the saucepan and makes a hissing sound.
Transfer to a stand mixer
Remove the saucepan from the heat and tip it into the bowl of a stand mixer fitted with the paddle attachment.
Mix the dough on low speed for 45 seconds to cool it off, then add one egg at a time making sure to wait until each egg is fully incorporated before adding the next. When fully incorporated, stop the machine and scrape down the sides. Mix again on low for another 20 seconds to ensure all the mixture has been incorporated.
Check consistency
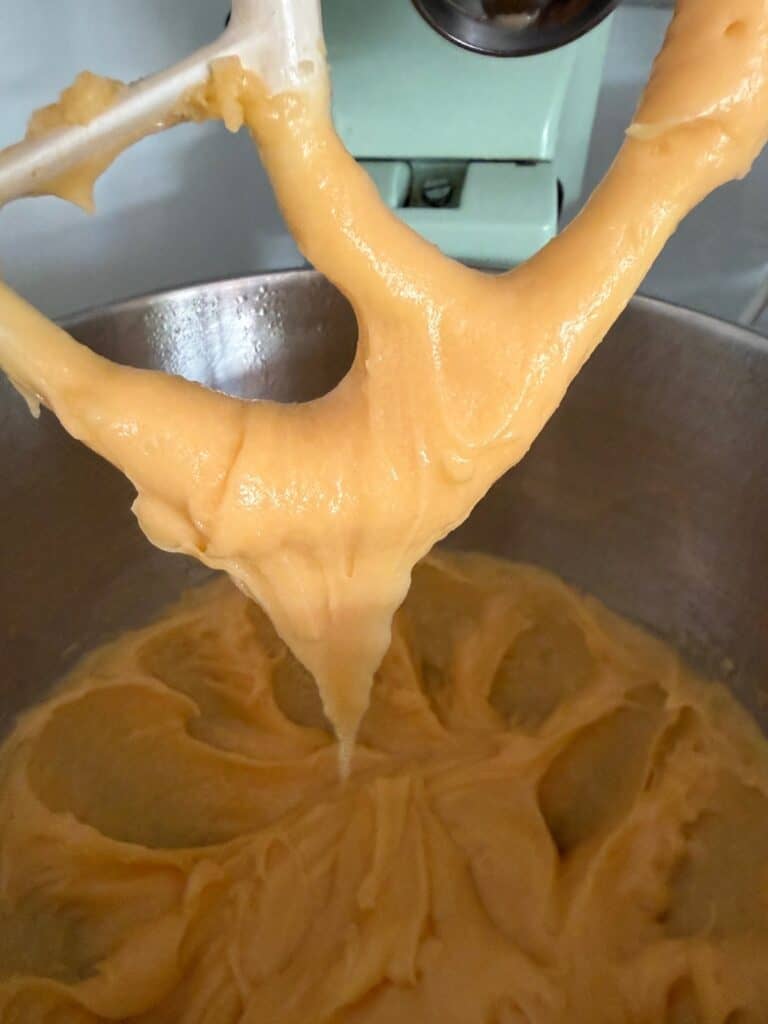
Remove the paddle attachment and pull up to check the dough’s consistency. It should hang from the attachment in a ribbon consistency V shape – not too loose, not too thick. (see photo / video). If you are happy with the choux dough, scrape the paddle beater and remove the bowl from the stand mixer.
If it is not looking as it should, add 1 tsp milk (maximum). Re-attach the paddle and mix on the lowest speed for 30 seconds. Check the consistency again – look for the V. Repeat until you achieve the desired consistency being super careful not to add too much liquid or it will be soupy and unusable. If that happens you can’t add extra flour – it just won’t work. You will unfortunately have to start over and that would be annoying and a waste of lovely ingredients.
Fill the piping bag
TIP: Take your two baking trays and add a little dot of choux mixture in the corners of both trays – this will stop the baking paper from moving around when you pipe.
*You will need a large piping bag fitted with a 10mm plain round tip.
Place the piping bag in a tall glass and turn the top third over to make a cuff.
Using a spatula, fill the piping bag with the choux mixture up to 2/3 full.
Pull up the cuff and remove the bag from the glass.
Pipe the choux
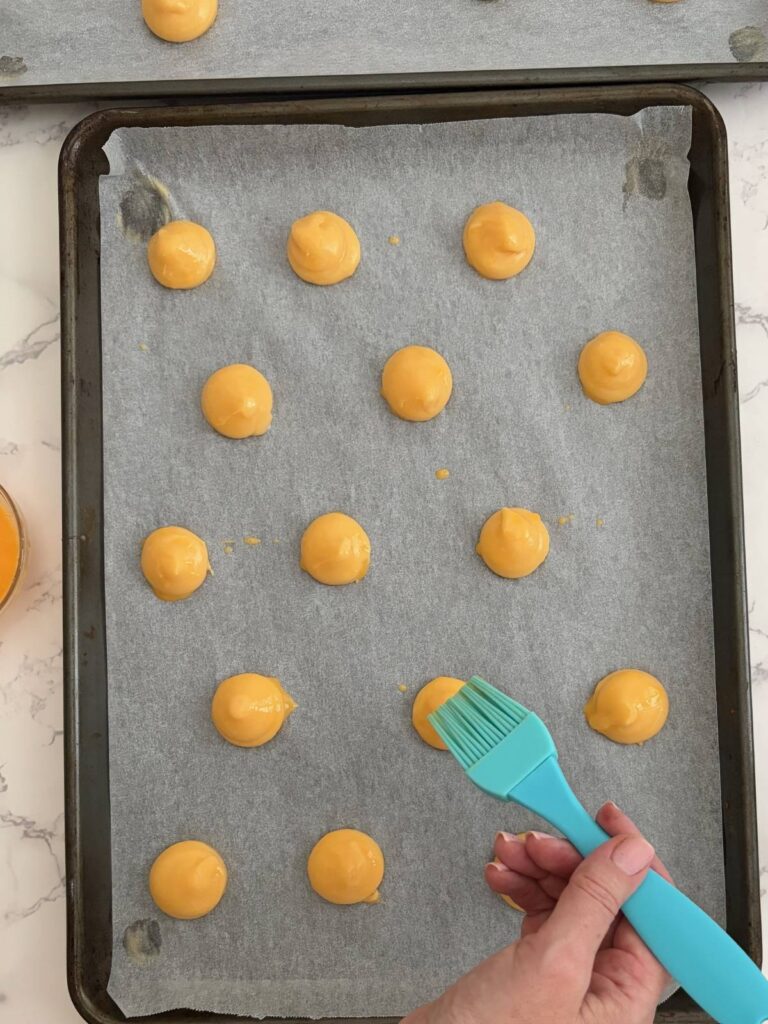
Holding the bag directly above the baking sheet pipe out blobs of choux around 3.5cm-4cm diameter in size with 5cm of space between each one. Repeat with the second baking sheet.
When finished piping, dip your finger in a little water and gently press down to remove any tails then brush each one with the egg wash.
Remove the craquelin dough from the fridge, peel off the baking paper, then place the dough on a board or clean bench and using a round 3.5cm cutter cut discs then place them on top of the choux.
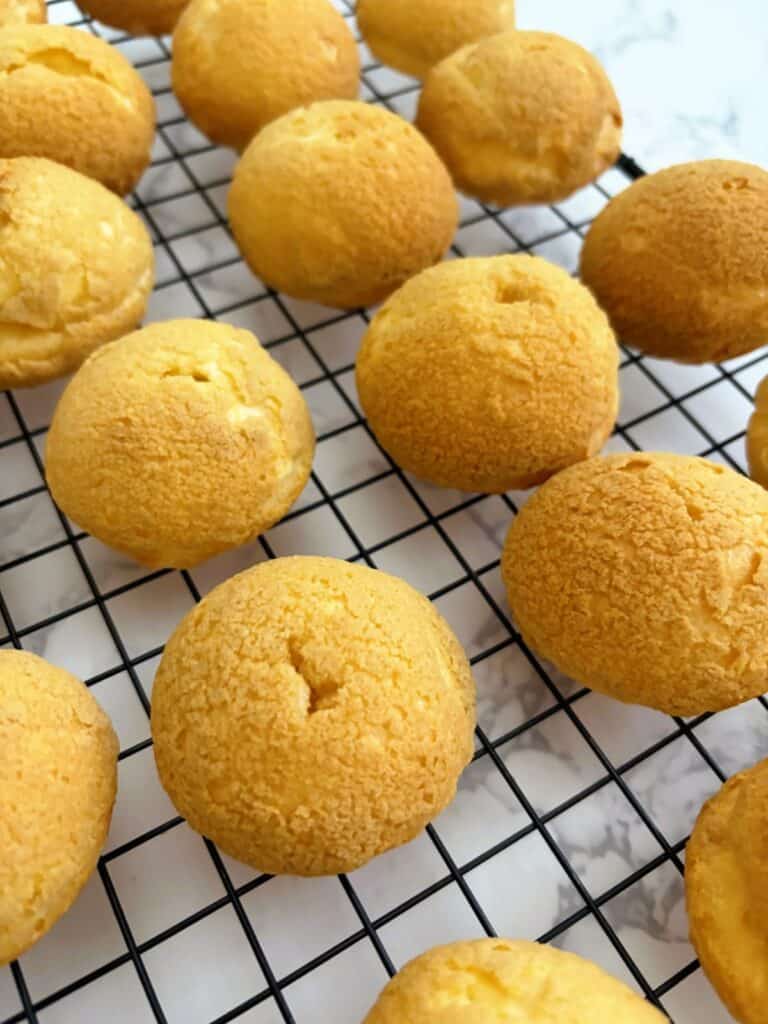
Bake the choux
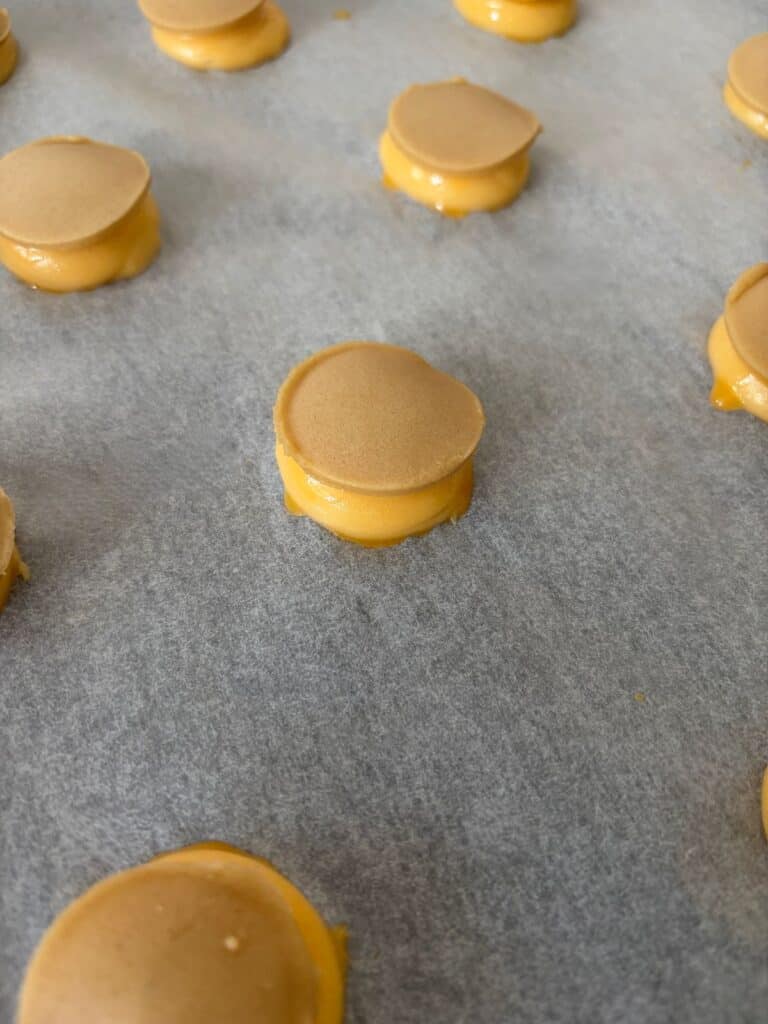
Place both trays in the oven then immediately drop the temperature to 160 C / 320 F and cook for 25 minutes. Don’t open the door to check on them or you may deflate the puffs! Trust the timings.
Remove from the oven, place on a wire rack and place a cut in the top for the steam to escape – don’t worry it will get covered with the raspberry cream cheese later on (I prefer this over a cut in the bottom as the filling can spill out when your guests bite into the puff).
Allow to cool completely. You can freeze at this stage (see below Freezing unfilled puffs).
Assembling the puffs – up to 60 minutes before serving
Place a large tray or plate on your bench.
Select 12 of your best puffs ensuring they’re all a similar size and colour. Freeze the rest (see Good to know: a word on quantities above). Take a small sharp knife and slice off the tops. Put the puffs on the tray or plate and place the tops next to each puff.
Remove the raspberry cheesecake filling from the fridge.
Place a large disposable piping bag fitted with a closed star tip such as an 857 into a tall glass. Turn over the top to make a cuff.
Fill with the raspberry cream cheese, remove from the glass, pull up the end of the bag and twist until a dollop escapes.
Fill the puffs
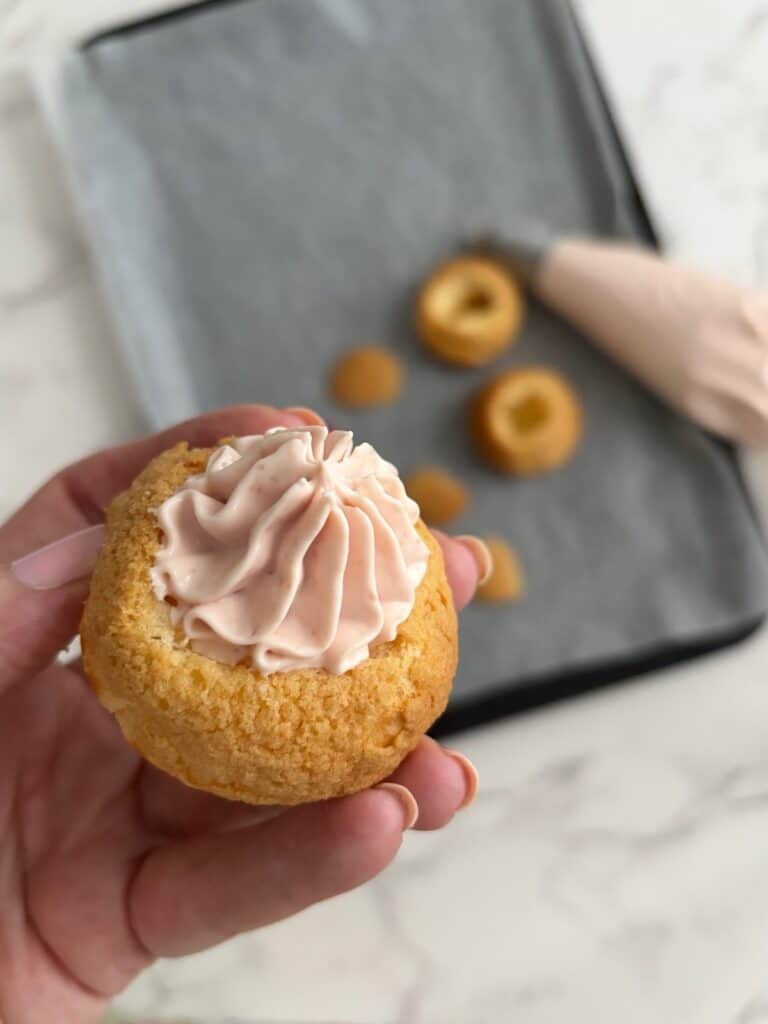
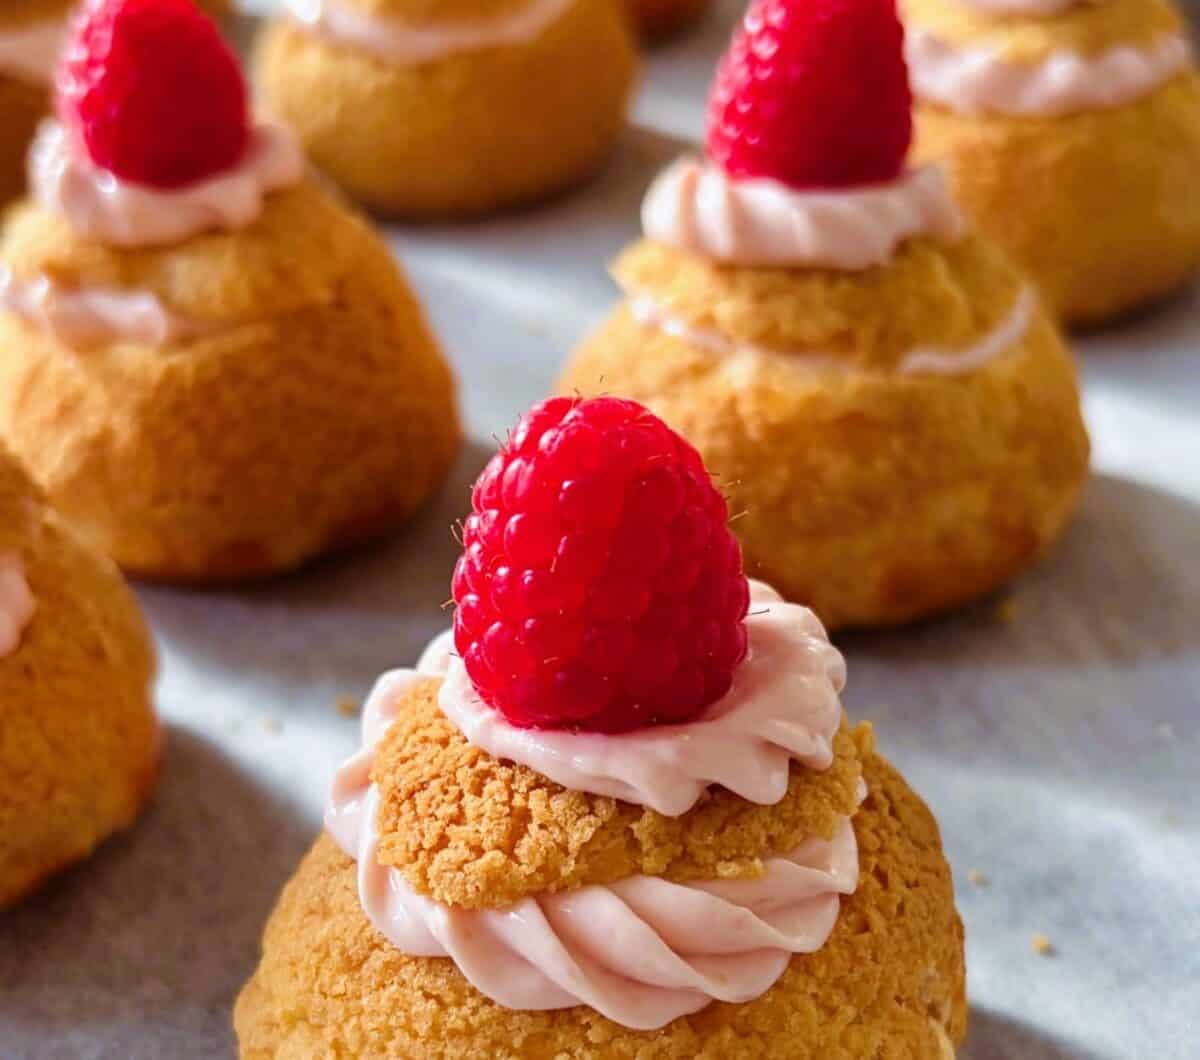
Take a puff, insert the piping tip into the cavity and pipe the filling extending it slightly above the edge of the puff. Add the choux top then twist it slightly to create a swirl effect. Now pipe a small star on top and finish with a raspberry – hole side down.
Repeat with the rest of the puffs.
Place the puffs in a sealed container lined with baking paper, return to the fridge for up to 60 minutes before serving.
To serve
Remove the puffs from the fridge. Place on a decorative plate and/or afternoon tea stand and enjoy.
Freezing unfilled puffs
Place puffs in a single layer in ziplock bag(s) and freeze for up to 6 weeks. To defrost, put the puffs on an unlined baking tray then preheat the oven to 160C / 320F. Bake for 5 minutes. Allow to cool then slice off the tops as detailed above. Check the puffs are completely cold before filling.
Frequently Asked Questions about my Raspberry Cheesecake Choux Puffs
Can I double the raspberry cheesecake filling? Yes! This is a great recipe if you need to cater for a larger crowd. As you’ll have plenty of puffs left over then why not make 24? Just make sure to double the raspberry puree recipe as well. So you’ll need two punnets of raspberries for the puree as well as 24 raspberries for the garnish so make sure you buy enough.
How long do the frozen puffs keep? About 4-6 weeks which means they’re fantastic for making ahead or making in batches for big events.
Raspberry Cheesecake Choux Puffs
12
filled puffs30
minutes25
minutesEquipment
 Digital scales
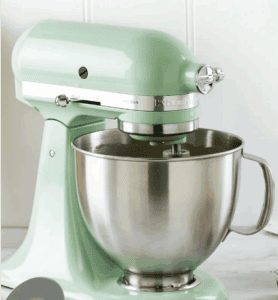 Stand mixer
 Baking tray x 2
Other equipment
Wooden spoon
Large piping bag fitted with a plain round tip measuring 10mm
Large piping bag fitted with a closed or open star tip 1M or 857 work well
Medium saucepans
Baking paper
Rolling pin
Pastry brush
Strainer
Measuring spoons
Cooling rack
Keep the screen of your device on
Ingredients
- Craquelin
40 g 1 2/5 oz plain/all purpose flour
40 g 1 2/5 oz soft brown sugar
35 g 1 1/4 oz unsalted butter, softened
- Raspberry puree
125 grams 4 2/5 oz fresh raspberries (plus 12 extra for garnish)
1 tbsp 1 tbsp water
2 tsp 2 tsp Icing sugar
- Raspberry cheesecake filling
60 ml 2 fl oz thickened or whipping cream
50 g 1 3/4 oz icing sugar, sifted
250 g 8 5/6 oz cream cheese
raspberry puree (recipe above)
- Choux mixture
100 ml 3 3/8 fl oz full fat milk
100 ml 3 3/8 fl oz water
85 g 3 oz butter cut into cubes
1 tsp 1 tsp sugar
1/2 tsp 1/2 tsp salt
115 g 4 oz plain flour
4 4 eggs
Egg wash (1 beaten egg)
- Garnish
12 12 fresh raspberries extra
Directions
- Make the craquelin
- Mix all the ingredients together in a small bowl until smooth.
- Place a piece of baking paper on your bench, place the mixture in the middle then top with another piece of baking paper the same size.
- Using a rolling pin, roll out the mixture as thin as possible (about 3mm / 1/12 in approx.)
- Place on a baking sheet or board so it stays flat, and refrigerate until required.
- Make the raspberry cheesecake filling
- Cook the raspberries: Put the raspberries in a small saucepan together with the water then place on low heat. Break up the raspberries with a fork then cook for 5 minutes until thick and jammy. Remove from the heat then pass the raspberries through a small sieve to remove the seeds, pressing with teaspoon until all you’ve got as much of the raspberry puree as possible. Add the icing sugar, stir well then leave to cool completely.
- Whip the cream cheese
- In the bowl of stand mixer fitted with the paddle attachment, add the cream cheese, sifted icing sugar and cream, and whip on medium speed until fluffy. Add the cooled raspberry puree and whip until fully incorporated. Taste and adjust the sweetness (sometimes the fresh raspberries are very tart) by adding an extra teaspoon of icing sugar if necessary. Transfer to a bowl, cover with plastic wrap and refrigerate for at least two hours (or overnight if you prefer).
- Make the choux
- Cut two large pieces of baking paper to fit two baking trays and set aside.
- Fit a stand mixer with a mixing bowl and paddle attachment.
- Preheat the oven to 200 C fan / 390F
- Make the milk mixture
- In a medium sized saucepan place the milk, water, butter, sugar and the salt on a medium heat on a hotplate.
- Mix to combine with a wooden spoon then bring the mixture to a full boil before removing from the heat. Give the mixture another quick stir, checking that all the butter has melted. If not, keep stirring until it is fully combined. Do not put it back on the heat.
- Add the flour
- Important: Make sure you have your wooden spoon ready.
- Add the flour to the hot milk mixture in one go, then grab your wooden spoon and mix quickly until all the flour has been absorbed. There will be lumps when you start but keeping mixing and they will eventually disappear.
- Place the saucepan back on a medium heat and cook while stirring the mixture for about 1 minute to dry it out. You will get a film on the bottom of your saucepan, this is normal.
- The mixture is ready when it becomes a single blob that starts to stick to the bottom of the saucepan and makes a hissing sound.
- Transfer to a stand mixer
- Remove the saucepan from the heat and tip it into the bowl of a stand mixer fitted with the paddle attachment.
- Mix the dough on low speed for 45 seconds to cool it off, then add one egg at a time making sure to wait until each egg is fully incorporated before adding the next. When fully incorporated, stop the machine and scrape down the sides. Mix again on low for another 20 seconds to ensure all the mixture has been incorporated.
- Check consistency
- Remove the paddle attachment and pull up to check the dough’s consistency. It should hang from the attachment in a ribbon consistency V shape – not too loose, not too thick. (see photo / video). If you are happy with the choux dough, scrape the paddle beater and remove the bowl from the stand mixer.
- If it is not looking as it should, add 1 tsp milk (maximum). Re-attach the paddle and mix on the lowest speed for 30 seconds. Check the consistency again – look for the V. Repeat until you achieve the desired consistency being super careful not to add too much liquid or it will be soupy and unusable. If that happens you can’t add extra flour – it just won’t work. You will unfortunately have to start over and that would be annoying and a waste of lovely ingredients.
- Pipe the choux
- TIP: Take your two baking trays and add a little dot of choux mixture in the corners of both trays – this will stop the baking paper from moving around when you pipe.
- You will need a large piping bag fitted with a 10mm plain round tip.
- Place the piping bag in a tall glass and turn the top third over to make a cuff.
- Using a spatula, fill the piping bag with the choux mixture up to 2/3 full.
- Pull up the cuff and remove the bag from the glass.
- Holding the bag directly above the baking sheet pipe out blobs of choux around 3.5cm-4cm diameter in size with 5cm of space between each one. Repeat with the second baking sheet.
- When finished piping, dip your finger in a little water and gently press down to remove any tails then brush each one with the egg wash.
- Remove the craquelin dough from the fridge, peel off the baking paper, then place the dough on a board or clean bench and using a round 3.5cm cutter cut discs then place them on top of the choux.
- Place both trays in the oven then immediately drop the temperature to 160 C / 320 F and cook for 25 minutes. Don’t open the door to check on them or you may deflate the puffs! Trust the timings.
- Remove from the oven, place on a wire rack and place a cut in the top for the steam to escape – don’t worry it will get covered with the raspberry cream cheese later on (I prefer this over a cut in the bottom as the filling can spill out when your guests bite into the puff).
- Allow to cool completely. You can freeze at this stage (see below Freezing unfilled puffs).
- Assemble the puffs – up to 60 minutes before serving
- Place a large tray or plate on your bench.
- Select 12 of your best puffs ensuring they’re all a similar size and colour. Freeze the rest (see Good to know: a word on quantities above). Take a small sharp knife and slice off the tops. Put the puffs on the tray or plate and place the tops next to each puff.
- Remove the raspberry cheesecake filling from the fridge.
- Place a large disposable piping bag fitted with a closed star tip such as an 857 into a tall glass. Turn over the top to make a cuff.
- Fill with the raspberry cream cheese, remove from the glass, pull up the end of the bag and twist until a dollop escapes.
- Fill the puffs
- Take a puff, insert the piping tip into the cavity and pipe the filling extending it slightly above the edge of the puff. Add the choux top then twist it slightly to create a swirl effect. Now pipe a small star on top and finish with a raspberry – hole side down.
- Repeat with the rest of the puffs.
- Place the puffs in a sealed container lined with baking paper, return to the fridge for up to 60 minutes before serving.
- To serve
- Remove the puffs from the fridge. Place on a decorative plate and/or afternoon tea stand and enjoy.
- Freezing unfilled puffs
- Place puffs in a single layer in ziplock bag(s) and freeze for up to 6 weeks.
- To defrost, put the puffs on an unlined baking tray then preheat the oven to 160C / 320F. Bake for 5 minutes. Allow to cool then slice off the tops as detailed above. Check the puffs are completely cold before filling.