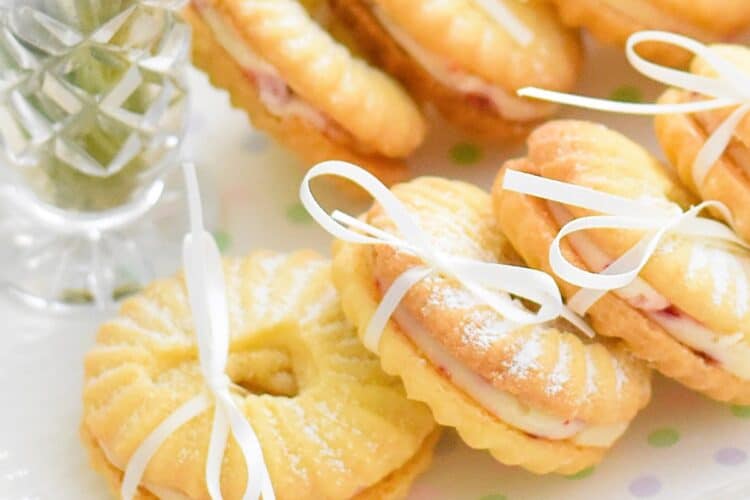
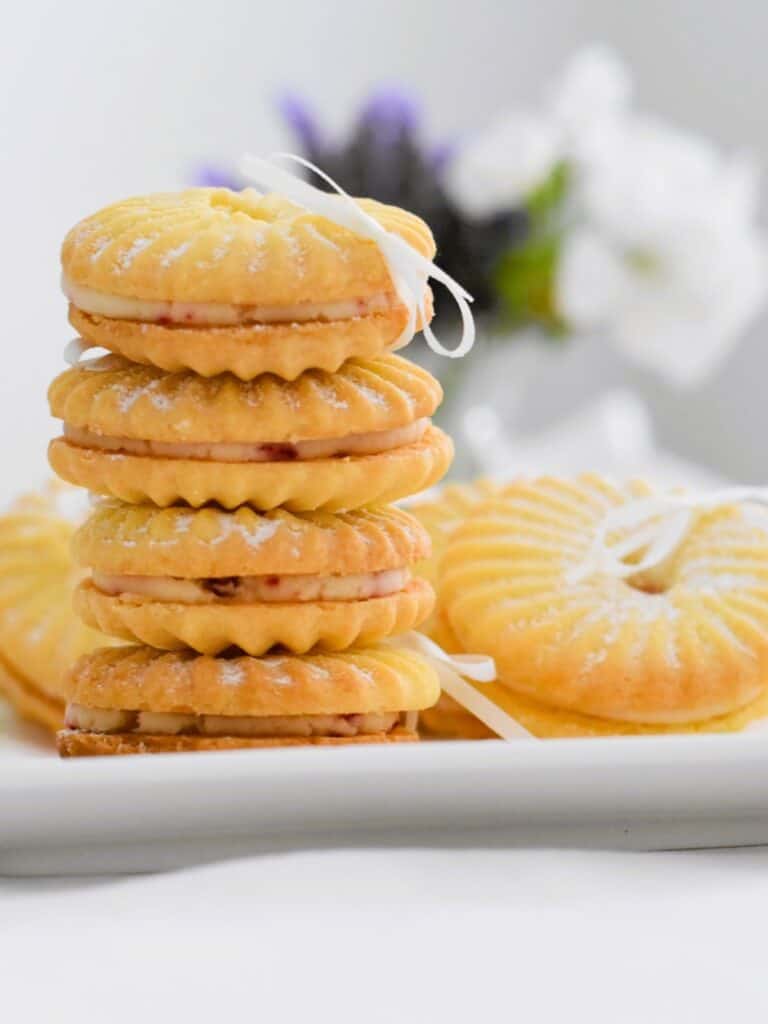
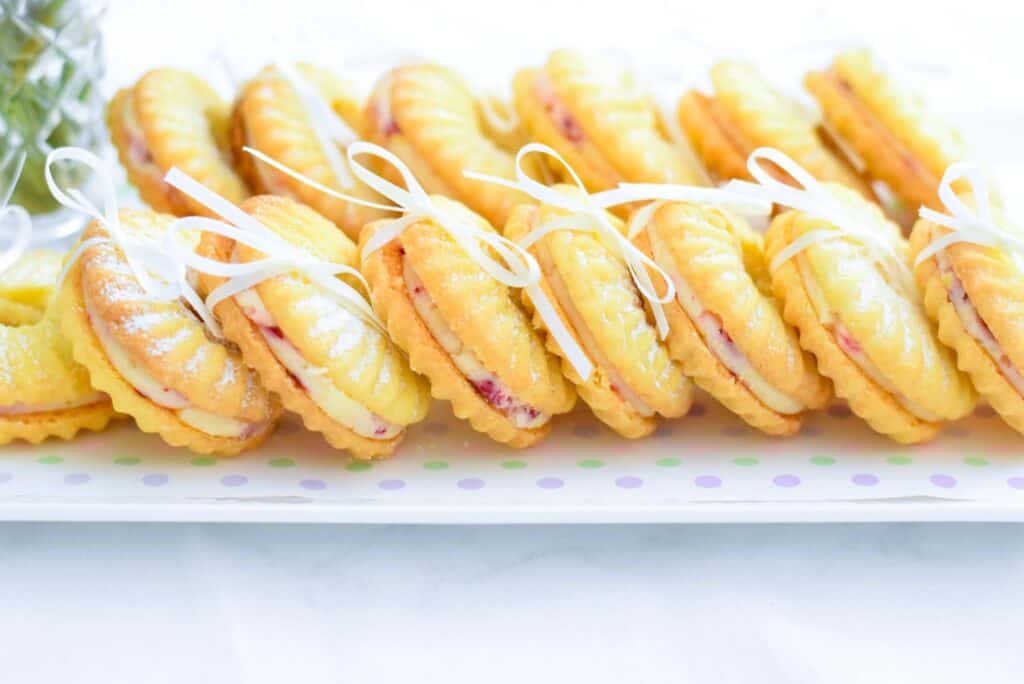
With a soft, buttery, melt-in-your-mouth texture, these elegant Melting Moment Rings are filled with tangy lemon buttercream and sweet freeze-dried raspberries. Finished with a pretty bow, they’re the ultimate cookie for baby showers, weddings, and afternoon tea parties. Watch my short promo video at the end of the recipe for inspiration!
The perfect combination of elegance and flavour
Growing up I was a HUGE biscuit maker (as we call them in Australia). Every weekend I would beg my Mum to buy the ingredients I needed to make whatever recipe had caught my eye that week. Custard creams, Viennese whirls, Meringue Kisses and of course Melting Moments – you name it, I pretty much made them all. The textures, the flavours and of course the presentation, I was completely obsessed with biscuits! Today as I write this recipe for Melting Moment Rings, I don’t think I’ve changed much. If it’s eye-catching, indulgent and delicious…I’m in!
From an Afternoon Tea perspective, creating food that packs a lot of flavour in a visually appealing format is really important. Those dainty treats featured on a tiered stand are one of the reasons why indulging at a 5-star hotel can be so expensive.
However you don’t need to be a pastry chef from The Ritz to make these delights. The cookie part is made with just simple ingredients: unsalted butter, icing sugar, salt, cornflour and flour. And for the buttercream – I’ve included freeze-dried raspberries which really complement the lemon with their sweet, tart flavour.
The piping tip does all the work
The trick to making these look so fancy is the sultane piping tip. That’s right! No cutting, just piping out cookie dough – you can’t get any easier than that. Just make sure your mixture is nice and soft (I’ve included details on how to do this).
These cookies truly live up to their melt-in-the-mouth name too which makes them such a joy to eat, particularly with a cup of tea or coffee close by.
Adding the pretty bow detail before serving not only increases their visual appeal but also makes them completely customisable with your choice of colour: bridal shower, baby shower, garden party, wedding favour, take home gift – these are so adaptable.
Here’s why you’ll love these Melting Moment Rings
Show-stopping presentation – elegant rings with customisable bows.
Delicate, buttery texture – the classic melt-in-your-mouth cookie.
Flavour perfection – zesty lemon & raspberry buttercream.
Surprisingly simple – no cutters needed, just a sultane piping tip.
Perfect for any celebration – from afternoon tea to weddings.
Good to know
- You will need a sultane piping tip measuring 3cm in diameter
- A stand mixer with a paddle attachment
- Digital scales
- Microwave
See the recipe card for additional equipment
Other Afternoon Tea recipes to tray
Preparation


Line two baking sheets with baking paper.
Trace fifteen (15), 5cm /2 inch round circles on each tray with a pencil, leaving a space (two fingers) between each circle. Turn the paper over.
Tip: Press firmly with your pencil so you can see the outline when you flip the paper over.
Take a little bit of butter and stick the baking paper down in each corner. This will stop the paper moving about when you pipe.
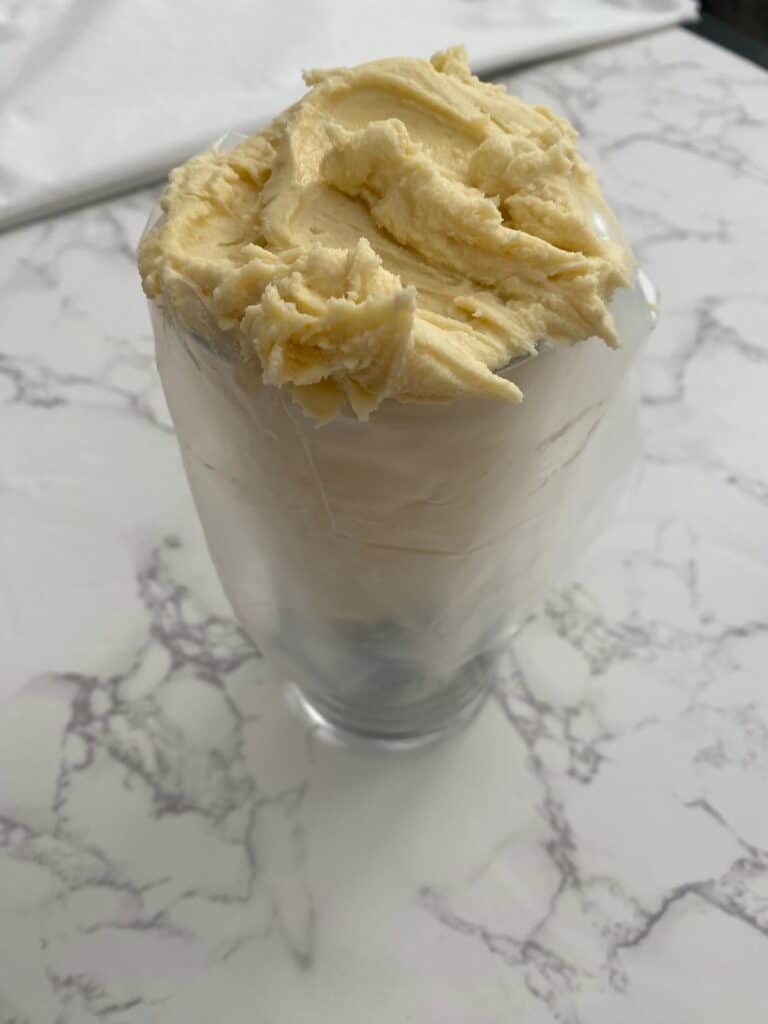
Place a sultane tip measuring 3cm in diameter inside a large disposable piping bag and snip off the end. Make sure the teeth of the tip are fully visible. Sit the bag and tip in a tall glass and turn over the top third to make a cuff.
Mix the cornflour and plain flour together in a medium bowl and set aside.
Make the dough
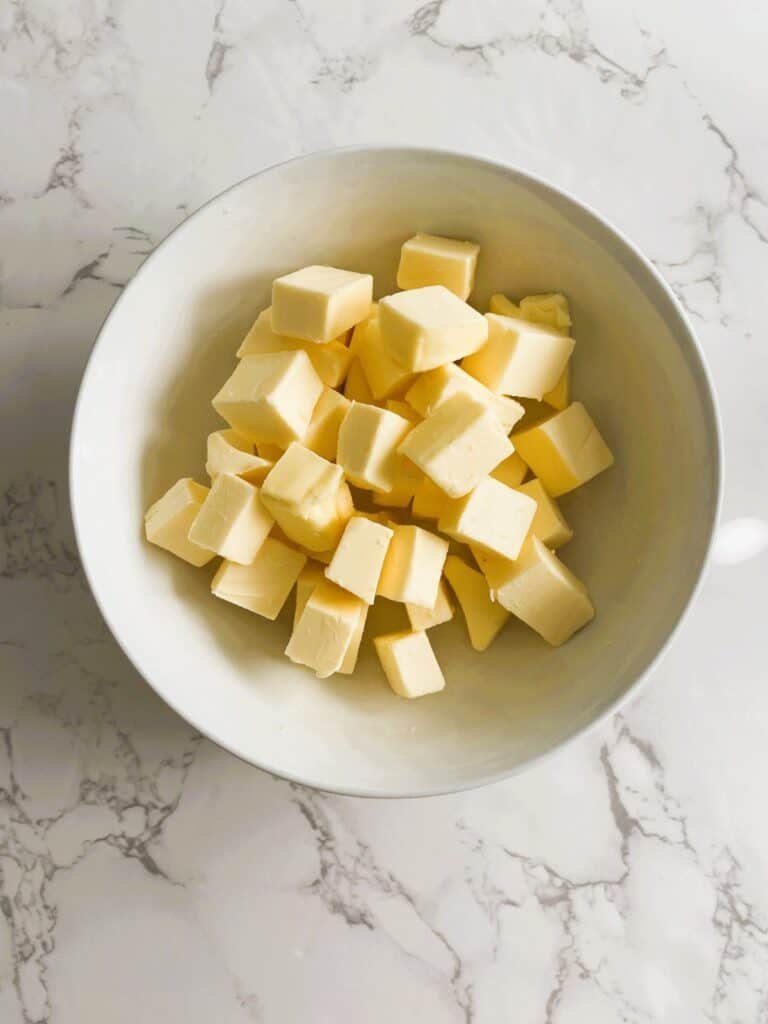
Cut the butter into small cubes then soften it in the microwave. Start with 10 second bursts, stirring between bursts until the butter is very soft but not melted.
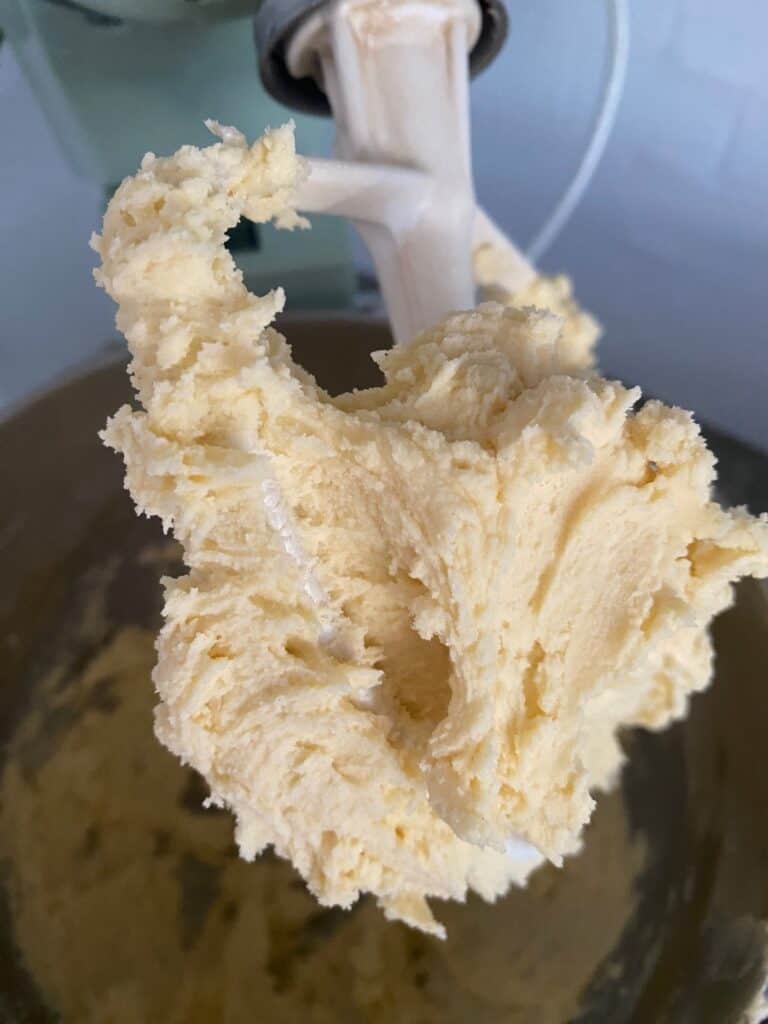
Place the softened butter, icing sugar and salt in the bowl of a stand mixer fitted with the paddle attachment. Beat on low speed until the icing sugar is incorporated then increase the speed to medium and beat until lighter in colour. This should take about 90 seconds.
Stop the mixer and scrape down the sides of the bowl.
Re-start the mixer on the lowest setting and add half the flour/cornflour mixture until incorporated. Scrape down the sides. Now add the remaining flour/cornflour mixture and again mix until incorporated.
Soften the dough
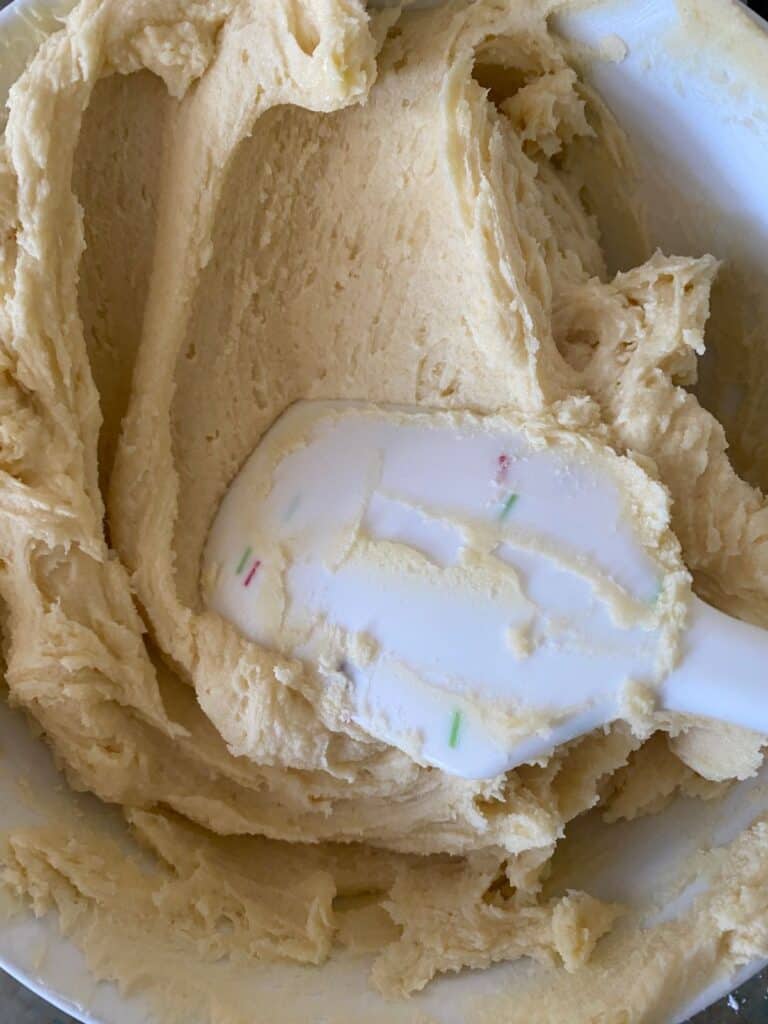
Tip the dough into a microwave safe bowl and heat the mixture on HIGH for 10 seconds. Stir with a spatula, it needs to be a very soft, pipeable consistency. If you don’t think it is soft enough, give it another 10 seconds.
Pipe your cookies
Fill your piping bag, twist, then press the mixture down until it starts to come out of the tip.
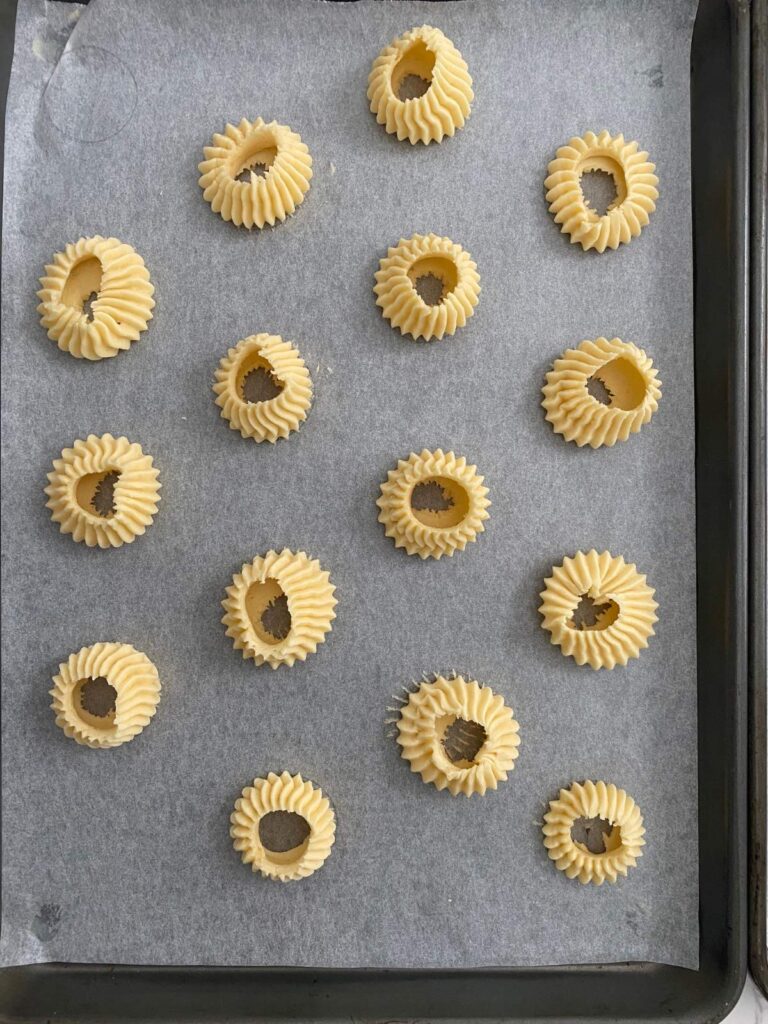
Holding the bag directly above the tray, pipe rounds of mixture over the circles you drew earlier. Repeat with the other tray.
Tip: Don’t worry if they look a little wonky or you make a mistake. The dough is quite robust so just straighten them up with your finger or scrape them off your tray, place the mixture back in the bag and re-pipe until you are happy with the result.
Refrigerate
Place the trays of Melting Moment Rings in the fridge for 20 minutes to firm up. This will ensure they keep their shape when baked.
Meanwhile preheat the oven to 170 C fan / 340 F fan.
Bake the Melting Moment Rings
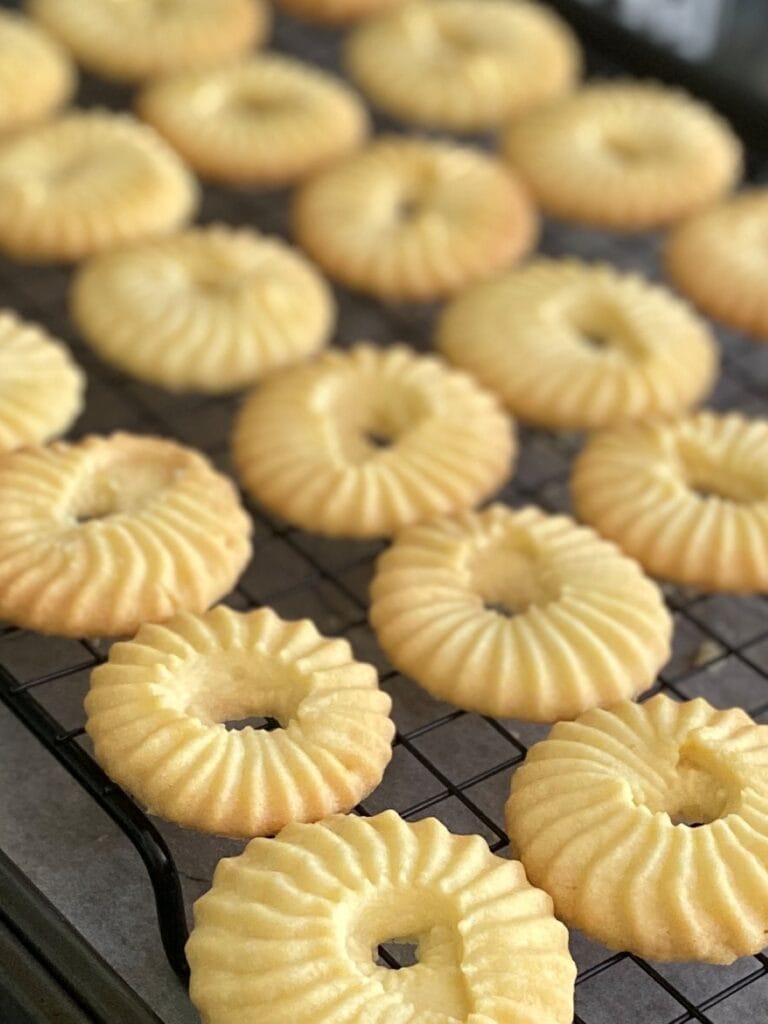
Bake for 10 to 12 minutes or until slightly brown on top.
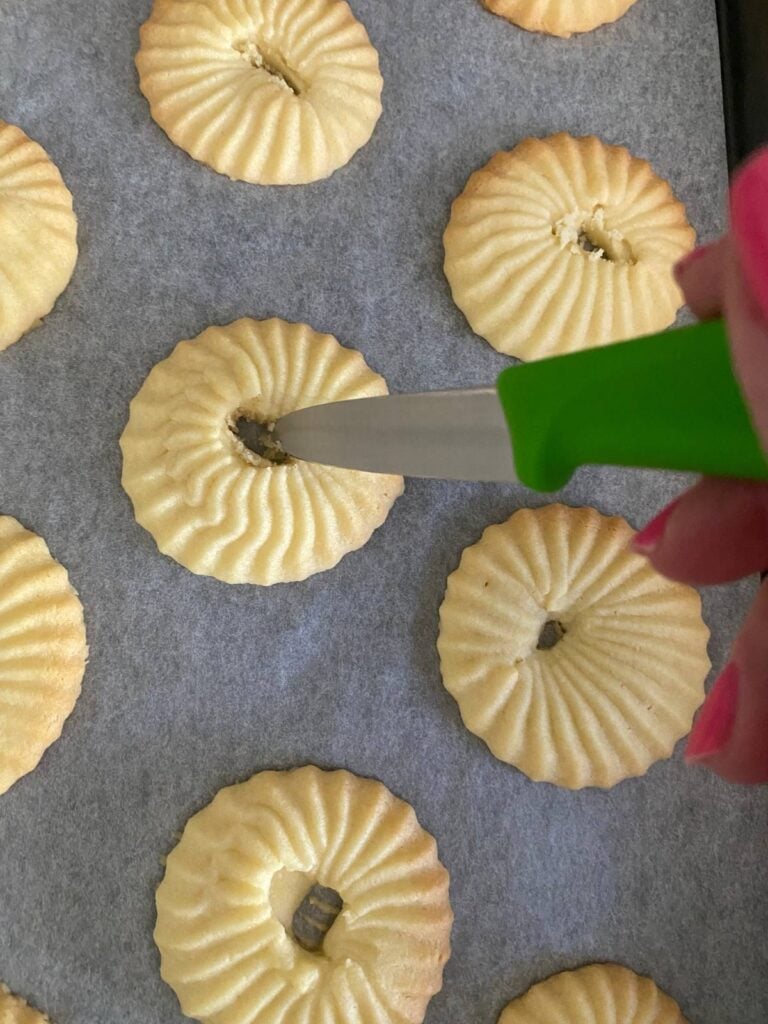
Remove from the oven and leave on the tray for 5 minutes. If you have lost the centre during baking simply insert the tip of a sharp knife and make a small hole while the rings are still soft.
Cool the Melting Moment Rings
Transfer the cookies to a cooling rack. Remove any stray crumbs around the hole with a pastry brush then leave to cool completely before filling.
Raspberry & lemon buttercream
While the Melting Moment Rings are cooling, make the raspberry and lemon buttercream.
Sift the icing sugar into a medium bowl and set aside.
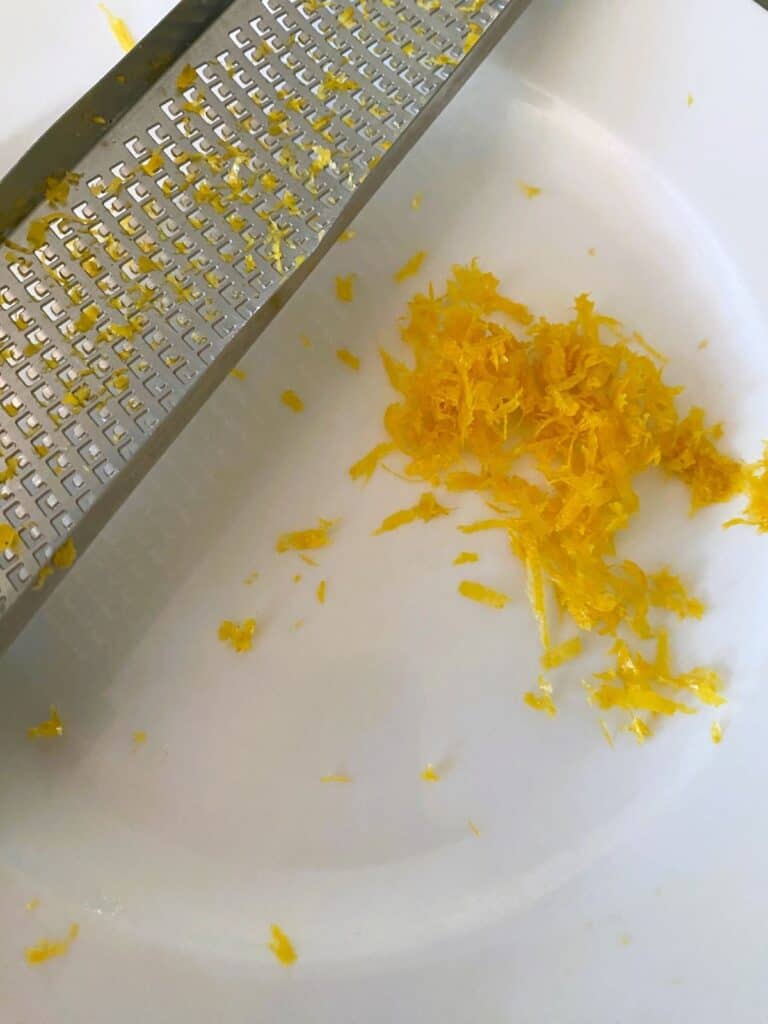
Zest the lemon then cut in half and juice one half.
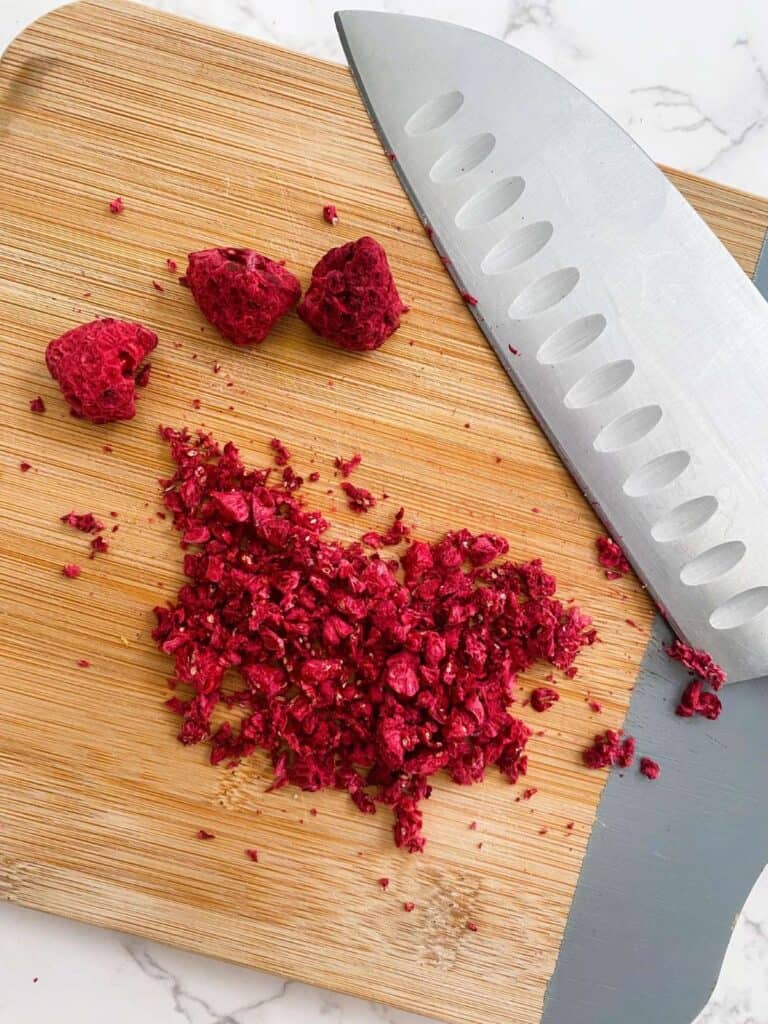
Chop the freeze-dried raspberries into small pieces (if required).
Cube the butter and soften in the microwave in 10 second bursts, stirring between bursts, until very soft but not melted.
Make the buttercream
Place the butter in the bowl of a stand mixer fitted with the paddle attachment. Beat on medium speed until light in colour. Add half the icing sugar one tablespoon at a time. Stop the mixer, scrape down the sides, then add the zest and lemon juice. Restart the mixer on low then add the other half of the icing sugar one tablespoon at a time.
Once all the icing sugar has been added, increase the mixer speed to medium and beat for 1 minute.
Remove the bowl from the stand mixer. Add the freeze-dried raspberries then gently stir through until fully incorporated.
Pair up the Melting Moment Rings
Match up the cookies in pairs of equal size making sure the holes line up as well.
Pipe the filling
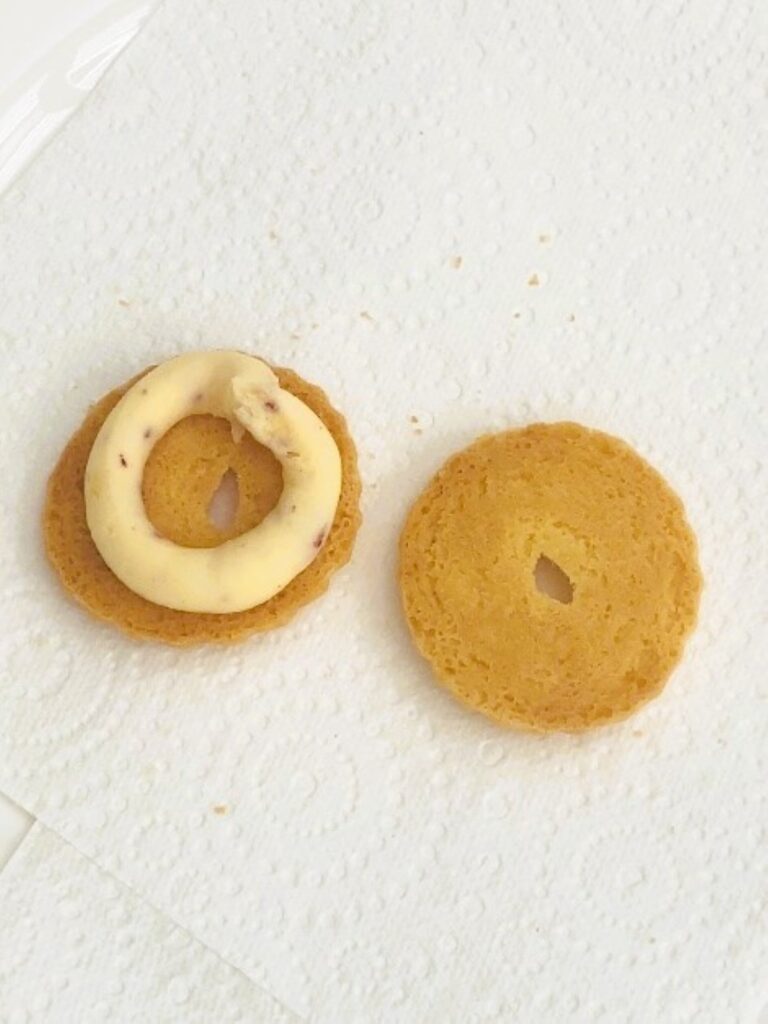
Fill a medium disposable piping bag with the buttercream and snip 2cm off the tip.
Pipe a small ring of buttercream in the middle of one cookie then top with the other cookie. Give it a gentle squeeze so the two sides stick together – the filling should reach the edge of the melting moment without spilling over. Repeat with remaining cookies.
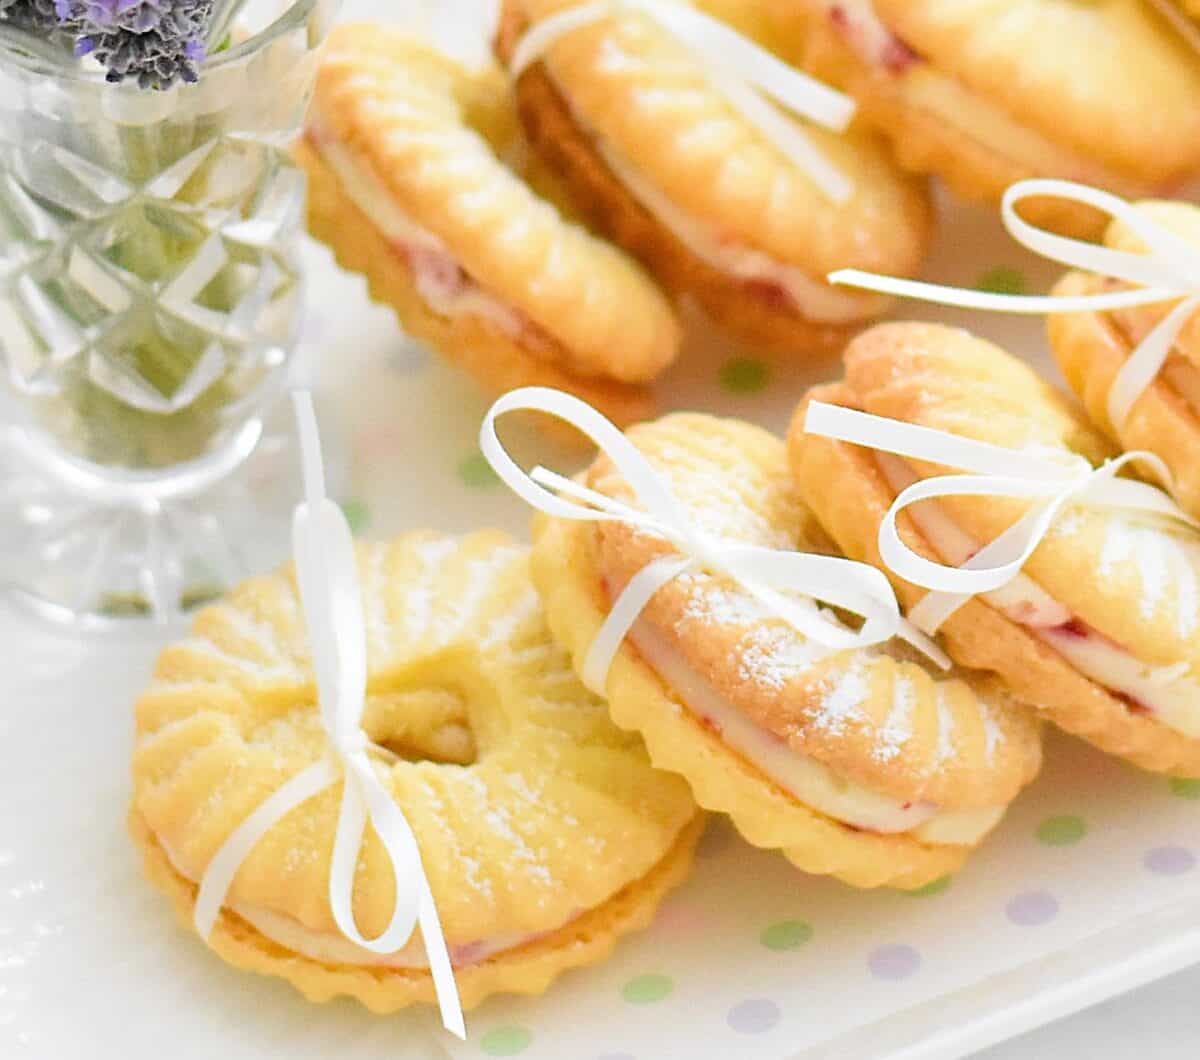
Fill a fine sieve with a teaspoon of icing sugar and sprinkle it over your melting moments.
Place the Melting Moment Rings in a sealed container lined with baking paper. Let the filling set for at least 1 hour before serving.
To serve

Tie each melting moment ring with a thin ribbon bow up to 2 hours before serving.
Serve on your favourite platter, stacked on a cake stand or arranged on a tiered stand.
To store
Keep the cookies (without the ribbon) in a sealed container lined with baking paper for up to 3 days.

Melting Moment Rings
15
Melting Moments30
minutes12
minutesEquipment
 3cm diameter
Sultane piping tip Two baking trays lined with baking paper
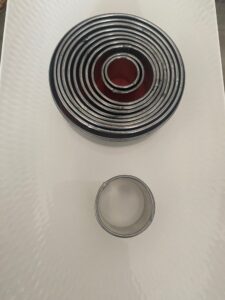 5cm round ring cutter (or a similar item for tracing circles)
Other Equipment
Pencil
Large and medium disposable piping bags
Stand mixer with paddle attachment
Microwave
Digital scale
Scissors
Tall glass
Fine sieve
Spatula
Cooling rack
Small knife
Pastry brush
Keep the screen of your device on
Ingredients
- Melting Moment Rings
250 g 8 5/6 oz unsalted butter
60 g 2 1/8 oz pure icing sugar (not icing mixture)
200 g 7 oz plain / all-purpose flour
60 g 2 1/8 oz cornflour
1/4 teaspoon 1/4 tsp salt
- Lemon and Raspberry Buttercream
100 g 3 1/2 oz unsalted butter
200 g 7 oz pure icing sugar plus extra for dusting
Zest of a small lemon
1 teaspoon 1 tsp freshly squeezed lemon juice
5 g 1/6 oz freeze-dried raspberries approx 12 whole
- Garnish
Thin ribbon in the colour of your choice
Directions
- Line two large baking sheets with baking paper.
- Trace fifteen (15), 5cm /2 inch round circles on each tray with a pencil, leaving a space (two fingers) between each circle. Turn the paper over.
- Tip: Press firmly with your pencil so you can see the outline when you flip the paper over.
- Take a little bit of butter and stick the baking paper down in each corner. This will stop the paper moving about when you pipe.
- Place a sultane tip measuring 3cm in diameter inside a large disposable piping bag and snip off the end. Make sure the teeth of the tip are fully visible. Sit the bag and tip in a tall glass and turn over the top third to make a cuff.
- Mix the cornflour and plain flour together in a medium bowl and set aside.
- Make the dough
- Cut the butter into small cubes then soften it in the microwave. Start with 10 second bursts, stirring between bursts until the butter is very soft but not melted.
- Place the softened butter, icing sugar and salt in the bowl of a stand mixer fitted with the paddle attachment. Beat on low speed until the icing sugar is incorporated then increase the speed to medium and beat until lighter in colour. This should take about 90 seconds.
- Stop the mixer and scrape down the sides of the bowl.
- Re-start the mixer on the lowest setting and add half the flour/cornflour mixture until incorporated. Scrape down the sides. Now add the remaining flour/cornflour mixture and again mix until incorporated.
- Soften the dough
- Tip the dough into a microwave safe bowl and heat the mixture on HIGH for 10 seconds. Stir with a spatula, it needs to be a very soft, pipeable consistency. If you don’t think it is soft enough, give it another 10 seconds.
- Pipe your cookies
- Fill your piping bag, twist, then press the mixture down until it starts to come out of the tip.
- Holding the bag directly above the tray, pipe rounds of mixture over the circles you drew earlier. Repeat with the other tray.
- Tip: Don’t worry if they look a little wonky or you make a mistake. The dough is quite robust so just straighten them up with your finger or scrape them off your tray, place the mixture back in the bag and re-pipe until you are happy with the result.
- Refrigerate
- Place the trays in the fridge for 20 minutes to firm up. This will ensure they keep their shape when baked.
- Meanwhile preheat the oven to 170 C fan / 340 F fan.
- Bake the Melting Moment Rings
- Bake for 10 to 12 minutes or until slightly brown on top.
- Remove from the oven and leave on the tray for 5 minutes. If you have lost the centre during baking simply insert the tip of a sharp knife and make a small hole while the rings are still soft.
- Cool
- Transfer the cookies to a cooling rack. Remove any stray crumbs around the hole with a pastry brush then leave to cool completely before filling.
- Raspberry and lemon buttercream
- While the cookies are cooling, make the raspberry and lemon buttercream.
- Sift the icing sugar into a medium bowl and set aside.
- Zest the lemon then cut in half and juice one half.
- Chop the freeze-dried raspberries into small pieces (if required).
- Cube the butter and soften in the microwave in 10 second bursts, stirring between bursts, until very soft but not melted.
- Make the buttercream
- Place the butter in the bowl of a stand mixer fitted with the paddle attachment. Beat on medium speed until light in colour. Add half the icing sugar one tablespoon at a time. Stop the mixer, scrape down the sides, then add the zest and lemon juice. Restart the mixer on low then add the other half of the icing sugar one tablespoon at a time.
- Once all the icing sugar has been added, increase the mixer speed to medium and beat for 1 minute.
Remove the bowl from the mixer then add the freeze-dried raspberries. Gently stir through until fully incorporated. - Pair up the cookies
- Match up the cookies in pairs of equal size. Make sure the holes line up too.
- Pipe the filling
- Fill a medium disposable piping bag with the buttercream and snip 2cm off the tip.
- Pipe a small ring of buttercream in the middle of one cookie then top with the other cookie. Give it a gentle squeeze so the two sides stick together – the filling should reach the edge of the melting moment without spilling over. Repeat with remaining cookies.
- Fill a fine sieve with a teaspoon of icing sugar and sprinkle it over your melting moments.
- Place the rings in a sealed container lined with baking paper. Let the filling set for at least 1 hour before serving.
- To serve
- Tie each melting moment cookie with a thin ribbon bow up to 2 hours before serving.
- Serve on your favourite platter, stacked on a cake stand or arranged on a tiered stand.
- To store
- Keep the cookies (without the ribbon) in a sealed container lined with baking paper for up to 3 days.